
You are using an out of date browser. It may not display this or other websites correctly.
You should upgrade or use an alternative browser.
You should upgrade or use an alternative browser.
- Status
- Not open for further replies.
G
Guest
Guest
Thanks Paul.....Outstanding. PaulE
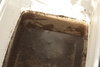
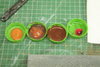
Today saw the collecting of very fine soil particles. Taking a sieve ( from the green house:smiling2: and not from the kitchen ) I put a small amount on soil into a plastic tub.. Then adding water,followed by stirring, and then allowing to settle.
The scum on the top consisting of light bits of dust, the odd of root are poured away.
View attachment 314907 Leaving a very fine soil, note Wolfgang is showing you how small these sections are.
View attachment 314908
This will be left to completely dry, and will end up being used on the stone sets.
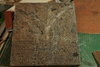
Meanwhile a shot of the paints for the brick work
View attachment 314909
The one on the left is AK rust, the rest from cheap tubes of acrylics, just a small amount of water added.
View attachment 314911
The darker brown has been applied, then a random stippling of the red. At this point I was putting the AK over the top. In using a stipple motion the 3 colours can remain, only partly being covered so as to expose parts.
View attachment 314912
You can see the effect starting to appear..
All done for the time being, needs to be left to dry for at least a couple of days at the least, before I do another black wash. Followed by the white/grey pigment .
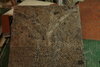
As Richard and Fernando alluded to I had marked the sets on the base to show some damage, but added more and came up with this. Again dragging a 120 g across the foam removed some of the paint. I renewed the set lines and then picked out some of the foam, to represent a broken stone set. I decided that when something heavy is dragged or turns on something like stone it would remove the top level, and most likely leave a clean mark. Having done that I used two colours, one dark wash and a light grey. Think it looks about right. I had also done another light brown drag , as might be able to be seem. I can see another touching up on some of the sets will be required.
View attachment 314915
Any way comments on any part would be welcome.
John.
Attachments


G
Guest
Guest
Hi there John what a great progress the figures looks good the wash certainly helped to bring the facial expressions out ! Well done mister! The scratch built building is stunning, have to say you have a lot of patience to carve all those bricks in ! Will be a great scene! Are you planning to live the roof open so you can see in ? Regards Danny
G
Guest
Guest
Hi mate, and thanks. As for the roof, it will be on, the doors will be bi fold and 4 in total will be open with lights inside . always wanted to do something like this and seeing Stevens trench mortar and how good that light was was the trigger. Going to need about 3 or 4 lights, have to work out the wiring, probably with Fernando's help .Hi there John what a great progress the figures looks good the wash certainly helped to bring the facial expressions out ! Well done mister! The scratch built building is stunning, have to say you have a lot of patience to carve all those bricks in ! Will be a great scene! Are you planning to live the roof open so you can see in ? Regards Danny
John .
G
Guest
Guest
Hi john great idea ! Check this website out for lights , when i built the control tower i get the lights from here ! You can buy it pre wired and also with a battery and switch pack and its less then 10£ look around hope it helps!
https://www.smallscalelights.co.uk
Regards Danny
https://www.smallscalelights.co.uk
Regards Danny
G
Guest
Guest
Thanks for that Danny , i've emailed them.:thumb2:Hi john great idea ! Check this website out for lights , when i built the control tower i get the lights from here ! You can buy it pre wired and also with a battery and switch pack and its less then 10£ look around hope it helps!
https://www.smallscalelights.co.uk
Regards Danny
John.
G
Guest
Guest
Your welcome John! Just a suggestion to think about... i do see the doors will be big however if the roof on an all the sides visibility will be limited ! I think you should make one sidewall off or just a little frame that way your scene will be visible for the viewers! That’s what I did with the control tower! Hope didn’t offend you! Regards Danny View attachment 314938
Danny
Danny, No, of course not. The more input the better. I can certainly see your point. I was thinking about having the doors open, just folded back. If I did that I think there will be enough to see. If not I could have one of the sides open, with brick damage !
The front of the building is set back from the front edge by about 2 "
John
G
Guest
Guest
Terrific work John - good to see you getting down and messy too. Lots of good tips there.
Peter.
Peter.
G
Guest
Guest
Thanks Peter.Terrific work John - good to see you getting down and messy too. Lots of good tips there.
Peter.
Looking at the bricks today when they had fully dried, (the foam board seems to hold the water far longer than plastic so it takes so long) I'm going to dry brush again to give some more variations and certainly use hardly any water to thin.
Have 2 lots of muddy water settling, will. continue to collect the very fine soil. Tomorrow will be the start of the doors. These would have to be sliding due to the night. Need to mark out for the bottom track and glue in some plastic strip. The doorsv will be hung from the inside so won't have to think about the top track. The doors will have to be open. Hope to post some photos tomorrow.
John.
Hi John
Cobbles are looking great. That fine soil Wolfgang showed us - do you use it dry like pigment or mixed to a slurry? Another masterpiece in progress.
Jim
Cobbles are looking great. That fine soil Wolfgang showed us - do you use it dry like pigment or mixed to a slurry? Another masterpiece in progress.
Jim
G
Guest
Guest
Hi Jim..... Thanks for looking in. Once dry I store it in a jar, then spray a very light coat of flat/mat varnish on the base , then scatter very thinly over the still wet varnish. Then turn the base over and remove the surplus.The thinner the application the better, you can always add more if required. I suppose you could use pigment fixer, If doing this on the hull sides, but I think the varnish coat for thin applications is just as good. HSH.Hi John
Cobbles are looking great. That fine soil Wolfgang showed us - do you use it dry like pigment or mixed to a slurry? Another masterpiece in progress.
Jim
John .
Wolfgang says . Guten Morgen !
G
Guest
Guest
Hi there john i have been surfing on the net and i came across few things and I remembered that you are building a workshop! So I found these pieces which are might be at your interest! Here are some pictures! Regards Danny View attachment 315149View attachment 315150View attachment 315151View attachment 315152View attachment 315153View attachment 315154View attachment 315155
G
Guest
Guest
Probably the first MMK kit is the best option its only 20€ and loads of things in it! Hope it helps! All the best Danny
G
Guest
Guest
OOH Temptations. Thanks for that Danny. I liked the gen right hand side.Probably the first MMK kit is the best option its only 20€ and loads of things in it! Hope it helps! All the best Danny
you will see some modifications to the building .........
Evening all .
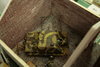
Good day had, some time at bench and other spent making small size soil. Soil first.
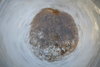
1st load a sample of garden soil in small bucket, add water.
View attachment 315156
By angling the bucket in a circular motion .
View attachment 315157
The slight tipping leaves the very fine at the top , larger particles fall to the bottom.
View attachment 315160
You can now see the very fine particles that I need at the top , by carefully removing the water with a small container I was able to separate ost of the fine, Its now drying in another plastic tub.
Before any one else changes channel or goes to sleep .
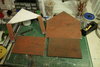
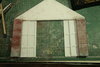
Made some sliding doors , using plastic sheet I glued some thick plastic strip to form the styles and rails. Then marking the sheet made some planking .This is just to show how it will all look .
View attachment 315162
View attachment 315164
View attachment 315165
View attachment 315166
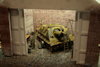
It was at this point I decided to put a door way into the rest of the factory
View attachment 315168
Piece of channell as rsj
View attachment 315169
Now its going to be pretty cramped in there, and to be able to see in from two sides I might as Danny's suggestion open the right hand wall with some battle damage.
On a roll at the moment, I even produced some doors for the above opening , just a section of foam board with some section stuck to it. Will add bolts later .
Thanks for following .Comments welcome.
John.
Attachments
-
 _MG_3758.JPG2.6 KB · Views: 0
 -
 _MG_3756.JPG3 KB · Views: 0
 -
 _MG_3754.JPG2.2 KB · Views: 0
 -
 _MG_3753.JPG2.6 KB · Views: 0
 -
 _MG_3752.JPG2.5 KB · Views: 0
 -
 _MG_3749.jpg S1.jpg1.9 KB · Views: 0
 -
 _MG_3748.JPG2.1 KB · Views: 0
 -
 _MG_3747.JPG3 KB · Views: 0
 -
 _MG_3746.JPG3.1 KB · Views: 0
 -
 _MG_3757.JPG2.5 KB · Views: 0
Looking awesome John! Your brick and cobble stone work is very convincing.
I personally enjoy scratching up the foam myself but not on such a scale, I've heard though that too much "scoring-o-de-foam" can
lead to manic behavior :flushed:

I personally enjoy scratching up the foam myself but not on such a scale, I've heard though that too much "scoring-o-de-foam" can
lead to manic behavior :flushed:
- Joined
- Apr 27, 2018
- Messages
- 14,907
1/3
Outstanding work John
- Status
- Not open for further replies.
Legal Notice
scalemodelling.co.uk is a privately operated online discussion forum. All content posted by members reflects their own views and opinions and does not necessarily represent those of the forum owners or administrators. While reasonable efforts are made to moderate content, no responsibility is accepted for user-generated material. By using this site, you agree to comply with UK law and the forum rules.