
You are using an out of date browser. It may not display this or other websites correctly.
You should upgrade or use an alternative browser.
You should upgrade or use an alternative browser.
Airfix 1/48 Folland Gnat
- Thread starter Dave W
- Start date
- Status
- Not open for further replies.
If it's any encouragement Dave, I was reading a build of this kit on another forum and the builder was encountering some of the same issues as you are. He also had to file the base of the seats down because the canopy wouldn't fit otherwise, so it seems as if maybe there are some issues with the positioning of the cockpit tub. I have this kit myself so am watching your progress with interest.
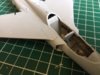
The height of the cockpit tub is set by the nose gear bay which I ns glued to the underside in an early construction sequence.Mine is fitted as per the instructions and lines up perfectly with the cut out in the fuselage.ive just checked and will need to thin the base of my seats as well to get the canopy to fit.The front of the tub locates against a raised ring inside the fuselage.I don't think it is possible to fit it in wrong.So there must be a problem with the kit.\ said:If it's any encouragement Dave, I was reading a build of this kit on another forum and the builder was encountering some of the same issues as you are. He also had to file the base of the seats down because the canopy wouldn't fit otherwise, so it seems as if maybe there are some issues with the positioning of the cockpit tub. I have this kit myself so am watching your progress with interest.
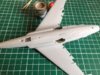
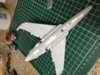
Now the wing is glued on its going to need some filler to get rid of the joins.The underside of the fuselage will as well.I thought this was going to be a quick build.I was really looking forward to building this.Now I'm fed up with it and am going to carry on with my 1/24 spitfire instead .At least I knew that was going to be a kit with problems when I bought it.Its a Pitty Tamiya or Hasegawa don't do a Gnat.There wouldn't be any of these problems.Although it would probably cost three times as much.Ive never been a big Airfix fan and have only bought their kits when no one else has done one of a type I really want.This kit has done nothing to change my opinion.
View attachment 97259
View attachment 97260
View attachment 97261
View attachment 97262
View attachment 210282
View attachment 210283
View attachment 210284
View attachment 210285
Attachments

rickoshea52
Active member
1/3
It's a shame this isn't working out for you Dave as I enjoy reading about your builds and the end product. Sometimes it's best to take a step back from a project that isn't going well and regroup, enjoy something else for a bit then come back refreshed; often things just go much easier after a break.
G
Guest
Guest
Don't loose heart with it Dave you seem to be taming the beast. this one will be a credit to your skills.
scott
scott
That's exactly what I intend to do Rick.I always get the better of a kit in the end.Its just that I was expecting this one to be better than it is.I wonder if Airfix actually build one of their new kits before putting them on sale to make sure they go together as intended?.\ said:It's a shame this isn't working out for you Dave as I enjoy reading about your builds and the end product. Sometimes it's best to take a step back from a project that isn't going well and regroup, enjoy something else for a bit then come back refreshed; often things just go much easier after a break.
G
Guest
Guest
Look forward to return of the Gnat Dave, ")
Shame about the fit issues cause the detailing looks great I'm sure after a break you will comeback and wrestle this into shape.To be fair to airfix they are making big improvements and in the scheme of things this is a setback for them.I will be putting this on my not to buy list.I wouldnt be put of from buying other new airfix kits though as some of these are very good and go together really well and compared to their old stuff they are worlds apart look forward to the next update cheers John
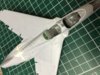
I had a look at some builds of this kit online Dave. I have come to the conclusion from looking at your bulkhead and then the others, that yours is in back to front. The step under the very top rounded piece should face the front of the aeroplane. You had it facing rearwards. The slots in the face of it are to position the seats up against.
Here's the instruction sheet stage showing the correct orientation of the bulkhead. It is the reverse of how yours was positioned. Solved I think.
View attachment 97363
View attachment 210386
View attachment 97363
View attachment 210386
Attachments
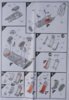
Joe,I think you've solved it.Your right.Looks like I've fitted the bulkhead the wrong way round!.What an idiot I am!.Thats entirely my fault then.Just the other problems to solve now.\ said:I had a look at some builds of this kit online Dave. I have come to the conclusion from looking at your bulkhead and then the others, that yours is in back to front. The step under the very top rounded piece should face the front of the aeroplane. You had it facing rearwards. The slots in the face of it are to position the seats up against.
Knowing its my fault and not the kit has changed my attitude.So it's on with the build.Actually ,I put some filler on some of the many joins that need attention this afternoon.Thinking back to when I assembled the cockpit,I think alcohol was involved !.When will I learn?!.Good job I don't drink when I'm working on real aeroplanes!.\ said:Well, soldier on Dave, because we are all keen to see this wonderful Gnat in service soon

Many years ago a friend glued the wings of a Stuka on upside down.Mind you,that was after he had been smoking 'something' !.\ said:Dang!!I bet that is not the first time any of us misread the instructions or stuck something the wrong way around or simlar!!
Progressive resistance, bub!!")
Well Dave glad to see your back on track after your minor mistake with the cockpit being clued back to front and upside down Lol I can put this back on my wish list now then.so come on then on with the build and some more pictures please......good luck with the rest of it and no more beer!!!!!!!
Lol I can put this back on my wish list now then.so come on then on with the build and some more pictures please......good luck with the rest of it and no more beer!!!!!!!View attachment 97616
View attachment 97617
I've done some filling and sanding this evening.Ive filled the gap in the fuselage behind the nose gear bay with superglue gel.And I've filled in my cockup In the cockpit rear bulkhead.The fit of this kit looks bad.But I think it's just very precise with no leeway for clumsy fools like me!.View attachment 210639
View attachment 210640
Attachments
G
Guest
Guest
Wow glad you get that round the right way. Dave\ said:!.Good job I don't drink when I'm working on real aeroplanes!.
Looks OK to me Dave. I like a tussle every now and then. Good for the soul. Nice panel line markings.
Laurie
rickoshea52
Active member
1/3
Do you think the gaps in the fuselage and rear wing join might be because you got that bulkhead back to front and it has just thrown out any tolerances in the parts?
No.I don't think the bulkhead position would have any affect on the join at the back of the wing .Because the top section of the bulkhead locates under the front of the wing and I've cut that bit off.Maybe at the front its lifted the wing slightly.If I was to build another one I would approach it like a limited run kit.Test fitting and sanding before committing to glueing.I expected this to be better and treated it as a quick build.Obviously that was a mistake.\ said:Do you think the gaps in the fuselage and rear wing join might be because you got that bulkhead back to front and it has just thrown out any tolerances in the parts?
- Status
- Not open for further replies.
Legal Notice
scalemodelling.co.uk is a privately operated online discussion forum. All content posted by members reflects their own views and opinions and does not necessarily represent those of the forum owners or administrators. While reasonable efforts are made to moderate content, no responsibility is accepted for user-generated material. By using this site, you agree to comply with UK law and the forum rules.