G
Guest
Guest
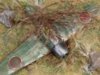
After two days, I finished my first model. The Mitsubishi Zero Starter Kit by Airfix.
Building this aeroplane has been an amazing experience and I learnt many things, such as how awful the pots they give you for the paint are to open, as well as how I never want to touch one of those stupid fiddly little decals ever again.
The glue dissolved the paint on a little bit of the right wing, so I had to touch it up - it doesn't look as good as it did, but oh well.
I welcome criticism and advice on how I can do my next model better!
View attachment 245009
View attachment 245010
View attachment 245011
View attachment 245012
")

")