Theme editor

Scale Model Shop

Airfix 1/72 Spitfire Vc

yak face

Moderator
Staff member
Joined
Jun 13, 2009
Messages
14,395
Reaction score
936
Points
113
Age
60
1/3
Thread owner
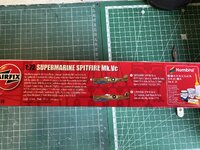
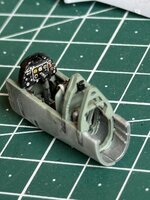
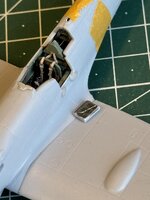
After the classic Airfix GB and tackling a 55 year old tooling heres one of the newer offerings from Airfix. This was first released in 2020 and is a lovely bit of moulding . It has very comprehensive cockpit details and looks like it will build up very well. It comes on four sprues with nicely done recessed panel lines and two decal options , one American and one South African air force machines IMG_5414.jpg IMG_5415.jpg IMG_5416.jpg IMG_5417.jpg IMG_5420.jpg IMG_5421.jpg IMG_5423.jpg IMG_5422.jpg .
 

Attachments

  • IMG_5419.jpg
    IMG_5419.jpg
    461.8 KB · Views: 0
Nice one Tony.

These latest Airfix 1/72 offerings are superb and make for very addictive model making, don't they?

Ron
 
Thread owner
Nice one Tony.

These latest Airfix 1/72 offerings are superb and make for very addictive model making, don't they?

Ron
Absolutely Ron , fantastic value and I’m really into 1/72 scale at the moment , ive got another three or four Airfix new tools lined up
 
Good choice Tony it’s a cracking little kit 👍

I’ve built two of them, I’m sure you will enjoy it.

Geoff.
 
As far as I remember it goes together with no real problems. I’ve built two and have another in the stash so it must be good 👍
 
Thread owner
IMG_5452.jpg IMG_5453.jpg Started on the cockpit today . After a prime with black the various bits were sprayed interior grey green . The seat was painted red brown to represent the plastic these were made from and a few bits and bobs were picked out in black . The instrument panel is nicely moulded but I took the easy option and used the decal instead of trying to paint it . It should be fine once its dried down over the detail ,
 
Thread owner
IMG_5454.jpg IMG_5456.jpg IMG_5457.jpg The decal instrument panel settled down nicely so it just needed a coat of matt to get rid of the shine . Then I got the dotting pens out and gave each instrument a dot of gloss . The rest of the cockpit has had a dark wash to highlight any detail and the seat has been stuck to the armour plate backing . I added the crowbar on the cockpit door with a bit of bent wire , this will be painted either black or interior green ( not red as often seen on restored machines ) . I’m not sure yet if im going to cut out the door and have it open .
 
This is looking really good Tony. The Airfix 1/72 Mark 1 had good interior detail like your Mark V, but the Mark IX looks rather basic in comparison. Looking forward to the updates, cheers 👍
 
Thread owner
Next up on the cockpit was to fit the aftermarket etched belts . These were the Eduard pre painted steel . I drilled out the middle of the moulded in slot so i could put the end of the belt in and glued them all on . A tensioning cable was added from fuse wire. Once the belts were done I could get the rest of the cockpit assembled. Once done this unit is fitted between the fuselage halves. A little tip for anyone doing this kit , when you fasten the fuselage halves only stick the cockpit tub to one side , the reason being the wing joints ( three part wing already being assembled ) are a bit gappy . A little sprue wedged between the fuselage halves should widen them out for a snug fit but if the tub is glued to both sides there wont be any movement . IMG_5465.jpg IMG_5463.jpg IMG_5461.jpg IMG_5466.jpg
 

Attachments

  • IMG_5461.jpg
    IMG_5461.jpg
    294.5 KB · Views: 0
Thread owner
After cutting and sanding to size a suitable piece of sprue this was glued in and spread the fuselage enough to give a nice tight joint. The underside of the fuselage wing fillet was also ground down slightly to ensure the joint was flush with the wing top. The tropical filter nose section was next to go on - its best to glue the very back piece of this first , let it set then glue up the front to get a better joint so the front will be glued tomorrow.
IMG_5471.jpg IMG_5473.jpg IMG_5470.jpg IMG_5474.jpg IMG_5478.jpg IMG_5479.jpg IMG_5480.jpg
 
Thread owner
This morning I decided I’d like the cockpit door open , of course I should have done this before gluing the fuselage together !!DOH! But fool that I am I decided to go ahead anyway. The door sides were carefully cut with a combination of razor saw and finishing off with the scalpel and the bottom was done with a scriber and finished with the scalpel again . Once it was cleaned up it looked fine except that the cockpit walls looked a little thick and the door sat too proud once offered up. A bit of smoke and mirrors was needed , the cockpit walls were chamfered to make the visible edge look thinner and a scoop was taken out under where the door will sit so it will look thinner too . Various bits have now had a bit of Mr surfacer applied and this is now curing . IMG_5481.jpg IMG_5482.jpg
 

Attachments

  • 167 KB · Views: 0
  • 175.5 KB · Views: 0
  • IMG_5483.jpg
    IMG_5483.jpg
    215.9 KB · Views: 0
Thread owner
The nose section has now been glued and the tailplanes and rudder have been fitted. The two outer cannons for some reason are separate and these have been added too . The whole airframe has had a check over and everything looks ok. The gunsight was painted and fitted then after masking , the screen and rear section of the canopy were glued on with non fogging CA. The morse code signal light on the top of the fuselage is moulded solid on the kit whereas it is a clear lamp . I got some clear sprue and sanded it to an oval shape then heated and stretched it .After cutting it I held it close to the candle flame till it started to melt slightly and this gave me an oval clear shape . The solid kit lamp was sanded off and a hole drilled so the new on will fit snug.
IMG_5488.jpg IMG_5489.jpg
 
Missed the start of this Tony, sorry. These new Airfix kits are certainly very good and represent great value for money. Off to an excellent start, lots of careful neat work. I've often considered that non fogging CA - does it work OK?
 
Back
Top