Theme editor

Scale Model Shop

Airfix 1/76 Bedford MK Tactical Refueller

Status
Not open for further replies.

flyjoe180

SMF Supporters
Joined
Jan 18, 2012
Messages
13,306
Reaction score
1,097
Points
113
Location
Earth
1/3
Thread owner
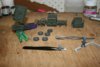
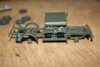
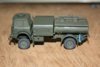
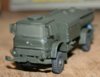
I acquired this cheap little kit to compliment my Harrier when it's finished. I've not built a road going vehicle kit before so this is a first. I believe this is Airfix's re-box of a former JB Models kit. Someone (I think Alan if my memory serves me right) built the 4-tonne version of this a while ago. Probably very similar.
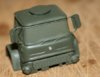
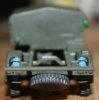
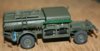
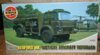
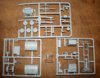
The box and bits:

View attachment 81857


View attachment 81858


View attachment 81859


View attachment 81860


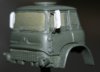
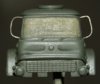
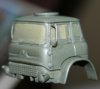
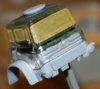
First impressions, nicely moulded if not old. Decals are a little off register, but nothing that can't be fixed or replaced with spares or paint. The instructions are shocking, very difficult to understand and the colour schemes likewise. I'm going to keep this one simple.

View attachment 194880

View attachment 194881

View attachment 194882

View attachment 194883
 

Attachments

  • IMG_2136.JPG
    IMG_2136.JPG
    2.5 KB · Views: 0
  • IMG_2143.JPG
    IMG_2143.JPG
    3.2 KB · Views: 0
  • IMG_2145.JPG
    IMG_2145.JPG
    3.8 KB · Views: 0
  • IMG_2146.JPG
    IMG_2146.JPG
    2.5 KB · Views: 0
Thread owner
Progress while the Harrier bits dry.

Chassis and exhaust etc:

View attachment 81861


The cab has been sparsely painted inside, very little will be seen through that clear plastic anyway so I stuck with basic colours. I added plastic card under the section rear of an closest to the cab so you can't see up into the model from underneath when completed. The clear cab has been mated with the lower section. Primer time next then a coat of green:

View attachment 81862


View attachment 194884

View attachment 194885
 

Attachments

  • IMG_2148.JPG
    IMG_2148.JPG
    2 KB · Views: 0
  • IMG_2161.JPG
    IMG_2161.JPG
    2.9 KB · Views: 0
Thread owner
Going to add a refueller figure (converted from a German ground crew set from Revell) and a pair of rear-view mirrors for the cab from wire and foil.
 
Excellent mask on the cab Joe. I have some Land Rover at this scale and brand, I never build them, but they look lovely
 
That's a nice little kit Joe - it'll look good with your Harrier.
 
I always wondered what these "older" kits were like. I'm looking forward to seeing it with your Harrier.
 
I've built this kit and the GS bodied 4 tonner and it's really simple to do. Mirrors and a bonding strap finish it off but it's a shame about the decals. You can get replacements from BW Models or Kingfisher Miniatures.

I only ever saw one of these during my RAF career and that was a light grey painted LH drive used to refuel GSE with diesel in Al-Kharj. I think they were used with the Army Air Corps and Harrier units mostly.
 
Hope for realism you're going to give the driver large biceps, them and the old knockers we had didn't have power steering and all the drivers looked like popeye on steroids. When we got Bedford TM's it was real luxury.....Jeff
 
Good start joe , I did build one quite a while ago for my first dio , nice little kit joe and for it's age quite detailed :)
 
lovely work so far and nice kit, i admire you folks who build in this scale.

scott
 
This should make up a nice little diorama Joe. Should look great with the Harrier. Looks like a good start and I look forward to the updates.

Cheers

P
 
Going to be a great companion for the Harrier Joe,looking great keep it comin'!
 
Thread owner
Bear in mind figures are not my thing, and if they were they certainly wouldn't be in 1/72 or 76 scale! Here is Mr Refueller, resplendent in RAF blue overalls and sporting a 1982 side burn for good measure:

View attachment 81973


Wheels and tyres:

View attachment 81974


My mirror frames were made from 15 Amp fuse wire and attached using super glue. The mirrors are plastic card:

View attachment 81975


View attachment 81976


View attachment 81977


Fire extinguishers (why they are blue I have no idea but that is what Airfix tell me and the colour they are on pictures of that period):

View attachment 81978


Everything is laid out and ready to go together:

View attachment 81979


View attachment 194996

View attachment 194997

View attachment 194998

View attachment 194999

View attachment 195000

View attachment 195001

View attachment 195002
 

Attachments

  • IMG_2232.JPG
    IMG_2232.JPG
    2.5 KB · Views: 0
  • IMG_2223.JPG
    IMG_2223.JPG
    1.7 KB · Views: 0
  • IMG_2222.JPG
    IMG_2222.JPG
    1.9 KB · Views: 0
  • IMG_2204.JPG
    IMG_2204.JPG
    1.7 KB · Views: 0
  • IMG_2208.JPG
    IMG_2208.JPG
    1.5 KB · Views: 0
  • IMG_2218.JPG
    IMG_2218.JPG
    2.3 KB · Views: 0
  • IMG_2219.JPG
    IMG_2219.JPG
    2.4 KB · Views: 0
Thread owner
Cracking on to try and finish with the Harrier build, I painted the fuel hose area and attached the fire extinguishers:

View attachment 81980


An attempt at imitating the Bedford logo, probably would have been camouflaged out anyway but just playing:

View attachment 81981


Wheels are on and side screen fitted. It's Humbrol No.3 gloss green but will be dulled with the rest of it in due course:

View attachment 81982


View attachment 81983


Spare wheel:

View attachment 81984


Fuel bowser tank fitted, still some detail to do on that:

View attachment 81985


The cab is fitted:

View attachment 81986

View attachment 81987

View attachment 81988


And here we all are waiting for things to dry.

View attachment 81989


I've made a base from a picture frame, using wet and dry sandpaper and some old railway grass I had laying about. I knew that huge roll of grass would come in handy.

View attachment 195003

View attachment 195004

View attachment 195005

View attachment 195006

View attachment 195007

View attachment 195008

View attachment 195009

View attachment 195010

View attachment 195011

View attachment 195012
 

Attachments

  • IMG_2233.JPG
    IMG_2233.JPG
    2.3 KB · Views: 0
  • IMG_2234.JPG
    IMG_2234.JPG
    2.4 KB · Views: 0
  • IMG_2240.JPG
    IMG_2240.JPG
    1.8 KB · Views: 0
  • IMG_2241.JPG
    IMG_2241.JPG
    1.8 KB · Views: 0
  • IMG_2242.JPG
    IMG_2242.JPG
    2.9 KB · Views: 0
  • IMG_2245.JPG
    IMG_2245.JPG
    2.1 KB · Views: 0
  • IMG_2246.JPG
    IMG_2246.JPG
    1.9 KB · Views: 0
  • IMG_2247.JPG
    IMG_2247.JPG
    2.3 KB · Views: 0
  • IMG_2248.JPG
    IMG_2248.JPG
    2.4 KB · Views: 0
  • IMG_2249.JPG
    IMG_2249.JPG
    1.9 KB · Views: 0
Status
Not open for further replies.
Back
Top