Theme editor

Scale Model Shop

Airfix Cromwell mk4 tank - 1:76 scale

pjgtech

SMF Supporters
Joined
Dec 28, 2023
Messages
1,556
Reaction score
1,360
Points
113
Age
61
Location
Kent, UK
1/3
Thread owner
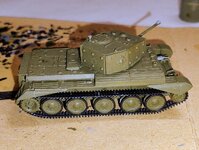
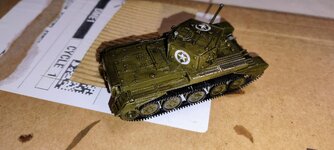
My next build will be the last of the little "starter" sets I got from Lidl (or Aldi?).
The Airfix Cromwell mk4 Tank in 1:76 scale.
I have been using these little kits as my learning projects and they have been very useful for that purpose.
I note that this one does not have the one piece tank tracks, so I will have to assemble the wheels, etc, so that will be a new one for me, especially bearing in mind how small they are!
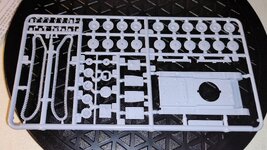
So here are the obligatory pics of the box and sprues....
Cromw tnk orig kit nov24 (1).jpg
Cromw tnk orig kit nov24 (2).jpg
Cromw tnk orig kit nov24 (3).jpg

Cromw tnk orig kit nov24 (4).jpg
Cromw tnk orig kit nov24 (6).jpg
Cromw tnk orig kit nov24 (7).jpg
 

Attachments

  • 207.2 KB · Views: 0
This is a nice little kit....did it a few years ago

You might have to assemble the wheels but at least you aint got rubber band tracks 😂
 
Thread owner
So I made a start on this today.....👍

Gave the sprues a wash.
Started the main assemblies, tank base, tank top, turret, tracks and added a few bits.
This one is bloody small! Didn't originally clock that 1:76 is slightly smaller than 1:72? I just assumed that all these Airfix starter kits were the same scale.
Have just now gave the sub sections a prime coat.
I have decided to try and paint the (two part) wheels on the sprue before assembly as they will be very tricky to paint once assembled?

I know that there's quite the debate in the modelling World about whether to Paint On the Sprue (POS) or not....
First batch of pics, nothing spectacular (NB: these were taken prior to priming).....
Click image for larger version  Name:	crom tnk 1st build 14nov24 (2).jpg Views:	1 Size:	692.9 KB ID:	1240387
Click image for larger version  Name:	crom tnk 1st build 14nov24 (1).jpg Views:	1 Size:	997.5 KB ID:	1240389
Click image for larger version  Name:	crom tnk 1st build 14nov24 (4).jpg Views:	1 Size:	416.1 KB ID:	1240390
Click image for larger version  Name:	crom tnk 1st build 14nov24 (6).jpg Views:	1 Size:	329.3 KB ID:	1240391
 
Last edited:
Thread owner
Little update...
The tank is now primed and painted. Needed two top coats as the first coat was a bit patchy. Don't think it needs a third as it now looks fine to me.
I painted the wheels on the sprue, and a few other bits.
Cut them off the sprue, then decided I would try the black/dark grey rubber wheel edges, even though they are bloody tiny!
Put them on cocktail sticks with blutack, and if I say so myself they did not come out too bad.
Letting them dry now, will then do the final assembly.
Pics...
Click image for larger version  Name:	crom tnk painted 15nov24 (1).jpg Views:	0 Size:	414.9 KB ID:	1240473
Click image for larger version  Name:	crom tnk painted 15nov24 (2).jpg Views:	0 Size:	301.8 KB ID:	1240475
 
Last edited:
Thread owner
Model made and painted, but before appying gloss/transfers....
Had issues getting the wheels/tracks on, did not recess the inside half of the wheels enough, so when I put the tracks and the outside wheels halfs on, they are protruding a bit too much, and the large end cog wheel/drive wheel is actually outside the track!
This then meant that the armour end plates covering the end wheels does not fully recess properly!
A pro would have stripped the wheels and tracks and started again, but I have "bodged" it...

But again, these little kits are just a learning process for me.
And I have learnt that if you bodge one small thing, it can then have consequences further down the line!

For only my 4th kit, it don't look too bad (to me)....
Click image for larger version  Name:	cromtnk 17nov24 (7).jpg Views:	0 Size:	858.9 KB ID:	1240773
 

Attachments

  • cromtnk 17nov24 (7).jpg
    cromtnk 17nov24 (7).jpg
    858.9 KB · Views: 0
Last edited:
Thread owner
Little update this morning, have now glossed and applied transfers....

Knocked over my bottle of Micro set, lost half its contents on my desk!
Luckily most of it soaked into the cardboard base I tend to use and I mopped it up pretty quick before it could spread too far, but....Doh!
Handy tip, always keep a loo roll/kitchen roll/paper towel handy for mopping up spills on your work area.....

Couple of pics.
I think this will will get a grime wash and maybe a track wash and a bit of panel liner and that will be it, then its final matt coat.....
Cheers
Click image for larger version  Name:	crom tnk 18nov24 (10).jpg Views:	1 Size:	677.7 KB ID:	1240780
Click image for larger version  Name:	crom tnk 18nov24 (5).jpg Views:	1 Size:	379.6 KB ID:	1240781
Click image for larger version  Name:	crom tnk 18nov24 (8).jpg Views:	1 Size:	486.0 KB ID:	1240782
 
Last edited:
Thread owner
Almost complete now, I have added the track wash and a grime wash and panel liner wash.
Need to go round with a bit of thinners and clean up.
Last thing to do is to add a matt coat later or tomorrow. Nearly there....
Some pics....
crom tnk 18nov24 wash (2).jpg
crom tnk 18nov24 wash (1).jpg
crom tnk 18nov24 wash (3).jpg
 

Attachments

  • crom tnk 18nov24 wash (2).jpg
    crom tnk 18nov24 wash (2).jpg
    247.3 KB · Views: 0
Thread owner
Final update on this one, now finished with final matt coat and all dried.
As I said earlier in the thread, I bodged up the drive wheels (not pushing them in far enough, so wheels track now protrude a bit too much) and then that affected the track, and then the track side armour end plates.
But hey, its a learning process, and I won't make that mistake again.
(Looks ok from the sides, Lol...!)
Final pics..... cheers

crom tnk final 19nov24 (3).jpg
crom tnk final 19nov24 (6).jpg
 
Nice work Peter 👍.

Sounds like you’ve had a few issues and learnt a bit along the way, either way you’ve ended up with a good result 😎
 
Back
Top