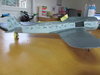
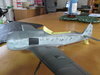
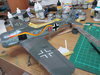
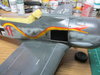
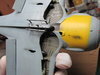
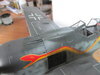
Ok finally got a little bit done on it today. Got the exhaust/engine cooling flap vent area painted along with my first mottling attempt in absolutely ages. Not great but passable.

You are using an out of date browser. It may not display this or other websites correctly.
You should upgrade or use an alternative browser.
You should upgrade or use an alternative browser.
AlanG's 1/32 Hasegawa Fw190 A8
- Thread starter AlanG
- Start date
- Status
- Not open for further replies.
HI Al she's comin on nice I like the mottled effect on the fusealarge an the snake really sets it off are you gonna paint the black an white spirl on the prop spinner ?
chris
chris
1/3
Evening Alan
Lovely work of a great plane, got to love the snake!
Lovely work of a great plane, got to love the snake!
HI Al she's comin on nice I like the mottled effect on the fusealarge an the snake really sets it off are you gonna paint the black an white spirl on the prop spinner ?
chris
Hi Chris. I may have to as i've just snapped the decal for it. Eaglecals are great but boy are they thin and fragile. So i might have to do some masking (again) and spray the spiral. Just noticed i also missed the yellow engine cowls. Masking time !
Well Al have funHi Chris. I may have to as i've just snapped the decal for it. Eaglecals are great but boy are they thin and fragile. So i might have to do some masking (again) and spray the spiral. Just noticed i also missed the yellow engine cowls. Masking time !
chris
May I ask Al what theyle be ?Cheers Chris. Always nice to see a model coming together near the end. Already planning my next few builds too lol
May I ask Al what theyle be ?
172 Hawker Hunter F. Mk6 from 26 Sqn (my father's squadron during national service and a present for him), then special project (not sharing until it's done lol) and then finally a 1/32 Bf109 G6/R6 from 3./JG300
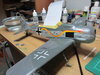
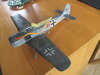
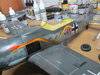
Ok bar a couple of small decals to put on the fuselage i am ready to start the exhaust staining, weathering and connecting the aerial & armour wires. Had a few mares with the snake decal. It tore a couple of times so i'm going to try and hide the tears with some paint chips and staining. Hopefully should have this wurger complete by next weekend.... SWMBO permitting.
Attachments

Ok i've finished the decals. Just need to seal them in with future and paint the ladder (i forgot). Then it's just to add the weathering and then the canopy, gear doors and few its that have fallen/snapped off and it's complete.
Made ton of mistakes along the way but i'll know that for the next time i build this kit (i have another four in the stash).
Made ton of mistakes along the way but i'll know that for the next time i build this kit (i have another four in the stash).
Attachments

1/3
Lovely work Al, now what about the nightfighter one??
Lovely work Al, now what about the nightfighter one??
It's on the list to be done. G4 first then probably the 109 G6
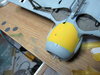
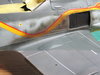
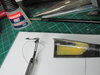
Right last one for tonight. Added some brown to the smoke now. I was going to add burnt umber pastel but i seem to have lost it (or my kids have nicked it), so i was left with my only other option of using a dark rust weathering dust to try and re-create the brown in the staining the Germans had. I think it's done ok. Sealed it all in with Hannants flat varnish. Which might i add is an excellent acrylic varnish.
Attachments
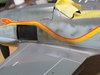
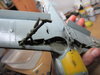
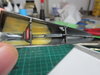
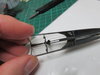
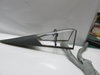
So onto the canopy wires. Eye balls well and truly minced now. Connected the armour guide wires and the internal aerial wire. Not happy with a few things, but that is down to my (lack of) workmanship and not the models fault. But hopefully you can see it adds something to the canopy behind the pilot. Is it worth the extra effort? You decide.
Attachments
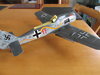
Home straight at last. Last few bits to do. Fit broken aerial underneath, fit gear doors, glue on main canopy and lastly fit external aerial wire. Should be finished tonight (fingers crossed).
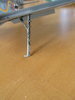
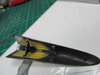
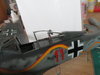
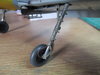
As you can see i've added some slight chipping details around the gun cover latches. Also tried to show how the wires look when fitted to the aircraft. Finally painted the brake hydraulic pipes on the gear legs.
As you can see i've added some slight chipping details around the gun cover latches. Also tried to show how the wires look when fitted to the aircraft. Finally painted the brake hydraulic pipes on the gear legs.
Attachments
- Status
- Not open for further replies.
Legal Notice
scalemodelling.co.uk is a privately operated online discussion forum. All content posted by members reflects their own views and opinions and does not necessarily represent those of the forum owners or administrators. While reasonable efforts are made to moderate content, no responsibility is accepted for user-generated material. By using this site, you agree to comply with UK law and the forum rules.