
Hi all
So this is something that Si hinted at in a previous post.
This is another idea we got from the Terrain Tutor (link). Stylised hills/rocky outcrops for our battles - made from that expanding insulation foam you get in cans.
Process is as follows:
ACW as usual.
Andrew
---------------------------------------------------------------------
How The Terrain Tutor does it
Junior squirting out and the result once set:
View attachment 356050
View attachment 356052
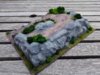
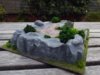
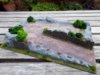
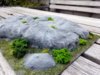
Our attempts in chronological order. The last one was almost entirely Junior's own work.
View attachment 356053
View attachment 356054
View attachment 356055
View attachment 356056
View attachment 356057
View attachment 356058
View attachment 356059
So this is something that Si hinted at in a previous post.
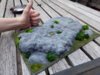
This is another idea we got from the Terrain Tutor (link). Stylised hills/rocky outcrops for our battles - made from that expanding insulation foam you get in cans.
Process is as follows:
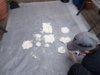
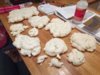
- Squirt out foam as desired.
- Shape to your wishes and glue to a base.
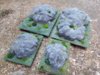
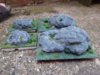
- Cover in polyfiller and grit to your taste.
- Paint using kids or household paints - a base coat of dark grey following by 3 coats of dry brushing 3 different shades and colours.
- Add flock and foliage to your taste.
- Job done!
ACW as usual.
Andrew
---------------------------------------------------------------------
How The Terrain Tutor does it
Junior squirting out and the result once set:
View attachment 356050
View attachment 356052
Our attempts in chronological order. The last one was almost entirely Junior's own work.
View attachment 356053
View attachment 356054
View attachment 356055
View attachment 356056
View attachment 356057
View attachment 356058
View attachment 356059
Attachments
-
 48025212557_80db24619c_c.jpg2.5 KB · Views: 0
 -
 48026289503_54432b190f_c.jpg3.6 KB · Views: 0
 -
 48221598282_8baf76102f_c.jpg3.4 KB · Views: 0
 -
 48221600822_11b7ce2678_c.jpg3.2 KB · Views: 0
 -
 48274126176_54df4cb024_c.jpg3.1 KB · Views: 0
 -
 48274132016_ff953a7f98_c.jpg2.9 KB · Views: 0
 -
 48274134906_79ac789094_c.jpg3.2 KB · Views: 0
 -
 48482525706_feed8d3796_c.jpg3.3 KB · Views: 0
 -
 48482528171_7c7189a53f_c.jpg3.4 KB · Views: 0