
You are using an out of date browser. It may not display this or other websites correctly.
You should upgrade or use an alternative browser.
You should upgrade or use an alternative browser.
ARNHEM: Major General R E URQUHART'S HIDE OUT HOUSE Zwarteweg 14
- Thread starter Richi72
- Start date
- Status
- Not open for further replies.
02.02.14 Update
Hi all here is a little update.
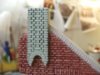
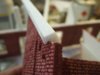
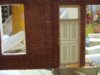
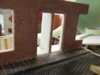
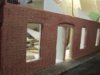
Made the top wall parts and the chimney and glued them in to place, and simulatet the stones.
View attachment 77323
View attachment 77324
View attachment 77325
View attachment 77326
View attachment 77327
View attachment 77328
View attachment 77329
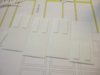
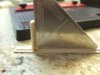
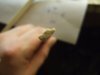
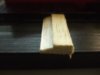
After that I made the front doors from 0,5mm sheet and put some detail on it.
View attachment 77330
View attachment 77331
View attachment 77332
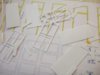
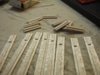
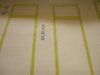
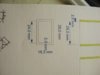
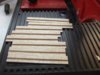
Then I made the door windows from Balsawood cut them and glued them together
And I put in a picture of some dimensions I used for the door windows.
View attachment 77338
View attachment 77339
View attachment 77340
View attachment 77341
View attachment 77342
View attachment 77343
View attachment 77344
View attachment 77345
View attachment 77346
Cheers Richi
View attachment 190346
View attachment 190347
View attachment 190348
View attachment 190349
View attachment 190350
View attachment 190351
View attachment 190352
View attachment 190353
View attachment 190354
View attachment 190355
View attachment 190361
View attachment 190362
View attachment 190363
View attachment 190364
View attachment 190365
View attachment 190366
View attachment 190367
View attachment 190368
View attachment 190369
Hi all here is a little update.
Made the top wall parts and the chimney and glued them in to place, and simulatet the stones.
View attachment 77323
View attachment 77324
View attachment 77325
View attachment 77326
View attachment 77327
View attachment 77328
View attachment 77329
After that I made the front doors from 0,5mm sheet and put some detail on it.
View attachment 77330
View attachment 77331
View attachment 77332
Then I made the door windows from Balsawood cut them and glued them together
And I put in a picture of some dimensions I used for the door windows.
View attachment 77338
View attachment 77339
View attachment 77340
View attachment 77341
View attachment 77342
View attachment 77343
View attachment 77344
View attachment 77345
View attachment 77346
Cheers Richi
View attachment 190346
View attachment 190347
View attachment 190348
View attachment 190349
View attachment 190350
View attachment 190351
View attachment 190352
View attachment 190353
View attachment 190354
View attachment 190355
View attachment 190361
View attachment 190362
View attachment 190363
View attachment 190364
View attachment 190365
View attachment 190366
View attachment 190367
View attachment 190368
View attachment 190369
Attachments
-
 DSCF0038.jpg1.5 KB · Views: 0
 -
 DSCF0037.jpg1.9 KB · Views: 0
 -
 DSCF0036.jpg2.7 KB · Views: 0
 -
 DSCF0009.jpg2.7 KB · Views: 0
 -
 DSCF0008.jpg2.7 KB · Views: 0
 -
 DSCF0006.jpg2.3 KB · Views: 0
 -
 DSCF0005.jpg2.2 KB · Views: 0
 -
 DSCF0002.jpg2.3 KB · Views: 0
 -
 DSCF0046.jpg2.5 KB · Views: 0
 -
 DSCF0010.jpg1.5 KB · Views: 0
 -
 DSCF0045.jpg2.6 KB · Views: 0
 -
 DSCF0042.jpg2.6 KB · Views: 0
 -
 DSCF0039.jpg2.9 KB · Views: 0
 -
 DSCF0028.jpg2.1 KB · Views: 0
 -
 DSCF0027.jpg2.1 KB · Views: 0
 -
 DSCF0024.jpg1.7 KB · Views: 0
 -
 DSCF0013.jpg1.5 KB · Views: 0
 -
 DSCF0012.jpg1.5 KB · Views: 0
 -
 DSCF0001.jpg2.5 KB · Views: 0
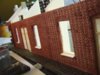
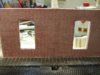
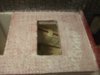
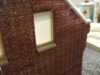
And here are some pics of the door in the wall ")
View attachment 77349
View attachment 77350
Cheers Richi
View attachment 190372
View attachment 190373
View attachment 77349
View attachment 77350
Cheers Richi
View attachment 190372
View attachment 190373
Attachments

G
Guest
Guest
Dear Richard.
Is a pleasure read and look this thread step by step!
Fantastic work so far
Polux
Is a pleasure read and look this thread step by step!
Fantastic work so far
Polux
09.02.2014
Hi all,
here's a little progress on the build.
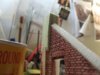
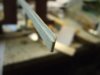
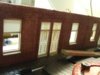
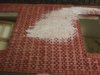
made the windows and started with filing in the gabs between the stones. I used plaster for this.
but here are the pictures.
View attachment 77617
View attachment 77618
View attachment 77619
View attachment 77620
View attachment 77621
View attachment 77622
View attachment 77623
View attachment 77624
View attachment 77625
View attachment 77626
View attachment 77627
View attachment 77628
View attachment 77629
View attachment 77630
View attachment 77631
View attachment 77632
View attachment 77633
View attachment 77634
View attachment 77635
View attachment 77636
So this needs to dry for a day or so.
Thanks for watching.
Cheers Richi
View attachment 190640
View attachment 190641
View attachment 190642
View attachment 190643
View attachment 190644
View attachment 190645
View attachment 190646
View attachment 190647
View attachment 190648
View attachment 190649
View attachment 190650
View attachment 190651
View attachment 190652
View attachment 190653
View attachment 190654
View attachment 190655
View attachment 190656
View attachment 190657
View attachment 190658
View attachment 190659
Hi all,
here's a little progress on the build.
made the windows and started with filing in the gabs between the stones. I used plaster for this.
but here are the pictures.
View attachment 77617
View attachment 77618
View attachment 77619
View attachment 77620
View attachment 77621
View attachment 77622
View attachment 77623
View attachment 77624
View attachment 77625
View attachment 77626
View attachment 77627
View attachment 77628
View attachment 77629
View attachment 77630
View attachment 77631
View attachment 77632
View attachment 77633
View attachment 77634
View attachment 77635
View attachment 77636
So this needs to dry for a day or so.
Thanks for watching.
Cheers Richi
View attachment 190640
View attachment 190641
View attachment 190642
View attachment 190643
View attachment 190644
View attachment 190645
View attachment 190646
View attachment 190647
View attachment 190648
View attachment 190649
View attachment 190650
View attachment 190651
View attachment 190652
View attachment 190653
View attachment 190654
View attachment 190655
View attachment 190656
View attachment 190657
View attachment 190658
View attachment 190659
Attachments
-
 DSCF0022.jpg2.7 KB · Views: 0
 -
 DSCF0010.jpg1.6 KB · Views: 0
 -
 DSCF0009.jpg2 KB · Views: 0
 -
 DSCF0008.jpg2 KB · Views: 0
 -
 DSCF0007.jpg2.7 KB · Views: 0
 -
 DSCF0006.jpg2.3 KB · Views: 0
 -
 DSCF0004.jpg2.9 KB · Views: 0
 -
 DSCF0003.jpg2.3 KB · Views: 0
 -
 DSCF0002.jpg1.6 KB · Views: 0
 -
 DSCF0011.jpg2.2 KB · Views: 0
 -
 DSCF0013.jpg2.8 KB · Views: 0
 -
 DSCF0021.jpg2.3 KB · Views: 0
 -
 DSCF0020.jpg2.5 KB · Views: 0
 -
 DSCF0019.jpg2.3 KB · Views: 0
 -
 DSCF0018.jpg2.5 KB · Views: 0
 -
 DSCF0017.jpg2.7 KB · Views: 0
 -
 DSCF0016.jpg2.2 KB · Views: 0
 -
 DSCF0015.jpg2.4 KB · Views: 0
 -
 DSCF0014.jpg1.9 KB · Views: 0
 -
 DSCF0001.jpg1.6 KB · Views: 0
thank you for a great detailed update Richi,, wow you put in some work into the window frames,/doors and they look so good ,
nice easy way to do mortar , flood in the plaster
look forward to the next update keep the good work going
nice easy way to do mortar , flood in the plaster
look forward to the next update keep the good work going
G
Guest
Guest
Amazing work and detailing Richi, I really am enjoying your updates and look forward to seeing more of this superb build.
10.02.2014
Hi all,
thanks for the kind replies.
I have had a big disaster , after the first layer of plaster I put on a second layer of plaster, but this layer took away lots of details
 of the wall. So back to the drawing board and make a new wall, will put on some pics later on so you can see what I mean.
Cheers Richi
Hi all,
thanks for the kind replies.
I have had a big disaster
, after the first layer of plaster I put on a second layer of plaster, but this layer took away lots of details of the wall. So back to the drawing board and make a new wall, will put on some pics later on so you can see what I mean.Cheers Richi
G
Guest
Guest
There's some impressive detail work going on there...
G
Guest
Guest
Ohhh!! Sorry to hear that Richard!!\ said:10.02.2014Hi all,
thanks for the kind replies.
I have had a big disaster
Cheers Richi
Anyway the diorama is coming along very nice
")
OH No ,Booooooo, that real S----, all that work so sorry to hear that Richi ,you cannot wash off the plaster at all ? to try and save it\ said:10.02.2014Hi all,
thanks for the kind replies.
I have had a big disaster
Cheers Richi

Hi Polux, Hi Moni,
Thanks for the kind words guy's
no way of saving it the depron is way softer than the plaster.
But the new wall is half done, so thumbs up, gone go with 1 layer of plaster this time
cheers Richi
Thanks for the kind words guy's
no way of saving it the depron is way softer than the plaster.
But the new wall is half done, so thumbs up, gone go with 1 layer of plaster this time
cheers Richi
hi Richi ,thats nice to hear, but alot more work than you needed to do, i use a wall filler , that i water down more , and has alot
longer drying time, so you can rub it back with a wet sponge when half set and just give that bit more time to play with as i found
plaster seens to set fast and quick once you pore it out ., dont know if its a help off any type to you, over hear its called sally wall filler
longer drying time, so you can rub it back with a wet sponge when half set and just give that bit more time to play with as i found
plaster seens to set fast and quick once you pore it out ., dont know if its a help off any type to you, over hear its called sally wall filler
Hi Moni,
it was my own dumb mistake, poured a second layer. The first layer sucks up the water from the second layer which is then almost dry in an instant and I know this
I got something like that somewhere, its called Molto filler here. but I don't want to wait that long
 .
.
But there is a saying around here, ''Übung macht den Meister'' wildly translated ''practise and you will become a master'' (someday)
Cheers Richi
it was my own dumb mistake, poured a second layer. The first layer sucks up the water from the second layer which is then almost dry in an instant and I know this
I got something like that somewhere, its called Molto filler here. but I don't want to wait that long
.But there is a saying around here, ''Übung macht den Meister'' wildly translated ''practise and you will become a master'' (someday
)Cheers Richi
- Status
- Not open for further replies.
Legal Notice
scalemodelling.co.uk is a privately operated online discussion forum. All content posted by members reflects their own views and opinions and does not necessarily represent those of the forum owners or administrators. While reasonable efforts are made to moderate content, no responsibility is accepted for user-generated material. By using this site, you agree to comply with UK law and the forum rules.
Currently on our website
Threads
37,389
Messages
707,782
Members
2,652
Latest member
Waffenträger Auf E-100