Theme editor

Scale Model Shop

BarryW’s 1/32 Aircraft Review Thread.

Thread owner
In-box Review Zoukei-Mura J2M3 Raiden (Jack) SWS no5

This is an early ZM kit and the first produced reflecting a lot of lessons learnt from their first four kits.

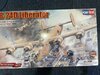
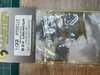
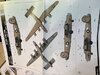
The box is the standard top opening one, no wrap around inner box just yet. Great box art as usual from ZM

20210703_142644791_iOS.jpg

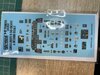
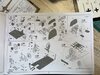
The instruction manual is established in its format and is just tweaked a little from earlier ones. This is just a selection of pages.
20210703_142703040_iOS.jpg
20210703_142713103_iOS.jpg
20210703_142721303_iOS.jpg
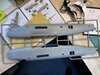
Note that they provide the two seat options, one with the moulded in seat belts.
20210703_142752179_iOS.jpg
20210703_142809373_iOS.jpg
20210703_142826619_iOS.jpg
20210703_142841300_iOS.jpg

Two markings options included
20210703_142902793_iOS.jpg
20210703_142912045_iOS.jpg

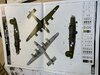
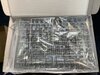
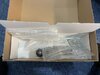
The plastic comes with sprues individually wrapped. High quality plastic having dropped the multi-colour nonsense.

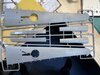
You can see below the fine detail is present, but I am inclined to think some more rivet detail would be welcome.
20210703_143008078_iOS.jpg
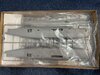
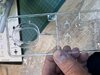
An example close up of a sprue. As you can see parts are cleanly moulded and crisp.
20210703_143300330_iOS.jpg
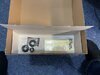
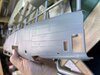
The transparencies are nice and clear.
20210703_143130322_iOS.jpg

There are separate canopy frames.
20210703_143152234_iOS.jpg

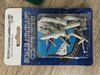
The pre-cut canopy masks and the decals.
20210703_143457610_iOS.jpg

I will, however, be using Maketar Masks on my kit for the markings. For this I found a set for the Hasegawa kit but I should think its fine on this one, after all they don't have to fit as closely as canopy masks.
20210703_143533097_iOS.jpg

All in all this is a very nice quality kit, Highly Recommended.

Next up: ZM Ki45 Toryu
 
Thread owner
In-box Review No3 Zoukei Mura Kawasaki Ki-45 Kai Ko/Hei Toryu (Nick)

I thought I would plus straight on and post this review.

I have to say that this must be the biggest model box I have ever opened...
20210704_082827022_iOS.jpg

It is packed with plastic.
20210704_083014269_iOS.jpg

The manual is the normal format with detailed instructions in Japanese and English.
20210704_083056407_iOS.jpg
20210704_083124299_iOS.jpg
20210704_083135274_iOS.jpg
20210704_083151006_iOS.jpg
See the seat with moulded in seatbelt. I must emphasise that they are well done as well and look great painted up.
20210704_083255754_iOS.jpg
It is worth a closer look at the i.p. options, for two kit versions and different options for preparing the ip.
20210704_083302318_iOS.jpg
20210704_083343437_iOS.jpg
20210704_083415209_iOS.jpg
20210704_083431111_iOS.jpg
20210704_083455040_iOS.jpg
There are two schemes, but not just schemes but two armament versions so you will need to decided which you want to build early on.
20210704_083513817_iOS.jpg
20210704_083523605_iOS.jpg

I will look at the plastic in part two posted shortly.
 
Thread owner
ZM Ki-45 Toryu, Part 2.

This is why the box is so large - the main aircraft structure is replicated in clear parts. Effectively you get two aircraft, sadly only one set of internals so you can only build one.... That is a lot of transparent sprues.
20210704_083649989_iOS.jpg

A close look at the main structure. You can see the fine surface detail much better on the clear parts.
20210704_083747651_iOS.jpg
20210704_083920738_iOS.jpg

Reviews have made two criticisms of ZM for this approach.
First about the added cost of providing all these clear parts and the fact that they are not very clear due to the surface texture.
Well, the reason for the surface texture is because they shot the clear plastic into the main moulds that also take the grey plastic. To get fully transparent parts a new set of moulds would have been needed. As the cost in a model lays more in the very expensive moulds and not the plastic material, transparent clears would have pushed up the costs while just the plastic material would have little effect on the cost. Somewhat contradictory criticism methinks...

I believe that these clears for the main structure were just for the original release and wont be followed up on. They do provide a whole range of options for those so inclined and I suspect the relevant areas could be sanded and polished clear where wanted.

Personally I will use the grey plastic parts only and these clears will just be 'in reserve' in case I cock up....

These are the only clears I will use and they are crystal clear.
20210704_084058598_iOS.jpg

And these are the main structural parts I will use.
20210704_084417594_iOS.jpg
20210704_084503335_iOS.jpg

The plastic is right up to the highest standards, clean and sharp.
20210704_084704082_iOS.jpg
20210704_084819379_iOS.jpg

Decals and canopy masks.
20210704_084859420_iOS.jpg

I will be painting the main markings though.
20210704_084947320_iOS.jpg

I love this kit and it will be a real treat to build. Highly Recommended.

So what is next for me in 1/32 - I really don't know. Once these three are finished I will start my 1/48 project and, no doubt, I will acquire more 1/32 kits as we get new releases. I may even decide to repeat some old 1/32 builds. As and when I acquire new 1/32 kits I will post in-box reviews here.

In the meantime I will post build reviews on these when I get started in my new hobby room/man-cave....
 
Barry,
thanks for all those reviews, very interesting - a substantial investment in time ( and capital! ). 1/32 is a bit too big for me, I'd have to do some house modifications to display even a small number! Looking forward to your 1/48 project ( oddly enough I looked at the Tamiya 1/48 Raiden, the other day in my stash - very simple, not to say crude! )
Dave
 
Thread owner
In Box Review No4 - ICM Bell AH-1G Cobra.

Now for something a little different and a nice change from ZM, a brand new 1/32 tool from ICM, a helicopter gunship.

I don't think I have ever built a chopper before and I really could not resist a 1/32 produced by one of my favourite brands.

Length 422mm
Span 106mm
226 parts

1/32 Bell AH-1G Cobra (early Production), US Attack Helicopter ICM 32060 – Scale Model Shop

For those who don't build in 1/32 scale because of size then this is ideal with a width less than the wingspan of a 1/72 Spitfire, Ok it is long at nearly 17" but that's far easier to accommodate with a narrow width.

Packaging is the usual high standard.

IMG_4492 (002).jpg

The instructions, likewise are as expected. No real issues or problems, nicely illustrated.
20210804_122723166_iOS.jpg
As you can see they have launched their own brand of paint (I suspect rebranded Vallejo) but still provide colours for other brands, Tamiya and Revell.

Example pages...
20210804_122800847_iOS.jpg

20210804_122824682_iOS.jpg
As you can see there is a good choice of stores.

here are the schemes provided:
20210804_122847267_iOS.jpg

20210804_122858529_iOS.jpg

20210804_122912269_iOS.jpg

Of these the two-tone camo or the one with the Confederate flag are my most likely choice.

Decals - ICM usually perform well.
20210804_123129089_iOS.jpg

The plastic sprues are the usual high quality, clean and crisp mouldings with no issues observed. Nice surface detail as usual.

20210804_123201371_iOS.jpg

20210804_123230900_iOS.jpg

20210804_123249936_iOS.jpg

Transparencies are nice a clear. It is good to see that ICM produce a masking template in the instructions.
20210804_123350701_iOS.jpg

As for my plans with this kit.
I expect that I will get a Quinta Studios interior set for this, which has just been released, which includes seatbelts that will be more effective that the kit decals along with an i.p. and other key parts. I may also get an aftermarket set of markings, I will see what's released as I don't expect to start this build for a good while yet.

This kit, with more versions to be released, will I am sure be a big winner for ICM. Very Highly Recommended.
 
Thread owner
In Box Review No5 - 1/32 Hobby Boss B24D Liberator.

Yes, I did it and bought this monster of a kit. Indeed this aircraft is bigger than both the Lancaster and B17…. I have always had a soft spot for the two less glamorous primary allied heavy bombers, the B24 and Halifax and these were always going to be more difficult to resist. So far I had resisted this kit partly due to the reviews that focussed on an incorrect wing aerofoil shape, incorrect engines, and a lack of interior and exterior detail. That was until I saw a couple at Telford…. They looked like Liberators, you could not see the aerofoil and the engines could hardly been seen while the cockpit detail can easily be enhanced. As for the surface detail, well we will take a look.

Here is the box, it is huge
View attachment 439844

The box is packed with plastic and there are two interior boxes that keep smaller vulnerable parts safe.
View attachment 439845

This is to give you an idea of the size of the model. I placed a six inch ruler that is actually nearer 7inches long overall on the plastic.
View attachment 439846

Here is a look at the detail. There is riveting, nicely done. OK it does not have the stressed skin effect but most models don’t and besides, look at what you pay for this kit compared to the HKM B17 and Lanc…..
View attachment 439847

Like at the size of the wing and there is that ruler again…
View attachment 439848

The contents of the smaller internal box and the smaller box. View attachment 439850
View attachment 439849
View attachment 439851

All sprues individually wrapped
The transparencies are nice
View attachment 439854

A few pages of the instructions. They are the usual HM/Trumpy.
View attachment 439852View attachment 439853
View attachment 439855

I am not sure what’s happening. Since the posting of picture last changed some appear on their sides despite being corrected on my phone. I don’t know how to change that. Apologies.

The decals look good but, as usual for HB/Trumpy, they will certainly be unusable.
View attachment 439856

This kit demands some aftermarket.

Kits World are producing 3D decals that look up to Quinta standard and are far superior to etch.
View attachment 439857

I am using etch for seatbelts as, unlike Quinta they are not included with Kits World sets
View attachment 439859

The machine gun barrels are vulnerable and a brass set will look better and be more resilient. Also a metal set of undercarriage legs will help.
View attachment 439858
View attachment 439860

As for the scheme - Kits World, my favourite decals.
View attachment 439861

I might get a mask set for the insignia.

All in all I do think that this kit is a lot of plastic for the money, much more affordable than the other 1/32 heavies. It also builds into an impressive model. Recommended.
 

Attachments

  • B6E7A0C7-A896-4084-B433-257837DA0F25.jpeg
    B6E7A0C7-A896-4084-B433-257837DA0F25.jpeg
    3.9 KB · Views: 0
  • 4F80C6DF-5DFE-4044-8F59-B57047DD931E.jpeg
    4F80C6DF-5DFE-4044-8F59-B57047DD931E.jpeg
    3.9 KB · Views: 0
  • C2392000-E73F-4A3B-A428-A240A946EB9F.jpeg
    C2392000-E73F-4A3B-A428-A240A946EB9F.jpeg
    3.4 KB · Views: 0
  • 51F6D924-529F-4648-85F3-CB83BD23D00A.jpeg
    51F6D924-529F-4648-85F3-CB83BD23D00A.jpeg
    4.1 KB · Views: 0
  • F0C01ACB-74E6-494B-9F50-0A0B7FCE387E.jpeg
    F0C01ACB-74E6-494B-9F50-0A0B7FCE387E.jpeg
    3.3 KB · Views: 1
  • FEFBDFE2-CF9B-4885-ADA0-3FD31A7B9CA5.jpeg
    FEFBDFE2-CF9B-4885-ADA0-3FD31A7B9CA5.jpeg
    3.5 KB · Views: 1
  • 8F71DFDB-F4F6-4C9A-82AA-BF285C647F37.jpeg
    8F71DFDB-F4F6-4C9A-82AA-BF285C647F37.jpeg
    3.8 KB · Views: 0
  • 222E3488-0D86-4D52-AF99-330D49B54C63.jpeg
    222E3488-0D86-4D52-AF99-330D49B54C63.jpeg
    5 KB · Views: 0
  • F7D31A6F-0BB1-4F53-9018-0DD10F2709A8.jpeg
    F7D31A6F-0BB1-4F53-9018-0DD10F2709A8.jpeg
    4 KB · Views: 0
  • 19B09176-6C0E-488D-BEC3-262A3FE178E6.jpeg
    19B09176-6C0E-488D-BEC3-262A3FE178E6.jpeg
    3.5 KB · Views: 0
  • A301C0A9-D9EC-4AF3-82B6-B78C5C415E51.jpeg
    A301C0A9-D9EC-4AF3-82B6-B78C5C415E51.jpeg
    3.9 KB · Views: 0
  • 7433877D-6381-4583-A760-A5217B54E685.jpeg
    7433877D-6381-4583-A760-A5217B54E685.jpeg
    3.9 KB · Views: 0
  • E772E13F-CF00-4D61-8D8F-E7281BA051D0.jpeg
    E772E13F-CF00-4D61-8D8F-E7281BA051D0.jpeg
    2.9 KB · Views: 1
  • 5E1661DD-AA25-4292-BB59-947D6F55A857.jpeg
    5E1661DD-AA25-4292-BB59-947D6F55A857.jpeg
    3.7 KB · Views: 0
  • BA91AB04-64AE-44FF-9E46-A99F19F8B210.jpeg
    BA91AB04-64AE-44FF-9E46-A99F19F8B210.jpeg
    2.9 KB · Views: 0
  • FFCB8EC5-C092-4874-BB8F-319249797E89.jpeg
    FFCB8EC5-C092-4874-BB8F-319249797E89.jpeg
    3.9 KB · Views: 1
  • 3FE0614D-4735-4FDB-AFCE-EA63BBF7659E.jpeg
    3FE0614D-4735-4FDB-AFCE-EA63BBF7659E.jpeg
    3.7 KB · Views: 1
  • 76138371-B0BD-4049-909B-C36C7718D486.jpeg
    76138371-B0BD-4049-909B-C36C7718D486.jpeg
    4.1 KB · Views: 0
Barry,
that's a lot of plastic - you'll need more than a bottle of paint to cover that! - Any reason you chose the 'D' version over the 'J' ?
Dave
 
That is absolutely huge Barry…..about a three foot six wingspan :surprised:
That will take some storing after it’s built. Looks a really nice kit though.
 
Thread owner
Barry,
that's a lot of plastic - you'll need more than a bottle of paint to cover that! - Any reason you chose the 'D' version over the 'J' ?
Dave
Hi Dave
Two reasons.
First I rather like the look of the D and the desert scheme as well.
Secondly one problem with the kit that I did not mention is how the front and rear turrets are moulded. The D reduces that problem by half and, what is more, the front turret issue would be more visible.
 
Back
Top