Theme editor

Scale Model Shop

Bf109f

Status
Not open for further replies.

Vaughan

Well-known member
Joined
Apr 1, 2011
Messages
3,245
Reaction score
50
Points
48
1/3
Thread owner
Hi there everyone. I've just joined the forum so thought it might be a good idea to get some feed back on the model I'm building at the moment.

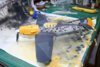
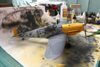
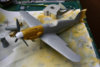
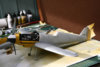
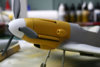
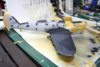
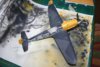
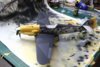
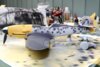
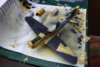
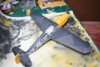
It's a BF109F 1/32 scale model by Revell and it's my first go at using an airbrush.

It's a bit of a challenge regarding masking off parts and deciding which parts to spray first. Any advice would be welcome.

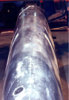
I also have issues filling fuselage and wing halves as using an airbrush doesn't fill in any slight imperfections. So if anyone can point me in the right direction regarding filler and sanding techniques that would be great. I have posted a few images so you can see how I'm progressing.

Vaughan

View attachment 32920

View attachment 32921

View attachment 32922

View attachment 145946

View attachment 145947

View attachment 145948
 

Attachments

  • BF109F 3.jpg
    BF109F 3.jpg
    3.8 KB · Views: 0
  • BF109F 1.jpg
    BF109F 1.jpg
    3.7 KB · Views: 0
  • BF109F 2.jpg
    BF109F 2.jpg
    3.7 KB · Views: 0
Nice one Vaugham, looking forward to the finished item.

well done.

John
 
Firstly that looks like a very nice clean build. Nicely done.

As far as painting order goes everyone develops their own system. I tend to leave off propellers,spinners,undercarriage,aerials etc,the so called dangly bits,until after most painting is done. I usually do attach a masked and sealed (if necessary) canopy and spray it with the rest of the model in an effort to avoid it looking "stuck on". By sealed I mean the application of some tape on the inside of any joins,where the hinging part of a Bf109 hood meets the windscreen and rear canopy for example. This isn't always practical. I mask wheel wells ,air intakes and the like by stuffing them with damp tissue. I usually use foam and tape for cockpits. I try to leave the control column off if I can so that it doesn't get broken off by the masking. I can usually get it in later with some tweezers and a lot of effing and jeffing.

It looks like you've done a pretty good job on your seams. For small gaps I use thick CA (superglue). A bit bigger and I use Tamiya putty. This stuff shrinks so you need to allow time and maybe make more than one application. Anything bigger may need some plastic card or even an epoxy (like Milliput).

In your photos I can see a very minor gap on the leading edge of the wing,near the wing root,which you could use the putty on. I sand using fine grade wet 'n' dry from Halfords. I start at 800 grit and progress to 1500 grit. After that you are polishing really. My only tip is obvious,let the filler dry completely before sanding. You can protect nearby detail with masking tape.

Photos are a great way of showing up small imperfections that you may miss with the naked eye as I know only too well!

Keep up the good work,you can never have too many 109s.

Cheers

Steve
 
Belated welcome to the forum Vaughan. This is a great place to be a part of, enjoy your time here.

I bought one of these along with a Hurricane Mk1 also in 1/32....Less than a tenner each from my local model shop so I will be watching how this goes together....No pressure then?!

Can't help with your masking questions I'm afraid, as I only brush paint so I don't need to mask any previous paintwork. After reading stona's post I'm glad I don't! lol

For filling I use Humbrol model filler. It looks and smells like car body filler but much finer. It is dispensed from a tube, easy to use and can be sanded after only a few minutes, grand stuff....

Your 109 is coming along nicely so far.

Cheers,

Ron

Ron
 
Thread owner
Thanks Steve andRon for the info regarding masking and filler. I will upload some more images later today. The model is coming on well.

Vaughan
 
Thread owner
BF109F Progress

Hi there all

Here are some more images of my build.I'm working on the camo and fixing the tail planes. Would have put some pictures up yesterday but ran out of time. The next stage is to fit and mask off the canopy. Has anyone got some advice on the correct face mask to use when spraying acrylic paints? Anyway here are the images.

Vaughan

View attachment 33012

View attachment 33013

View attachment 33014

View attachment 33015

View attachment 33016

View attachment 33017

View attachment 146038

View attachment 146039

View attachment 146040

View attachment 146041

View attachment 146042

View attachment 146043
 

Attachments

  • bf109f5.jpg
    bf109f5.jpg
    3.1 KB · Views: 0
  • bf109f6.jpg
    bf109f6.jpg
    3 KB · Views: 0
  • bf109f9.jpg
    bf109f9.jpg
    3.1 KB · Views: 0
  • bf109f8.jpg
    bf109f8.jpg
    3 KB · Views: 0
  • bf109f4.jpg
    bf109f4.jpg
    2.8 KB · Views: 0
  • bf109f7.jpg
    bf109f7.jpg
    3 KB · Views: 0
Looking good now Vaughan. Makes me want to open the box on the one I bought...

Apart from the bits you mention, what has the fit been like?

Ron
 
Thread owner
Hi Ron not the best of fits a lot of sanding and filling needed, but saying that the details very good considering the model was produced in the 70's. I'm just about to fit the canopy it's all masked off but it's going to need some filling as Revell in their wisdom have incorporated a hinge system to allow the canopy to open that's not to clever. I've elected to glue all three parts together as will make a neater job.

Vaughan
 
\ said:
Hi there again I forgot to mention that I have intensionally left the top fuselage seem as this is how they were constructed see image.Vaughan
And on the bottom too!

Allied assesments of the Bf109 were always very impressed with the construction techniques used on German aircraft and usually comment on the simple construction of the Messerschmitt fuselages. It took three times as many man hours to build a Spitfire MkI than it did to build a Bf109E and yet we outbuilt them! This says a lot about the relative war footing of the British and German economies.

Here's a page from such a report which will give an idea of the sort of thing I mean

Cheers

Steve
 
That's worth knowing, it's typically the kind of seam i'd automatically fill, damn those germans, messing up our model builds with their convoluted manufacturing processes :)

This ones looking good. You can never have too many bf109's, I prefer the e personally, I know the f was superior but just find the earlier one more aesthetically pleasing
 
Loads of good advice already in this thread. When it comes to sanding, I like to take those wooden coffee stiring things and glue thin strips of wet 'n' dry to them to make sanding sticks. You can even cut them in half for the really detailed sanding jobs.

Regards

Colin M.......
 
Colin, there might just be a few lying about in the cafe at Cosford......If Tony (yakface) doesn't beat us to it that is.lol

I am, of course referring to used ones!!!!!!!!!!!!!!!

Ron
 
Actually Ron, I usually send the kids to Mc Donalds...........does that make me a bit of a Fagan ??

Regards

Colin M......
 
\ said:
That's worth knowing, it's typically the kind of seam i'd automatically fill, damn those germans, messing up our model builds with their convoluted manufacturing processes :) This ones looking good. You can never have too many bf109's, I prefer the e personally, I know the f was superior but just find the earlier one more aesthetically pleasing
I completely agree and the Gustav was even more superior but again even less of a looker. You can't beat the looks of the E for my money. I just know there is someone here who will know, if the E was an Emil and the G was a Gustav what was the F?
 
\ said:
I completely agree and the Gustav was even more superior but again even less of a looker. You can't beat the looks of the E for my money. I just know there is someone here who will know, if the E was an Emil and the G was a Gustav what was the F?
Friedrich and the K version was known as the Kurfürst
 
Give me an "Friedrich" any day! The "Gustavs",and heaven knows there were enough different versions to confuse the Germans at the time,never mind us seventy years later,had too many lumps and bumps ruining their fine lines. I'll concede that the "Kurfurst" ironed some of these out but they were badly built and didn't perform as well as hoped.

I'm stuck in Dublin at the moment and only have drawings of the G-10 scanned on my HD. They show the fuselage skinning well. The rear fuselage is superficially not that different from the ancestral E model.

Cheers

Steve
 
Thats one sweet looking 109 .I use MMD green putty on seams and run acetone on a 'Q' tip quickly after its applied to smooth it, if I do it right it requires very little sanding.
 
Thread owner
Progress so far

The canopy is sprayed and unmasked I'm a bit disappointed as there are dust particles inside the canopy I don't know where They came from as i made sure that it was clean before I fitted it.

Undercarriage and wheels are sorted. Arial mast and aerolong counter balances yet to be fitted will leave them till the decals are done as they a rather fragile. I'm going to use Revell decal fix to help bed them down.

Also weathering to do, if any of you guys have some techniques on weathering I would welcome it. Here's another image of my progress.

Vaughan

View attachment 33024

View attachment 146050
 

Attachments

  • BF109F12.jpg
    BF109F12.jpg
    3.1 KB · Views: 0
Status
Not open for further replies.
Back
Top