Theme editor

Scale Model Shop

Bf109G6 Early Version

Status
Not open for further replies.
Thread owner
Hi Steve

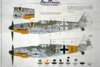
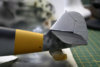
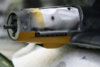
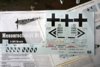
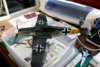
I've already committed myself to go with the Anton Hackl version didn't fancy doing the eye decals but on closer inspection see colour chart the ariel mast should be a high mast and the kit only provides the short version with a loop ariel. So it looks like I might have to try and scratch build one. Not quite sure how tall it should be as have no references to the mast hight.

Vaughan

View attachment 34627

View attachment 34628

View attachment 147653

View attachment 147654
 

Attachments

  • colour chart1.jpg
    colour chart1.jpg
    2.8 KB · Views: 0
  • short mast.jpg
    short mast.jpg
    3.3 KB · Views: 0
Thread owner
Progress at last!!

Hi all

At last I've managed to carry on with the build. Still having problems with the old airbrush nearly gave up over the W/E but things have been moving better today. Here are some images so far. Lots of bits 'n' bobs to still do but it's all going in the right direction now. I had to create a seam line on the air intake, as Trumpeter have omitted to add one, but got round it by using some Vallejo plastic putty luckily the putty comes with a thin nozzle so you can form a very thin bead. My shaky hand has added to the realism I think. Anyway I'm pleased with the results. The fuselage band was a challenge, not only the colour but trying to mask an elliptical shape didn't know what it was going to look like till I took off the masking tape. I was pleasantly surprised with the finish. Camo is all but done and will need to gloss varnish next I was thinking of using the new Klear which I bought yesterday.

I do have some reservations about using it having spent £100 on the model. I have tried it on a spare part and it does dry fairly quickly and gives a satin sheen. The perfume smell it's not nice and I don't know how long it would linger for, so unsure if I will go for it or just use the Vallejo gloss varnish and put up with it clogging the airbrush

Vaughan.

View attachment 35038

View attachment 35039

View attachment 35040

View attachment 35041

View attachment 35042

View attachment 148064

View attachment 148065

View attachment 148066

View attachment 148067

View attachment 148068
 

Attachments

  • camo.jpg
    camo.jpg
    3.9 KB · Views: 0
  • engine cowel.jpg
    engine cowel.jpg
    2.7 KB · Views: 0
  • cowel.jpg
    cowel.jpg
    3.2 KB · Views: 0
  • f band.jpg
    f band.jpg
    3.3 KB · Views: 0
  • oil cowel.jpg
    oil cowel.jpg
    3.1 KB · Views: 0
Your skill at painting is amazing so much detail in the cock pit looks like you could get in a fly the thing and the outside well 5 big ones

John
 
Thread owner
Hi John

Thank you very much for your complements. This one has been a bit of a hard slog but it's coming together now. Thanks again.

Vaughan
 
Looks good Vaughan. You could scale the longer mast from those profiles,they look to be in the right proportions. I can't look up the actual height at the moment. Looking forward to seeing this one done.

Cheers

Steve
 
Thread owner
Thanks Steve

Still deliberating on using the Johnson new Klear. Have tried brushing it on the clear fuselage half that I sprayed black.. Goes on ok and dries very quickly to a satin finish. Have you used the new version?

Vaughan
 
I haven't used it but I've seen the results and read positive comments,I'm sure some others here will be able to give first hand opinions.

Cheers

Steve
 
Thread owner

Attachments

  • _MG_0300.jpg
    _MG_0300.jpg
    3.7 KB · Views: 0
  • _MG_0305.jpg
    _MG_0305.jpg
    4.5 KB · Views: 0
  • _MG_0301.jpg
    _MG_0301.jpg
    3.7 KB · Views: 0
Thread owner
HELP Decal nightmare!!!!!

Hi all

Things were going great with the BF109G6 (Bf109G6 Early Version) until I tried to apply the Trumpeter decals this morning. A quick dip in luke warm water ready to apply to the model. Revell decal soft at the ready. I gently slid the decal from the backing paper to the model having pre wetted the area. Disaster struck the decal just fell apart. It cracked and had the consistency of brittle cellophane. I then tried another one and exactly the same thing happened this one didn't even get off the decal sheet before it fell apart. All the decals that I have used before from Airfix and Revell have been fine and have been very flexible and not brittle. Don't know if this is how Trumpeter Decals behave but if this is anything to go on they are of a very poor quality and near impossible to use.

I also noticed that the klear where wetted with the Revell decal soft has lost it's sheen don't know if there is some chemical reaction going on there?. I did allow it to dry for over 24 hours so should have cured properly. Any suggestion would be welcome as I now have an incomplete set of decals for the model and don't want to carry on trying to us them.

Vaughan

View attachment 35134

View attachment 35135

View attachment 35136

View attachment 35137

View attachment 148160

View attachment 148161

View attachment 148162

View attachment 148163
 

Attachments

  • decale sheet.jpg
    decale sheet.jpg
    3.4 KB · Views: 0
  • decale1.jpg
    decale1.jpg
    3.1 KB · Views: 0
  • decale2.jpg
    decale2.jpg
    3.2 KB · Views: 0
  • wing.jpg
    wing.jpg
    2 KB · Views: 0
Vaughan I have not experienced this before but it sure looks bad. I would suggest you either get aftermarket decals or take the measurements of the crosses, mask and then paint the markings on.
 
I've had Techmod decals do this to me once. I just bit the bullet and forked out for some different decals.

Various decal softeners can take the shine off Klear or even give it a slightly milky appearance. Don't panic,a further coat when you seal in your decals will solve the problem.

Cheers

Steve
 
Thread owner
I have just carried out a test with a spare decal from another Trumpeter kit, that I'm yet to build, a Bearcat and that one has gone on fine it's feel and texture was completely different. Looks to me like it's down to the quality of the decals in the Bf109G6 kit as that one dates from 2003 and maybe they weren't stored well. Will have to look at aftermarket decal sheets but they can be expensive. Can anyone recommend a good place to order them from? Hannants are selling Eagle Strike sheets for £9.99 plus postage. Is that a good price? and are they good quality?

Vaughan

View attachment 35169

View attachment 148195
 

Attachments

  • decale test.jpg
    decale test.jpg
    3.5 KB · Views: 0
Thread owner
Hi All

Eagle Strike decals ordered from Hannants so once they arrived I will make a start with the decals. In the mean time I'm going to make a start on a vintage kit a 1/32 Revell Grumman Wildcat dated 1969 that I purchased on eBay it arrived yesterday.

Vaughan
 
Thread owner
Hi all

Decals have arrived so have made a start. 10 decals down has taken 2 hours so far. The quality of these decals is very good in comparison to the kit decals, very thin and flexible. Have had a little problem with silvering on the upper wing decals but maybe it's down to how I applied them the Klear should have helped prevent it. Will continue tomorrow.

Just a question is it best to apply another coat of Klear over the decals? or apply a matt coat to seal them?

Vaughan

View attachment 35316

View attachment 35317

View attachment 35318

View attachment 35319

View attachment 35320

View attachment 148342

View attachment 148343

View attachment 148344

View attachment 148345

View attachment 148346
 

Attachments

  • _MG_0001.jpg
    _MG_0001.jpg
    6.6 KB · Views: 0
  • _MG_0003.jpg
    _MG_0003.jpg
    5.4 KB · Views: 0
  • _MG_0005.jpg
    _MG_0005.jpg
    5.5 KB · Views: 0
  • _MG_0002.jpg
    _MG_0002.jpg
    5.3 KB · Views: 0
  • _MG_0004.jpg
    _MG_0004.jpg
    4.9 KB · Views: 0
Vaughan decals are looking great,did you use any micro sol? I find it helps reduce silvering. Myself I've just been shooting dullcoat over mine when they dry.
 
Apply a coat of Klear over the decals. This will protect them from your weathering washes. You can seal everything in at the end with your final varnish.

Klear can also be used to cure silvering. Make some pin holes in the carrier film and flood some Klear over the decal,hopefully some will work its way under the decal and suck it down.

She's looking good,decals always give an aircraft its identity.

Cheers

Steve
 
Thread owner
Hi Steve

Funny you should say that I made some pin holes in it late last night and put some decal soft over it. The decal soft has worked its way underneath and seems to have solved the problem.

Vaughan
 
Thread owner
Hi All

All the decals are down now, what a mammoth task, and I have started to seal with Klear. Still not 100% convinced about using the stuff as it started lifting and wrinkling one of the underwing decals even though I had left the decal to set for over 48 hours. I can see the benefits of protecting the surface and decals. I have also noticed that on subsequent coats are more prone to pooling and needs to be constantly brushed to level it out. If a build up is left and because the new formula is not clear it appears yellow and very noticeable on a white surface.

Vaughan
 
Thread owner
Finished at last!!

Hi all

Well I think I've finally completed the BF109G6:D
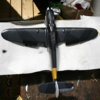
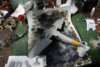
. Thanks everyone for your help with this build, I have put the images in the Aircraft Pictures Section.

Vaughan
 
Status
Not open for further replies.
Back
Top