Theme editor

Scale Model Shop

BOATMANS B58 HUSTLER IN 148th scale with lights

Thread owner
Good work Chris, even the instrument panel is going to be lit (y)
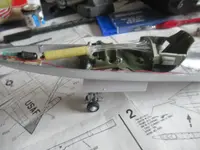
HI JOE well not sure of this yet untill i can fit in the big 5 mm led an power it up then i'll know an i think i have a pic of it now fitted will post a pic if i can an yes i have fitted in the 5 mm led an i painted it black around the sides to prevent light leak an will power it up an i hope the lights will show betrter when its all enclosed with the cockpit an when i go up to the man cave as at the moment im in livein room tryin to keep cool as to hot in man cave IMG_1859.webp
ATB SIR chrisb
 
Last edited:
Thread owner
OH DEAR DISATERDAY TODAY i started work on the nose section an was tryin to tidy up the tape i used to hold all them tiny wires for the led s an only went an cut through them all oh dear so been tryin to solder all 10 tiny hair thin wires an im now shatterd but yes ive done it an they all go again but the stress level has gone through the roof as the wires are so tiny an i dint know which wire worked which led so a lot of trail an error oh boy what a bad day an swear box overflowin just as well jen was over her freinds havin a rest now
 
Thread owner
Think about how you managed that ship Chris. This must seem childs play to you .
HI John yes that hornet was a bad build FOR ME BUT NOW ITS BUILT WITH ALL THEM B25 ON an made IM PLEASED WITH IT AS IT LOOKS GOOD ON ITS SHELF WITH THE BOX TOP PIC BEHIND IT but i near wanted to give up modeling for say 6 months or so an rest as i was shattered after that but now ive gone an done SUCH A STUPID THING OF CUTTING ALL THEM WIRES JUST TO TIDY UP THE TAPE AN TALK ABOUT ANGRY WITH MYSELF an yes swear box was over flowing it must be this gettin OLD bussiness as ive never done anything so stupid like this before an could not believie i had at the start untill it sank in as my eyes must have come out on stalks lol but YES it was a very hot day like it is now today an sweat was rolling down my face while i was tryin to find the right tiny wire to solder an that was a hell of a job as well as them tiny hair thin wires wont stay in the crokadile holders on my helping hands an kept slippin out so when i came to solder the little buggers with the solderin iron there was nothing there to solder AAARRRRGGGGGGGGHHHHHH so it was hunt the tiny wire an then when i had done it it was the wrong wire for them leds AAAARRRRRCCCCCCHHHHHHHH Gorwd i was swearing an sayin to myself next time check where the bloomin wires are lol so when i had them wires all connected up an leds goin AN JEN SAID HAVE A COOL SHOWER yes an went in for a good cool shower an jen washed me down as i was so angry but the shower was nice an after that i felt like i could take on any model AGAIN BOY DO WE LIVE AN LEARN THE HARD WAY LOL an SORRY for the RANT GUYS
an John hope you both ok an bearin up in the heat as its cookin here now
so now goin up to man cave to continue the battle on this hustler lol if i can an takin up a ice cream to cool down an just hope i can find the thin wire today what ive been searching for the last three days oh boy
ATB ALL
CHRIS an JEN
 
Last edited:
Great recovery Chris , give yourself another ice cream ! Bit cooler this morning so hopefully a bit less stressful on the build
 
Thread owner
Frankly awesome job you're doing here
THANKS Steve makes me wonder if im tryin to do to much on my planes regards lights but lets face it the real plane has them so i think the model should do also but the lights are all goin again now an its taught me a lesson to check where im cuttin as never done that before an wont again as if the cut wires were any shorter then it would have been impossible to resolder them wires but i was lucky so its think an check twice before i cut
cheers Steve for your reply AN HOPE you keep followin this build as i think it should look nice when its finished
ATB
chrisb
 
Thread owner
Great recovery Chris , give yourself another ice cream ! Bit cooler this morning so hopefully a bit less stressful on the build
AN G/M Tony yes it was a great cock up doin them cut wires as at times i seem to get ahead of myself as them tiny hair thin wires on these tiny 2mm leds the outer coating is a job to get off down to the wires so i can solder them so ive found the only way to get the coatin off is melt it off with the soldering iron then clean up the tiny wire then if the wires will hold in my crodile clips without them slidin out then resolder them ( phew ) im pooped just talking about them wires as they can be a nightmare if i dont handle gently an a wire comes off the led then its cut it out an replace it
ATB TOP OF THE DAY TO YOU TONY
chrisb
 
Sorry you've had a bad few days Chris, never mind Matron has left here this afternoon and should be with you soon. Saw she was sharpening her multi-point gun injection syringe so you will be ok.
 
Thread owner
Sorry you've had a bad few days Chris, never mind Matron has left here this afternoon and should be with you soon. Saw she was sharpening her multi-point gun injection syringe so you will be ok.
HI John yes a few bad days on the hustler but got to remenber this kit is maybe 60 odd yrs old so im exspecting a few probs on it as at the moment the problem is the rear tail fusealarge is to big to fit proberly with when pushed tight against the main fusealarge there are big gaps an by BIG i mean a 1 mm gap an it sits high by about 1mm so it filler time an sander time but i will try an get it the best i can but i think it will still be noticeable but that the way the ole cookie crumbles lol but will see how it looks when its resprayed in silver metalic paint an regards you know who its about time she goes for a newbie as after all the needle holes she's put in me when i have a cuppa i leak like heck lol
chrisb
 
Bit of a trial with this kit Chris, but nothing you can't handle mate. For those 1mm gaps, glue some plastic card in there and then fill. It will help to create a stronger joint and prevent shrinkage of the filler.
 
Thread owner
Bit of a trial with this kit Chris, but nothing you can't handle mate. For those 1mm gaps, glue some plastic card in there and then fill. It will help to create a stronger joint and prevent shrinkage of the filler.
Hi Joe yes this was a trail on this rear fusealarge boy talk about pulling my hair out lol every kit i have now always has a big problem on it an yes Jen helped me to fit this tail which was good of her an its done now but i think i may have made it worst as the rear fusealarge just would not meet up with the front fusealarge smoothly so done 2 days of saindin an fileing down but it still notices so im goin to try a secret idea to try an distrake the eye off the bad part of it thanks Joe for your reply sir an hopeing you dont think to badly of it when you see the plane
ATB SIR
chrisb
 
Last edited:
Thread owner
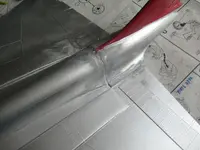
HI GUYS Well i thought that hornet had probs an gave me stress but this hustler has topped that for fit probs so prepare yourselves for some horror pics hope none of you are of nevouse dispasition lol if so dont look lol well after that bad fit on the tail fusealarge it was terrible an jen an i we battled for over 2 hrs to get it to a bad fit as it wont fit at all untill out came the filler an i had to grind down the tails fusealarge to get some sembelance of a fit an it still looked terrible an here it is as i beleive in showin warts an all in my builds an yes this is a near 60 yrs old kit so im makin allowance for it oh dear but im hopein it wont look to bad by the time ive finished with it an sprayed it silver
 

Attachments

  • IMG_1861.webp
    IMG_1861.webp
    2.2 MB · Views: 6
Thread owner
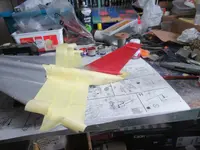
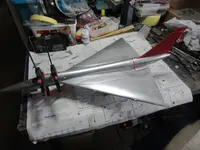
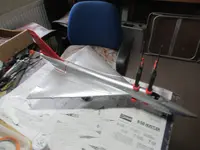
an here ive managed to sand it down an mask it up to respray the tail red
 

Attachments

  • IMG_1862.webp
    IMG_1862.webp
    1.3 MB · Views: 6
Thread owner
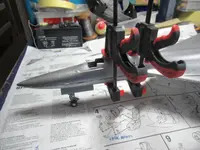
AN NOW more horror pics as when i came to fit the nose section it also would not fit as lookin along it its warped just a bit not noticeable until i come to fit it to the main fusealarge then it shows so had to grind a bit out of the front wings to get it to fit an then theres a line up problem but i think ive beaten it an glued it but took some big clamps to pull it togeather see in pic IMG_1863.webp
 
Thread owner
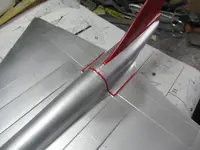
AN THIS is the best i could get the tail section to fit still not good but best i could do so ive painted a fusealarge red line so that this is where the fusealarge halfs for ground crews to get inside IMG_1864.webp
 
Last edited:
Back
Top