
You are using an out of date browser. It may not display this or other websites correctly.
You should upgrade or use an alternative browser.
You should upgrade or use an alternative browser.
Bowcat's 1/35 Tamiya King Tiger for Simon
- Thread starter Mr Bowcat
- Start date
")
G
Guest
Guest
I'm running late Bob, but it's looking great so far.
I tried my hand at soldering some PE the other day. Let's just say CA is the lesser of two evils for me :smiling5:
I tried my hand at soldering some PE the other day. Let's just say CA is the lesser of two evils for me :smiling5:
G
Guest
Guest
Fine work there Bob. Very clean and tidy despite all of the cutting.
Thanks guys. ")
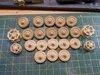
First of all, here ya go Steve, fill your boots mate.
View attachment 403997
I think I've decided to paint the wheels and lower part of the hull and get the wheels and sprockets installed sooner rather than later. Looking at how delicate the PE is I think it will be impossible to fit the running gear after the tin work is fitted.
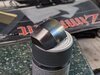
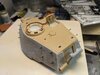
Tonight I only managed to get one front mudguard done. I soldered one bit then gave up and resorted to CA.
View attachment 403998
First of all, here ya go Steve, fill your boots mate.
View attachment 403997
I think I've decided to paint the wheels and lower part of the hull and get the wheels and sprockets installed sooner rather than later. Looking at how delicate the PE is I think it will be impossible to fit the running gear after the tin work is fitted.
Tonight I only managed to get one front mudguard done. I soldered one bit then gave up and resorted to CA.
View attachment 403998
Attachments
G
Guest
Guest
Evening Bob.
Those wheels give me nightmares, so many of them.
Think those front guards look the business. I've yet to try solder, the fumes put me off, so don't blame you resorting to CA.
Those wheels give me nightmares, so many of them.
Think those front guards look the business. I've yet to try solder, the fumes put me off, so don't blame you resorting to CA.
Morning guys,
I've been working on the tin work some more, both front and rear mudguards are now complete and I have finished one of the side skirts. This went together fairly well, I was just careful to make sure all the angles were the same before gluing the pieces together (I didn't dare try to solder these).


I also glued on some more of the Zimmerit, annoyingly the side pieces were too short. I vaguely thought about trying to heat them up in hot water and stretch them, but they are so thin I though they might break, so instead I cut each one and will fill in the missing Zimm with putty. It hopefully wont be too noticeable once the tow cables, etc. are on.

I've been working on the tin work some more, both front and rear mudguards are now complete and I have finished one of the side skirts. This went together fairly well, I was just careful to make sure all the angles were the same before gluing the pieces together (I didn't dare try to solder these).
I also glued on some more of the Zimmerit, annoyingly the side pieces were too short. I vaguely thought about trying to heat them up in hot water and stretch them, but they are so thin I though they might break, so instead I cut each one and will fill in the missing Zimm with putty. It hopefully wont be too noticeable once the tow cables, etc. are on.
Afternoon chaps.
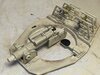
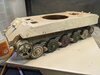
I pressed on with getting the running gear painted, weathered and installed.
View attachment 405956
I've also decided to get the tracks fitted before adding the guards, just too much potential to knock them off even with fruils. Unfortunately I ran out of pins (I like to use .53 mil dress making pins) so I only managed to get one whole run done, and a third of the other. I've ordered more pins so will finish the tracks off when they arrive.
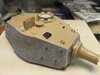
I wanted to get on with something else so turned my attention to the turret. The internal detail is sparse but as I'm planning on leaving the hatches open I painted and weathered anyway. The kit didn't come with any ammo for the racks, but I had some shells left over from another build so used those. They are much smaller than the correct ammo, but should give the impression if anyone looks in a hatch.
View attachment 405958
Once the turret halves were together I applied the zimmerit and PE to the exterior.
View attachment 405957
View attachment 405959
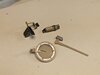
And I've also started working on some of the other PE bits.
View attachment 405955
I pressed on with getting the running gear painted, weathered and installed.
View attachment 405956
I've also decided to get the tracks fitted before adding the guards, just too much potential to knock them off even with fruils. Unfortunately I ran out of pins (I like to use .53 mil dress making pins) so I only managed to get one whole run done, and a third of the other. I've ordered more pins so will finish the tracks off when they arrive.
I wanted to get on with something else so turned my attention to the turret. The internal detail is sparse but as I'm planning on leaving the hatches open I painted and weathered anyway. The kit didn't come with any ammo for the racks, but I had some shells left over from another build so used those. They are much smaller than the correct ammo, but should give the impression if anyone looks in a hatch.
View attachment 405958
Once the turret halves were together I applied the zimmerit and PE to the exterior.
View attachment 405957
View attachment 405959
And I've also started working on some of the other PE bits.
View attachment 405955
Attachments
1/3
That’s building up really well Bob, great work.
Morning chaps.
I've had quite a productive weekend. The new pins arrived and I was able to finish and install the tracks. I tried burnishing fluid for the first time and I'm reasonably happy with the results. There were a quite a few areas on the outer tracks that didn't take, not quite sure why. The links were given 3 x 8 minute cycles in my ultrasonic cleaner before joining, and well agitated while in the burnishing fluid?? Still, nothing that some weathering won't hide.


With that out of the way I could get on with fitting the PE to the upper hull. The engine covers were quite tricky as they required 1mm standoffs.


I've had quite a productive weekend. The new pins arrived and I was able to finish and install the tracks. I tried burnishing fluid for the first time and I'm reasonably happy with the results. There were a quite a few areas on the outer tracks that didn't take, not quite sure why. The links were given 3 x 8 minute cycles in my ultrasonic cleaner before joining, and well agitated while in the burnishing fluid?? Still, nothing that some weathering won't hide.
With that out of the way I could get on with fitting the PE to the upper hull. The engine covers were quite tricky as they required 1mm standoffs.
G
Guest
Guest
Looking very good
Legal Notice
scalemodelling.co.uk is a privately operated online discussion forum. All content posted by members reflects their own views and opinions and does not necessarily represent those of the forum owners or administrators. While reasonable efforts are made to moderate content, no responsibility is accepted for user-generated material. By using this site, you agree to comply with UK law and the forum rules.