Theme editor

Scale Model Shop

Camouflage masks (RAF)

Status
Not open for further replies.

Neil

Active member
Joined
Nov 25, 2013
Messages
523
Reaction score
159
Points
43
Location
Consett
1/3
Thread owner
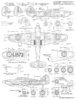
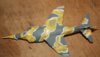
So I have a 1/72 airfix Hurricane to do the camo on, with my first attempts on a 1/48 Spit and Mossie I did these free-hand which, if I ever put pictures up, would show. I have put an initial very thinned flat earth on the hurricane but before going too far what do the experienced folk do for masks?


I know I can buy some from Hannants that are pretty inexpensive but I don't really want to keep buying something that just gets discarded again. I'm guessing that I could scan the box colour scheme in, use photoshop or gimp (have both) to then scale these to the right dimension and print that out?


If I do that, what is the best way to get the dimension, just measure wing-tip to wing-tip and nose to tail?


Neil
 
+1 on Patricks suggestion. I just finished a 1/72 FW and used blue tac. Once you roll it out into thin worm like strips just allow it to contract and then apply it.
 
I would suggest white tac rather than blue tac as it is less likely to leave grease marks.
 
Thread owner
I'm more on about matching the exact pattern, I'm pretty sure somewhere Stona said that RAF markings were very precise, with Luftwaffe it was less exact especially later in the war.


The problem here is that the box for the new airfix art has a plane that is 85mm or so, and the plane itself is probably twice that, so I can't just take a copy of the box art and transfer it without scaling up. That is the bit I was really asking about, having an exact match to the right scale, not what to mark it out with, but where to mark it if that makes more sense?. sorry if that wasn't clear.


Neil.
 
Hi Neil, I scan the instructions, then I measure the actual kit length, width, etc and then using microsoft word, I cropped and measured it at the exact cm/inches with the actual measurement, print it out then trace it to the masking tape. It takes time and effort with Words, but it's easier with photoshop I guess. And hope you understand what I meant lol :P
 
This shows the camouflage scheme for the Hurricane.


View attachment 102253


National markings (roundels, fin flashes) changed over time and that under wing serial was deleted, but the camouflage stayed the same.


Cheers


Steve

View attachment 215276
 

Attachments

  • hurric_marking_zps17nuadvk.jpg
    hurric_marking_zps17nuadvk.jpg
    2.4 KB · Views: 0
I agree with the tac use. Manipulate the tac into thin rolls and cut them and shape them onto the model after the first colour has been applied. Using tac rolls you can also achieve multi-coloured schemes.


Here was a Harrier I used this technique on:


First colour applied (ocean grey in this case):


View attachment 102293


The areas to remain grey were masked off. Make sure your tape seals into the tac edge:


View attachment 102294


The second colour (dark green) applied:


View attachment 102295


The result after the tac and masking removed with the paint dry:


View attachment 102296


I do my camouflage patterns visually from drawings and photographs. If the model is accurate you can get pretty close to placing your camouflage where it needs to be. I hope this may be of use as a simple option for masking Neil.

View attachment 215316

View attachment 215317

View attachment 215318

View attachment 215319
 

Attachments

  • IMG_2126.JPG
    IMG_2126.JPG
    2.5 KB · Views: 0
  • IMG_2129.JPG
    IMG_2129.JPG
    2 KB · Views: 0
  • IMG_2150.JPG
    IMG_2150.JPG
    2.6 KB · Views: 0
  • IMG_2152.JPG
    IMG_2152.JPG
    2.6 KB · Views: 0
As Joe has shown, you can do this even in smaller scales. Use the diagram, or the likely less accurate kit instructions, as a guide. You can roll the 'sausages' fairly thin, particularly at 1/72. Rather than converting measurements use the kits panel lines, gun positions, etc as an aid to creating the correct demarcations.


This 1/72 scale Spitfire was painted using this method.


View attachment 102297


How ever RAF camouflage was applied at the factory, and there is some debate about the exact methods at different points of production, the demarcations between the camouflage colours were strictly regulated. In model scales up to 1/32 this makes the demarcations effectively hard lines. Some choose to soften them as an artistic decision, which is entirely up to them. I would just point out that an incorrectly or loosely sprayed aircraft would not have got past the Ministry inspectors at the factory. It would have been rejected and re-finished.


For aircraft re-sprayed or repaired at a facility post production the demarcations might not be so rigorously controlled.


Cheers


Steve

View attachment 215320
 

Attachments

  • IMG_0993_zpsuwd8hsro.jpg
    IMG_0993_zpsuwd8hsro.jpg
    1.4 KB · Views: 0
i have just purchased some humbrol maskol for this job paint it on and spray over it when your paint is dry peel it off the only thing is the maskol has a really bad smell of amonia
 
Neil your instructions will have a plan showing the camouflage.


I take this, as they are usually not to scale, scan it and using an programme which can scale it up to the correct size. Print the results.


Cut out the parts which are those of the paint base already in position. But undercut a little. Using the rolled white tack fix it to the cut parts overlapping the cut outs (the reason for under cutting). Now lay on the wings or fuselage and press down the white tack. No need for tape as the cut outs perform the job in masking. Leading and back edges of the wings do need taping down.


Wow hope that makes sense. It is easier than trying to write it down.


Laurie
 
you can get the same effects by copying cammo instructions into your computer coverting the files into pdf files download adobe reader and you can scale them to any size you want to you may have to pay to upgrade the adobe software so that you can convert files
 
Status
Not open for further replies.
Back
Top