Theme editor

Scale Model Shop

Centurion3RTR's "Warrior MCV"

Status
Not open for further replies.
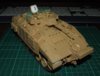
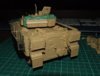
Looks good John ... more importantly its good news about your Dad.... give him our best.
 
Great news about your dad John and a great start on the Warrior ( if you want a challenge dont buy Tamiya ha ha )
 
I thought I recognised that figure :) 
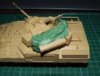
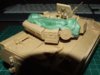
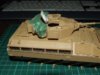
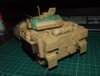
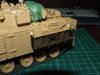
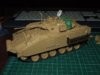
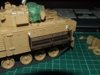
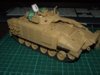
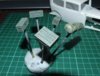
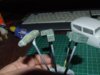
Good work so far, glad to hear about your dad...
 
Thread owner
Not much work done on this, well i say not much but it's being a pain. The basket at the back of the turret is giving me grief, the mesh will not gule down even with superglue. And it's to late in the build to get photo etch parts for it, but i've had an idea to fill it up then cover it with a tarpaulin so you can't see the mesh. The kit does supplied ammo boxs/jerry cans for water and even fold out chairs so i have enough to fill it, my idea is to scratch build the stuff to be covered in the basket and keep the good stuff for something else.

Photos to come as soon as i win the battle with the basket, or it turns me into a basket case.

Have fun, John.

PS, Thanks all for the comments about my Dad. He's ok, he's having a few tests today to see what is going on inside. Things are on the up, he's annoy me "can you do this, can you do that" and i'm happy to do so.
 
Thread owner
Well i said it wan't goin' to beat me and i won this round, fitted some old jerry cans and made something that looked like boxs then just covered it with two part putty. I've save the mesh just in case they come out with a glue that'll stick it down lol. The mesh on the side is from a Tamiya and went on lovely, so all the goodies that was going to go in the turret basket will now go into the side and make it look busy.

View attachment 47706View attachment 47707View attachment 47711View attachment 47709

Tracks are sorted and made a start on the chobham armour.

View attachment 47710View attachment 47708

Right, if anyone else is going to build the Academy Warrior be careful when you start building the accessorys. In step two you build one of two boxs, they are marked up wrong. K48 is for the bottom and is actually K42, and K30 for the back is K48 plus you need the other K30 for the front of the second box.

View attachment 47712

Thats it for now, so as i always say

Have fun, John

View attachment 50612

View attachment 50613

View attachment 50614

View attachment 50615

View attachment 50616

View attachment 50617

View attachment 50618

View attachment 163638

View attachment 163639

View attachment 163640

View attachment 163641

View attachment 163642

View attachment 163643

View attachment 163644
 

Attachments

  • DSCF7387.jpg
    DSCF7387.jpg
    2.7 KB · Views: 0
  • DSCF7394.jpg
    DSCF7394.jpg
    2.3 KB · Views: 0
  • DSCF7392.jpg
    DSCF7392.jpg
    2.3 KB · Views: 0
  • DSCF7391.jpg
    DSCF7391.jpg
    2.5 KB · Views: 0
  • DSCF7390.jpg
    DSCF7390.jpg
    2.8 KB · Views: 0
  • DSCF7389.jpg
    DSCF7389.jpg
    2.4 KB · Views: 0
  • DSCF7388.jpg
    DSCF7388.jpg
    2.7 KB · Views: 0
That tarpaulin looks the part mate (saved that idea for future)

Weird about the mesh not sticking eh?

coming along nicely John
 
Looking very nice work so far John. I like the tarp, How did you make that?

Ian M
 
Thread owner
\ said:
Looking very nice work so far John. I like the tarp, How did you make that?Ian M
Citadel "Green Stuff" it's called, very good too for this type of work. Cut it to the amount you need then roll it together, you'll need something to roll it out (i use the pole cut from a big blank CD case), greaseproof paper and some baby powder. Fold the greaseproof paper in half and dust on some baby powder on one half then place the green stuff on the baby powder, add more baby powder on top of that (trust me, this stuff sticks to anything). Fold the greaseproof paper back then roll the lot flat, to cut it to size i just use the edge of a metal ruler.

Cover what needs to be hidden (sorry, covered) and use a nice soft brush to work it in. If you've made it thin enough it'll just drape naturally after a few minutes but you'll still need to make it look right. The only thing i can say now is get some and have a play about with it, when you get it to look right on the model then it's time to leave it alone to dry for 24 hours.

Hope this helps and have fun, John
 
Thread owner
I was ment to post these yesterday but was at the hospital with my eldest daughter, looks like i'm going to be a grandad (again, woop!!).

Here we go, now we have the wheels and tracks on.

View attachment 47902

All of this needs to go on somewhere lol.......

View attachment 47903

.......so i did a field mod, this is the turret basket for the Tamiya Challenger 1 i had spare. The mesh i found in the spares box and went on nice (just wish i found it for the turret basket on the Warrior :( )

View attachment 47904

And this is where i'm up to now, all good fun. Still some things to go on but it's just about ready for paint.

View attachment 47905View attachment 47906View attachment 47907View attachment 47908View attachment 47909View attachment 47910

Have fun, John

View attachment 50783

View attachment 50784

View attachment 50785

View attachment 50786

View attachment 50787

View attachment 50788

View attachment 50789

View attachment 50790

View attachment 50791

View attachment 163809

View attachment 163810

View attachment 163811

View attachment 163812

View attachment 163813

View attachment 163814

View attachment 163815

View attachment 163816

View attachment 163817
 

Attachments

  • DSCF7403.jpg
    DSCF7403.jpg
    2.4 KB · Views: 0
  • DSCF7402.jpg
    DSCF7402.jpg
    2.4 KB · Views: 0
  • DSCF7401.jpg
    DSCF7401.jpg
    2.7 KB · Views: 0
  • DSCF7400.jpg
    DSCF7400.jpg
    2.4 KB · Views: 0
  • DSCF7399.jpg
    DSCF7399.jpg
    2.4 KB · Views: 0
  • DSCF7398.jpg
    DSCF7398.jpg
    2.3 KB · Views: 0
  • DSCF7397.jpg
    DSCF7397.jpg
    2.8 KB · Views: 0
  • DSCF7396.jpg
    DSCF7396.jpg
    2.6 KB · Views: 0
  • DSCF7395.jpg
    DSCF7395.jpg
    2.5 KB · Views: 0
Looking good, John. Now the exciting part commences - painting and weathering! :)
 
Seems a very, very clean work so far!!

I hope you enjoy painting it!! I'm sure will be fantastic!

Regards

Polux
 
Thread owner
Shouldn't be too long before it's in primer, but as soon as this is finished for the GB i have a big surprise (shock for some) on the way.

Have fun, John
 
Thread owner

Attachments

  • DSCF7420.jpg
    DSCF7420.jpg
    3 KB · Views: 0
  • DSCF7418.jpg
    DSCF7418.jpg
    3 KB · Views: 0
  • DSCF7422.jpg
    DSCF7422.jpg
    2.6 KB · Views: 0
Haven't seen this for a spell, some very nice extras going on John. It looks really well. Nice one.....

Ron
 
Looking great. A nice clean build and should look great with a splash of paint!

What's the car in the back ground?

Ian M
 
Thread owner
Thats a 1932 Ford Sedan Ian, just thought i start something while the heat is on. I did try the airbrush on the Warrior but made a right mess, so cleaned it up and i'll wait until it's a little cooler.

Have fun, John
 
Nice.

I know what you mean about the heat. I have the Pheasant waiting for primer but I daren't put primer in the airbrush until later when it has cooled down a bit.

Ian M
 
Status
Not open for further replies.
Back
Top