Theme editor

Scale Model Shop

Colin M's Trumpeter 1:72 fairey Gannet mk 1 / 4

Status
Not open for further replies.

colin m

Moderator
Staff member
Joined
Dec 26, 2008
Messages
9,113
Reaction score
380
Points
83
Location
Stafford, UK
1/3
Thread owner
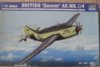
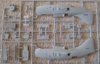
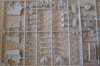
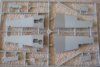
Here's my choice of build for this GB. A welcome return to 1:72 for me after a 1:24 SHAR.


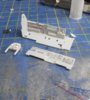
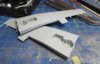
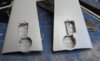
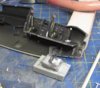
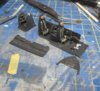
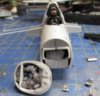
I've never built a Trumpeter kit before. It looks good, but I believe Trumpeter may not be the most accurate kits around. Well this looks like a Gannet, so that will do me.


Anyway, it has a good level of detail and fine recessed panel lines. Right, off to Youtube to watch some Gannet carrier landings.


Colin M....


View attachment 107267


View attachment 107268


View attachment 107269


View attachment 107270


View attachment 220290

View attachment 220291

View attachment 220292

View attachment 220293
 

Attachments

  • IMG_0703.JPG
    IMG_0703.JPG
    2.4 KB · Views: 0
  • IMG_0710.JPG
    IMG_0710.JPG
    2.3 KB · Views: 0
  • IMG_0709.JPG
    IMG_0709.JPG
    2.6 KB · Views: 0
  • IMG_0708.JPG
    IMG_0708.JPG
    2.5 KB · Views: 0
POpcorn in the pan. Comfy seat found.


Begin-


Ian M
 
I'm in Colin, this is a great kit. I found polishing the canopies a bit tricky but apart from that it was good fun. Hope you enjoy it as much as I did.


Jason
 
Thread owner
\ said:
I'm in Colin, this is a great kit. I found polishing the canopies a bit tricky but apart from that it was good fun. Hope you enjoy it as much as I did.
Jason
Eh up, polishing canopies, what have you seen that I haven't ?
 
\ said:
Eh up, polishing canopies, what have you seen that I haven't ?
Hi had a seam straight through the middle of all three canopies. Scraped them off with a blade and polished them back up with micro mesh. It was a bit of a pain. If you don't have that on your canopies then brilliant.
 
Thread owner
\ said:
Hi had a seam straight through the middle of all three canopies. Scraped them off with a blade and polished them back up with micro mesh. It was a bit of a pain. If you don't have that on your canopies then brilliant.
Alas no, my canopies do have the ridiculous seam just as you describe.


Well, masking canopies is probably my least favourite part of a build. I think I've just found something else I'm not going to enjoy.
 
Doh! Thought they might have fixed it. Do what I do Colin and get the worst bits out of the way first. Less likely to run out of enthusiasm that way as well.


One more tip mate, you'll need a LOT of weight in the nose to stop it tail sitting.


Jason
 
Thread owner
\ said:
Doh! Thought they might have fixed it. Do what I do Colin and get the worst bits out of the way first. Less likely to run out of enthusiasm that way as well.
One more tip mate, you'll need a LOT of weight in the nose to stop it tail sitting.


Jason
It certainly does look like a tail sitter. I'll start adding the lead at the spinner and work backwards.............
 
Thread owner
So, I've got a bit of a cold and don't feel like doing much - outside. So, great excuse to play with plastic.


Wendall recently completed one of these and pointed out to me that the canopies, three of them, will need polishing to remove some quite awful moulding lines.


Here is two of the little blighters, moulding lines just visible, but very visible in real life.


View attachment 108642


Start sanding


View attachment 108643


And after lots of polishing, a coat of Klear.


View attachment 108644


Now, the cockpit, well both of them are pretty sparse, so I'm adding just a few bits to liven things up. And yes, we all know, none of this will be visible once the fuselage is closed - why do we do it ??


View attachment 108645


That's it for now............................


Colin M..

View attachment 221665

View attachment 221666

View attachment 221667

View attachment 221668
 

Attachments

  • Cockpit 1.JPG
    Cockpit 1.JPG
    3.2 KB · Views: 0
  • Seams 3.JPG
    Seams 3.JPG
    2.6 KB · Views: 0
  • Seams 2.JPG
    Seams 2.JPG
    2.9 KB · Views: 0
  • Seams 1.JPG
    Seams 1.JPG
    2.7 KB · Views: 0
Thread owner
Cheers Gentlemen,


So, just a bit more. I didn't spend ages on the interior as it really won't be very visible at all, as you can see, quite basic.


View attachment 109188


Just under the cockpit is the front wheel well. Any one else think this is going to be a tail sitter ? Me too, hence the first load of lead going in here.


View attachment 109189


Main gear wheel wells were nearly devoid of any detail, so I glued some bits in, just a few.


View attachment 109190


And finally, the wings were slightly modified, just to avoid a 'totally flat' area. The holes may not be there on the real thing, but this looks a bit better than bare plastic.


View attachment 109191


Right, time to stick a fuselage together.


Colin M...

View attachment 222211

View attachment 222212

View attachment 222213

View attachment 222214
 

Attachments

  • Wing mods.JPG
    Wing mods.JPG
    2.5 KB · Views: 0
  • Wheel well.JPG
    Wheel well.JPG
    2.2 KB · Views: 0
  • Lead.JPG
    Lead.JPG
    3.4 KB · Views: 0
  • Cockpit 1.JPG
    Cockpit 1.JPG
    3.8 KB · Views: 0
Thread owner

Attachments

  • Tail sitter.JPG
    Tail sitter.JPG
    1.7 KB · Views: 0
  • Enough lead.JPG
    Enough lead.JPG
    3.6 KB · Views: 0
Bang goes the Church roofs in Stafford guys.


Great work Colin looking forward to more.
 
Thread owner
\ said:
Bang goes the Church roofs in Stafford guys.
Great work Colin looking forward to more.
Rumbled - doh........
 
Status
Not open for further replies.
Back
Top