Theme editor

Scale Model Shop

Cromwell Cruiser (near completion)

Status
Not open for further replies.

Matt.

New member
Joined
Dec 29, 2018
Messages
96
Reaction score
0
Points
0
1/3
Thread owner
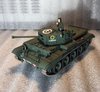
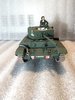
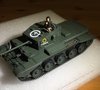
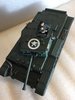
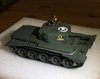
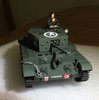
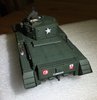
This is my 1st attempt at building a tank, not perfect but I,m happy so far.
I have seen some info on sprue stretching so will give this a go for the antenna.
I’m just wondering if anyone has any tips on painting the rubber tracks. I can easily get them on and off for painting but not sure what primer and paint to use, I have tamiya X and XF and tamiya and Halfords primer.
Any suggestions greatly appreciated as It’s unusual for me to get this close to completion without messing it up.
Had a bit of fun with the star decals due to the surface, I also did some pre shading on the panel lines but think I covered over too much.
View attachment 324349View attachment 324352View attachment 324353View attachment 324351View attachment 324354
 

Attachments

  • E375EDA1-1B28-4897-9AA5-0E9ED2AF4F76.jpeg
    E375EDA1-1B28-4897-9AA5-0E9ED2AF4F76.jpeg
    2.8 KB · Views: 0
  • 81FE9725-D1FA-456D-A288-8B5989E1574A.jpeg
    81FE9725-D1FA-456D-A288-8B5989E1574A.jpeg
    2.8 KB · Views: 0
  • 8EF7F604-1BE9-42F9-BBBD-D4A843281002.jpeg
    8EF7F604-1BE9-42F9-BBBD-D4A843281002.jpeg
    2.3 KB · Views: 0
  • 605EC3D9-C866-4FC3-A883-915757FC57CD.jpeg
    605EC3D9-C866-4FC3-A883-915757FC57CD.jpeg
    2.8 KB · Views: 0
  • DE6EAF50-8FD3-4680-8685-1ADCCCE79122.jpeg
    DE6EAF50-8FD3-4680-8685-1ADCCCE79122.jpeg
    2.8 KB · Views: 0
Matt,
looking good! Before painting the tracks, I suggest you wash them thoroughly in warm soapy water, rinse in clean water, and allow to air dry. THis does help paint adhere, but handle them gently, when painted. I use a dark grey primer, but as long as you give a good basecoat, over it, the colour doesn't matter. Track colours can be anything from metallic grey to rusty brown, you can generally mix up a suitable colour, varying the mix between inside of the track & outside. If it doesn't look right, add lots of weathering & mud!
Dave
 
A very nice tidy build Matt. Firstly if this is the look you are going for ie no weathering, then there probably isnt a great need to paint the tracks. However if you want to add a bit of colour to them then this is what I do with rubber tracks

I always put them in warm soapy water to clean and stretch the tracks and leave them to dry. Then I prime the tracks with black primer and then paint them with Vallejo Acrylic paints. Finally I add a selection of pigments and oil washes.

As for colours to use there are many different ones dependant on the theatre of war you want to base the tank in. Usually Burnt Umber is a good base colour to work with. Then add mud/dust based colours for effect. Also consider a steel/metal colour on areas of the track worn by the wheels or where the track touches the road.

There are other techniques which you can pick up on, the more tracks you do. Remember You Tube and Google are your friends and there are many "How to" blogs/videos on how to paint rubber tracks.

Look forward to seeing how they turn out
 
Matt,
A nice build and the guys have given you good advice on the tracks. The only other thing I would say is before you apply the decals paint the area they will go with some clear gloss when dry then apply the decals this will help prevent the silvering this is where you can see the carrier film around the detail. When they have dried just touch up with some clear matt. Other wise this is a great build.
 
Thread owner
Matt,
A nice build and the guys have given you good advice on the tracks. The only other thing I would say is before you apply the decals paint the area they will go with some clear gloss when dry then apply the decals this will help prevent the silvering this is where you can see the carrier film around the detail. When they have dried just touch up with some clear matt. Other wise this is a great build.
Thanks for the mention on the decals, this is another area where I’ve struggled. I have just moved onto alclad 2 lacquer and got some good results on a spitfire I just did. I tried glossing the tank before decaling but couldn’t get a smooth finish, I was airbrushing the varnish and was probably a little too cautious.
 
Thread owner
A very nice tidy build Matt. Firstly if this is the look you are going for ie no weathering, then there probably isnt a great need to paint the tracks. However if you want to add a bit of colour to them then this is what I do with rubber tracks

I always put them in warm soapy water to clean and stretch the tracks and leave them to dry. Then I prime the tracks with black primer and then paint them with Vallejo Acrylic paints. Finally I add a selection of pigments and oil washes.

As for colours to use there are many different ones dependant on the theatre of war you want to base the tank in. Usually Burnt Umber is a good base colour to work with. Then add mud/dust based colours for effect. Also consider a steel/metal colour on areas of the track worn by the wheels or where the track touches the road.

There are other techniques which you can pick up on, the more tracks you do. Remember You Tube and Google are your friends and there are many "How to" blogs/videos on how to paint rubber tracks.

Look forward to seeing how they turn out
Thanks Steve, as i’m relatively new to the hobby I was trying to stick with the clean look so not trying to learn everything at once. I will probably paint them but go for a metallic grey look rather than muddied up.
 
Thread owner
Matt,
looking good! Before painting the tracks, I suggest you wash them thoroughly in warm soapy water, rinse in clean water, and allow to air dry. THis does help paint adhere, but handle them gently, when painted. I use a dark grey primer, but as long as you give a good basecoat, over it, the colour doesn't matter. Track colours can be anything from metallic grey to rusty brown, you can generally mix up a suitable colour, varying the mix between inside of the track & outside. If it doesn't look right, add lots of weathering & mud!
Dave
Thanks for the advice Dave, I’ll try and go for clean metallic grey.
 
Matt.
You should be pleased with this, the paint work look clean as does the build.
The guys have put you right on the tracks, yours look better than any of my efforts. !
John .
 
I’ve never had problems painting Tamiya tracks (the glueable, soft plastic kind) with Tamiya acrylics. No primer or anything, just brush or spray the paint on and away you go.

As for the colour, I’d advise against metallic grey. Take a light-medium brown and paint them with that, then drybrush with a steel colour. This gives the impression of dirty/rusty tracks with the dirt/rust worn off on the raised bits that contact the road, and is very quick and easy to do.
 
Hi Matt and welcome.
To be really brutal, I can see nothing wrong with what is your first tank. Do not worry about the decals, most would have been hand painted. Glossing for decals - just cover the area where they need to go, or if you are doing an overall wash say with oils then do the whole vehicle it will help the oil paint run a lot better and protect the paint underneath. Stretching sprue, get a candle, make sure it is firmly stuck down with a few drops of wax, mine is in a lid from an old rattle can of primer. Get a coule of inches of round sprue and rotate the centre over the candle. As soos as it starts to sag then remove from the heat and using a steady pull is all you need. A few tries should give you the correct training required to get your certificate in sprue stretching. HTH
Cheers, Mike.
 
Nice clean work and excellent overall. You are now officially an armor builder.:smiling3:
Regards, Rick H.
 
Thread owner
Thanks again everyone for the advice, tracks washed and sprue stretching complete after a lot of practice.
 
sprue stretching complete after a lot of practice.
The positive thing about stretching sprue is that any modeller will have a just about endless supply of material to practice with :)

By the way, sprue retains its cross-section shape when stretched: if you stretch square sprue you will get square stretched sprue, for example. This can come in handy for some things.
 
Thread owner
Cruiser finished, back at work so things have slowed down.
Antenna attached and tracks complete, I ended up washing, priming, airbrushing brown and then dry brushing.

Many thanks to all who helped with suggestions, I am pleased with the tracks and there’s no way I would have achieved this without help.

View attachment 325981View attachment 325985View attachment 325983
 

Attachments

  • A6AD7492-FEB3-4358-A0EB-07AC913B33A3.jpeg
    A6AD7492-FEB3-4358-A0EB-07AC913B33A3.jpeg
    2.9 KB · Views: 0
  • 1FB05C2D-31D8-4251-9A6A-1E5B1B431AE7.jpeg
    1FB05C2D-31D8-4251-9A6A-1E5B1B431AE7.jpeg
    3.3 KB · Views: 0
  • 3AF6159E-F9D6-43C0-9CEA-F3CDDC040720.jpeg
    3AF6159E-F9D6-43C0-9CEA-F3CDDC040720.jpeg
    2.6 KB · Views: 0
Like that, nice job. Tracks look great. Some people overdo the rust on them, but yours are just right.
 
Looking quite nicely there. You’ve got the difficult decal on the turret roof, over the ventilator, down well too by the looks of it.
 
Nice Work Matt, I have a Cromwell in my stash which will be next up on the bench, planning to weather mine, but if it looks as good as this after painting, I will be very happy!
 
Status
Not open for further replies.
Back
Top