Theme editor

Scale Model Shop

Currently building for practice

Status
Not open for further replies.

Richi72

Active member
Joined
Sep 29, 2013
Messages
1,100
Reaction score
0
Points
36
1/3
Thread owner
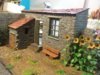
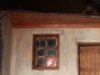
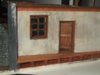
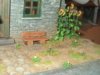
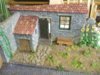
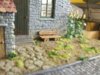
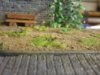
Hello I want to show you 2 models I am currently building to sharpen my building skills.

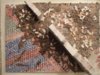
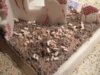
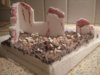
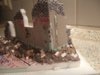
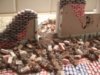
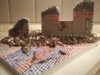
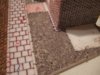
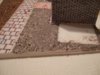
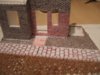
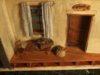
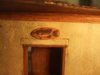
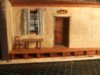
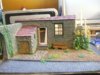
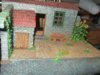
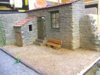
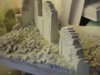
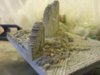
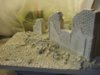
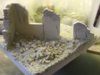
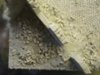
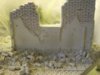
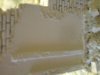
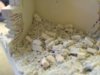
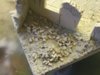
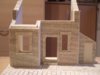
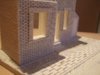
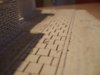
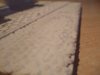
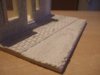
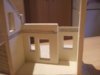
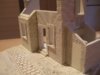
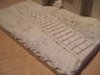
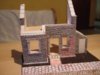
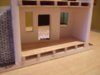
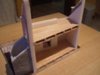
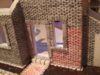
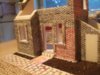
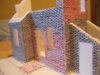
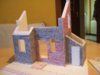
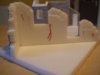
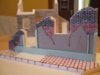
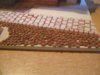
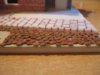
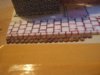
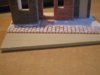
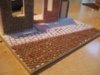
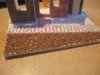
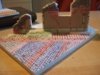
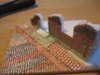
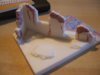
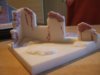
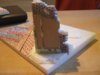
I took some pictures from Miniart and started to build.

I changed the door dimensions because I find them rather large.

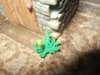
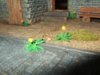
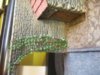
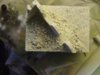
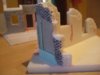
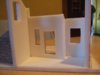
The materials I used so far is depron, selitron that’s the green stuff and some card board

But see for yourself.

View attachment 70219

View attachment 70220

View attachment 70221

View attachment 70222

View attachment 70223

View attachment 70224


If there are any questions don’t hesitate to ask and if you got suggestion also don’t hesitate to tell them.

Cheers Richard

View attachment 70212

View attachment 70213

View attachment 70214

View attachment 70215

View attachment 70217

View attachment 70218

View attachment 183237

View attachment 183238

View attachment 183239

View attachment 183240

View attachment 183241

View attachment 183242

View attachment 183243

View attachment 183244

View attachment 183245

View attachment 183246

View attachment 183247

View attachment 183248
 

Attachments

  • DSCF1756.jpg
    DSCF1756.jpg
    1.9 KB · Views: 0
  • DSCF1755.jpg
    DSCF1755.jpg
    2.3 KB · Views: 0
  • DSCF1754.jpg
    DSCF1754.jpg
    2.5 KB · Views: 0
  • DSCF1753.jpg
    DSCF1753.jpg
    2.1 KB · Views: 0
  • DSCF1752.jpg
    DSCF1752.jpg
    2.7 KB · Views: 0
  • DSCF1751.jpg
    DSCF1751.jpg
    2.5 KB · Views: 0
Very nice Richard, looking good.

Suggestions: Non regarding the building structure, however you could add roof timbers or even a broken floor; use thin wood or plasticard to create beams and lollipop sticks to create floor boards. The curved part of the lollipop stick can also be used as roofing tiles too. You could also score the brickwork and cobbled/kurb stones to give the impression of individual stones, once highlighted they will look better. I know that this is just a test piece but just thought that these suggestions may help on future builds.

I like it mate, keep up the good work.

Si:)
 
Thread owner
Hi Si,

Thanks for the input i definitely integrate some of those ideas.

I did some preparing for the ground work on both models

A while ago I was reading about beans that were used for cobblestones so I gave it a try.

I used some double faced adhesive tape and pused the beans on it. Now I must seal it up.

View attachment 70241

View attachment 70242

View attachment 70243


View attachment 70244

View attachment 70245

View attachment 70246


On the ruined building I have made some more details on the inside and some overall damage to the structure, I also made some elevated places where I can build up the ruble.

View attachment 70248

View attachment 70249

View attachment 70250


View attachment 70251

View attachment 70252


Cheers Richard

View attachment 70247

View attachment 183265

View attachment 183266

View attachment 183267

View attachment 183268

View attachment 183269

View attachment 183270

View attachment 183271

View attachment 183272

View attachment 183273

View attachment 183274

View attachment 183275

View attachment 183276
 

Attachments

  • DSCF1768.jpg
    DSCF1768.jpg
    2.5 KB · Views: 0
  • DSCF1767.jpg
    DSCF1767.jpg
    2.4 KB · Views: 0
  • DSCF1766.jpg
    DSCF1766.jpg
    2.3 KB · Views: 0
  • DSCF1765.jpg
    DSCF1765.jpg
    3.2 KB · Views: 0
  • DSCF1764.jpg
    DSCF1764.jpg
    2.1 KB · Views: 0
  • DSCF1769.jpg
    DSCF1769.jpg
    2.6 KB · Views: 0
  • DSCF1770.jpg
    DSCF1770.jpg
    2.4 KB · Views: 0
  • DSCF1758.jpg
    DSCF1758.jpg
    2.7 KB · Views: 0
  • DSCF1762.jpg
    DSCF1762.jpg
    2.7 KB · Views: 0
  • DSCF1761.jpg
    DSCF1761.jpg
    2.2 KB · Views: 0
  • DSCF1760.jpg
    DSCF1760.jpg
    2.3 KB · Views: 0
  • DSCF1759.jpg
    DSCF1759.jpg
    2.4 KB · Views: 0
I found in 1:35th that dried "mung beans" are about right for cobbles ... my method is laying out a skim of polyfiller on the area that i need doing and just pouring the beans on they find their own little nooks and crannies if you slightly push them down. then just tip off the spare and wait to dry.

My "coutances" diorama has this method used so have a search and a ganders (i dont like posting links to my own work in others threads)
 
\ said:
(i dont like posting links to my own work in others threads)
You are not alone Colin, I and several others had reservations. There was a discussion about linking to your own work a little while ago and there was a convincing consensus that it was perfectly okay to do it. Nobody will think that you are "blowing your own trumpet" when you are in fact trying to help a fellow member.

I'm liking your buildings and terrain Richard, all good stuff!

Cheers

Steve
 
Thread owner
Hi Colin,

thanks for the advice i will take a look (if I can find it;)) at your method. And i don’t mind if you put a link to your work.

Thanks Steve.

So here’s a little update on ground works, the Dutch building not so spectacular just poured white glue with some earth and sand on it.

View attachment 70253

View attachment 70254

View attachment 70255


The ruins also received allot of the glue with sand, stones a little wood and normal bricks.

I have to let it dry for now so tomorrow is another day.

View attachment 70256

View attachment 70257

View attachment 70258


View attachment 70259

View attachment 70260

View attachment 70261


Cheers Richard

View attachment 183277

View attachment 183278

View attachment 183279

View attachment 183280

View attachment 183281

View attachment 183282

View attachment 183283

View attachment 183284

View attachment 183285
 

Attachments

  • DSCF1779.JPG
    DSCF1779.JPG
    3.3 KB · Views: 0
  • DSCF1778.JPG
    DSCF1778.JPG
    3.1 KB · Views: 0
  • DSCF1777.JPG
    DSCF1777.JPG
    2.6 KB · Views: 0
  • DSCF1776.JPG
    DSCF1776.JPG
    2.4 KB · Views: 0
  • DSCF1775.JPG
    DSCF1775.JPG
    3.2 KB · Views: 0
  • DSCF1774.JPG
    DSCF1774.JPG
    2.8 KB · Views: 0
  • DSCF1773.jpg
    DSCF1773.jpg
    2.7 KB · Views: 0
  • DSCF1772.jpg
    DSCF1772.jpg
    2.2 KB · Views: 0
  • DSCF1771.jpg
    DSCF1771.jpg
    2.6 KB · Views: 0
\ said:
Nobody will think that you are "blowing your own trumpet" when you are in fact trying to help a fellow member.
I can see your point ... Its just the thought of taking a reader away from the original thread if they follow my link ... The original poster really deserves to have his/her thread read in its entirety.

Glad its just not me that thinks this way. Thanks Steve.
 
This is looking very good Richard!!

Remember to paint with matt colours, and added, if you want, pigments!

Looking terrific ;)

Colin# I don't think about it...some times I post my links...and you are right!! Will change this incorrect habit :)
 
Sometimes a visual is better than trying to describe so linking to one of your models is acceptable in my book.

Great work Richard, the beans look great, as does the rubble effects. Vey nice indeed.

Si:)
 
\ said:
Colin# I don't think about it...some times I post my links...and you are right!! Will change this incorrect habit :)
Polux, it is perfectly okay to post a link to your work to help show someone else how you have done something.

Richard, apologies for diverting your thread somewhat. I hope you don't mind too much :)

Cheers

Steve
 
Thread owner
 

Attachments

  • DSCF1477.JPG
    DSCF1477.JPG
    2.6 KB · Views: 0
  • DSCF1462.JPG
    DSCF1462.JPG
    2 KB · Views: 0
  • DSCF1460.JPG
    DSCF1460.JPG
    2.5 KB · Views: 0
  • DSCF1459.JPG
    DSCF1459.JPG
    3.3 KB · Views: 0
  • DSCF1455.JPG
    DSCF1455.JPG
    3.1 KB · Views: 0
  • DSCF1401.JPG
    DSCF1401.JPG
    2 KB · Views: 0
  • DSCF1400.JPG
    DSCF1400.JPG
    2.3 KB · Views: 0
  • DSCF1396.JPG
    DSCF1396.JPG
    2.7 KB · Views: 0
  • DSCF1392.JPG
    DSCF1392.JPG
    3.1 KB · Views: 0
  • DSCF1391.JPG
    DSCF1391.JPG
    3.3 KB · Views: 0
  • DSCF1390.JPG
    DSCF1390.JPG
    2.9 KB · Views: 0
  • DSCF1334.jpg
    DSCF1334.jpg
    3 KB · Views: 0
  • DSCF1332.jpg
    DSCF1332.jpg
    2.6 KB · Views: 0
  • DSCF1327.jpg
    DSCF1327.jpg
    3 KB · Views: 0
  • DSCF1337.jpg
    DSCF1337.jpg
    2.8 KB · Views: 0
  • DSCF1320.jpg
    DSCF1320.jpg
    2.6 KB · Views: 0
  • DSCF1309.jpg
    DSCF1309.jpg
    2.9 KB · Views: 0
  • DSCF1307.jpg
    DSCF1307.jpg
    2.9 KB · Views: 0
Very nice!

And lovely details!

PS: Colin (CDW) have proposed a building GB, you should vote it!! And join in, of course :) :) :)
 
Hi Richard,

Seeing this build of yours, I would have to say you really don't need to practice, it is stunning...

Andy...
 
Thread owner
 

Attachments

  • DSCF1784.jpg
    DSCF1784.jpg
    2.7 KB · Views: 0
  • DSCF1783.jpg
    DSCF1783.jpg
    2.5 KB · Views: 0
  • DSCF1781.jpg
    DSCF1781.jpg
    2.4 KB · Views: 0
  • DSCF1785.jpg
    DSCF1785.jpg
    2.6 KB · Views: 0
  • DSCF1786.jpg
    DSCF1786.jpg
    2.5 KB · Views: 0
  • DSCF1787.jpg
    DSCF1787.jpg
    2.7 KB · Views: 0
  • DSCF1793.jpg
    DSCF1793.jpg
    2.4 KB · Views: 0
  • DSCF1792.jpg
    DSCF1792.jpg
    1.9 KB · Views: 0
  • DSCF1791.jpg
    DSCF1791.jpg
    2.5 KB · Views: 0
  • DSCF1790.jpg
    DSCF1790.jpg
    2.7 KB · Views: 0
Beautiful work Richard very nice attention to detail, you should use this as more than a test piece.

scott
 
Very nice work Richard. It looks like you don't need much more 'Practice' ;)

About the linking to own build threads. It is OK to do this but if you are afraid of pulling the reader away from the original post, you could always just post a picture in the original posters thread. Something like this.

Her is what I did when I had this problem/idea......Insert photo..... If you want to see more you can look here....insert link.

I am sure that there is no one that would get the hump over being helped in that way.

Richard. That material used in the walls, is it the white foam art board type of thing?

Ian M
 
Thread owner
Hi you all,

thanks allot.

# Ian the material for the wall and street are called depron it is isolation foam normally used in the house. In Germany you can get 6mm and 3mm thickness, I came in contact with this material when I was building RC Planes, and was wondering if it could be used to make walls and streets and it worked.

So here are the updates on the Dutch building

I made some extra details on the walls made some floors (thanks Si) and some extra stones on the top. After that I put a layer of primer on it witch will take a couple of hours to fully cure.

But see for yourself here are the pictures

View attachment 70465

View attachment 70466

View attachment 70467

View attachment 70468

View attachment 70469

View attachment 70470

View attachment 70471

View attachment 70472

View attachment 70473

View attachment 70474

View attachment 70475

View attachment 70476

View attachment 70477


Cheers Richard

View attachment 183489

View attachment 183490

View attachment 183491

View attachment 183492

View attachment 183493

View attachment 183494

View attachment 183495

View attachment 183496

View attachment 183497

View attachment 183498

View attachment 183499

View attachment 183500

View attachment 183501
 

Attachments

  • DSCF1807.jpg
    DSCF1807.jpg
    2.3 KB · Views: 0
  • DSCF1806.jpg
    DSCF1806.jpg
    2.3 KB · Views: 0
  • DSCF1805.jpg
    DSCF1805.jpg
    2.1 KB · Views: 0
  • DSCF1804.jpg
    DSCF1804.jpg
    1.8 KB · Views: 0
  • DSCF1803.jpg
    DSCF1803.jpg
    2 KB · Views: 0
  • DSCF1802.jpg
    DSCF1802.jpg
    2.1 KB · Views: 0
  • DSCF1801.jpg
    DSCF1801.jpg
    2.2 KB · Views: 0
  • DSCF1800.jpg
    DSCF1800.jpg
    2.2 KB · Views: 0
  • DSCF1799.jpg
    DSCF1799.jpg
    2.6 KB · Views: 0
  • DSCF1798.jpg
    DSCF1798.jpg
    2.3 KB · Views: 0
  • DSCF1797.jpg
    DSCF1797.jpg
    2.3 KB · Views: 0
  • DSCF1796.jpg
    DSCF1796.jpg
    3 KB · Views: 0
  • DSCF1795.jpg
    DSCF1795.jpg
    3 KB · Views: 0
Looking spot on Richard, good effects there. The flooring looks spot on ;)

I love the cracked paving and the overall appearance and scale is spot on, well set and thought out. Great build from me despite you saying it is practice.

Si:)
 
Status
Not open for further replies.
Back
Top