Theme editor

Scale Model Shop

Cyber Hobby (Dragon) Bf109E Trop

Status
Not open for further replies.
Thread owner
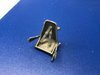
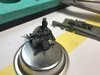
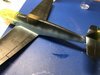
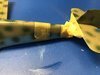
Over the weekend I tried attaching the painted seatbelts to the painted seat with superglue but it just would not grip and repeated attempts made a mess of the paint. In the end I decided to sand off the superglue and strip the paint with ipa. I am now using poly cement to attach a fresh set of seatbelts to the seat and then I will paint 'in situ' as that did work well before. This is how it looksnow with one end of the seatbelts anchored. I will bend them over and cement into position when fully dry.
View attachment 301449

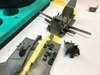
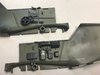
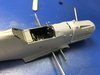
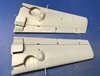
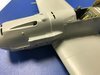
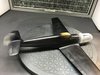
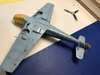
The nose parts fitted very well and I decided to cement those into place.
View attachment 301448
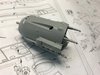
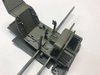
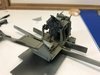
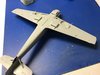
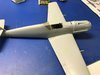
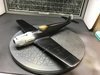
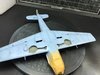
the interior is painted and in need of weathering. I will post some close ups when done but for now...
View attachment 301450
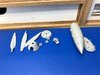
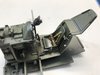
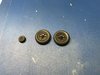
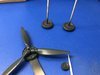
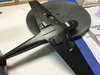
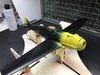
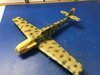
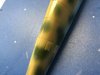
I have also been preparing some other sub-assemblies.
View attachment 301451
 

Attachments

  • IMG_3385.jpg
    IMG_3385.jpg
    2.7 KB · Views: 0
  • IMG_3387.jpg
    IMG_3387.jpg
    2 KB · Views: 0
  • IMG_3388.jpg
    IMG_3388.jpg
    3.3 KB · Views: 0
  • IMG_3389.jpg
    IMG_3389.jpg
    2.8 KB · Views: 0
Thread owner

Attachments

  • E0D9F250-8F47-4B2E-B43F-219DC9EC417D.jpeg
    E0D9F250-8F47-4B2E-B43F-219DC9EC417D.jpeg
    3.5 KB · Views: 0
  • D479BDF8-6180-4D1A-B282-BE485197049F.jpeg
    D479BDF8-6180-4D1A-B282-BE485197049F.jpeg
    3.1 KB · Views: 0
  • BACD33D6-63CC-4F18-AC31-0C8DA87692BB.jpeg
    BACD33D6-63CC-4F18-AC31-0C8DA87692BB.jpeg
    3.1 KB · Views: 0
  • 8459B24C-7046-4F77-801D-41602C68792A.jpeg
    8459B24C-7046-4F77-801D-41602C68792A.jpeg
    3.3 KB · Views: 0
  • 493DD590-A4B7-4708-BA51-01D485AF21A5.jpeg
    493DD590-A4B7-4708-BA51-01D485AF21A5.jpeg
    3.5 KB · Views: 0

Hi Barry,

If only I had seen this sooner. I believe the parts fit a step above the floorboard. There is a notch on the part that slots into a cut out on the two vertical frame that are opposite each other on the same line as the joystick. Leave it if you have already finished the cocpit 'cos nobody is going to look all the way down the floorboards just to see that it's left off.

Cheers,
Richard
 
Thread owner
Some more progress shots. Slow work but I am getting there.

View attachment 303224View attachment 303225View attachment 303226View attachment 303227View attachment 303228View attachment 303229View attachment 303230
As you can see I am working on fitting the nose to the main airframe. The fit is not bad but it does take some work and a spot of filler. I think the model was not designed to be built ‘buttoned up’.

I have also laid down some paint on other sub assemblies with some detail painting to do.
 

Attachments

  • FC271697-9DAF-4651-9689-387848053D3A.jpeg
    FC271697-9DAF-4651-9689-387848053D3A.jpeg
    2.5 KB · Views: 0
  • 3CE51386-75FF-414A-A461-7F835071FBE4.jpeg
    3CE51386-75FF-414A-A461-7F835071FBE4.jpeg
    3.5 KB · Views: 0
  • D4615088-731C-4CDC-B724-840DB322944B.jpeg
    D4615088-731C-4CDC-B724-840DB322944B.jpeg
    3.1 KB · Views: 0
  • 7799A568-3BBA-4A41-BEAE-E67B19681B3B.jpeg
    7799A568-3BBA-4A41-BEAE-E67B19681B3B.jpeg
    2.8 KB · Views: 0
  • 1EF98CF5-0FED-41D2-8B04-130DA06C0F4C.jpeg
    1EF98CF5-0FED-41D2-8B04-130DA06C0F4C.jpeg
    3.2 KB · Views: 0
  • 45517AC8-8AB7-4DFA-84FE-6AE4C147D75A.jpeg
    45517AC8-8AB7-4DFA-84FE-6AE4C147D75A.jpeg
    3.4 KB · Views: 0
  • FCACA44E-D8E7-41FA-AA3F-F6ADE633C132.jpeg
    FCACA44E-D8E7-41FA-AA3F-F6ADE633C132.jpeg
    3.2 KB · Views: 0
Thread owner

Attachments

  • CD466C0A-22A3-4D49-AD9B-F131B24155CA.jpeg
    CD466C0A-22A3-4D49-AD9B-F131B24155CA.jpeg
    3.5 KB · Views: 0
  • 3A408717-15B8-4D76-B0D6-176D2FCE5FB5.jpeg
    3A408717-15B8-4D76-B0D6-176D2FCE5FB5.jpeg
    3.1 KB · Views: 0
  • 4BD84885-FCC9-4484-9AB0-FEFC7B4606F6.jpeg
    4BD84885-FCC9-4484-9AB0-FEFC7B4606F6.jpeg
    2.9 KB · Views: 0
  • 126B39C2-92D0-44E8-8EB7-9A08EC2766FB.jpeg
    126B39C2-92D0-44E8-8EB7-9A08EC2766FB.jpeg
    3.3 KB · Views: 0
Thread owner
I have finished priming and on checking joins found very little corrective work to do thanks to plenty of preparation.

Yellow being known for poor coverage I then sprayed the nose and tail with the MRP sand primer, just a light coat to tone down the contrast before spraying RLM04 Gelb. I got the fairly subtle modulated effect I want.

Tomorrow I will spray RLM78 underside.
View attachment 304221View attachment 304222View attachment 304223View attachment 304224View attachment 304225View attachment 304226
 

Attachments

  • A4E035A4-AD42-486B-A46E-970162D6C9D1.jpeg
    A4E035A4-AD42-486B-A46E-970162D6C9D1.jpeg
    3.7 KB · Views: 0
  • 24E15D2B-2D33-47EB-B6ED-EB42C050A12F.jpeg
    24E15D2B-2D33-47EB-B6ED-EB42C050A12F.jpeg
    3.6 KB · Views: 0
  • 16F29385-16EC-4216-8B74-BA67BE6495F7.jpeg
    16F29385-16EC-4216-8B74-BA67BE6495F7.jpeg
    3.4 KB · Views: 0
  • F139BF8F-0043-453C-8C4A-3C804EAE1293.jpeg
    F139BF8F-0043-453C-8C4A-3C804EAE1293.jpeg
    3.5 KB · Views: 0
  • CE269D7C-17DC-450F-83C6-736CC7C5F729.jpeg
    CE269D7C-17DC-450F-83C6-736CC7C5F729.jpeg
    3.6 KB · Views: 0
  • C28C1BB4-5912-477A-A5A5-3535D2CF5214.jpeg
    C28C1BB4-5912-477A-A5A5-3535D2CF5214.jpeg
    3.9 KB · Views: 0
Hi Barry,
lovely work so far, the dashboard looks very good the dials look perfect
 
Thread owner
A bit more progress painting the RLM78 underside and lower sides. The lack basing has left me with the modulate colour effect I was after. Very pleased with the result.

I will be masking up for the top-side and also masking the wheel wells to paint them RLM02 next.

View attachment 304343View attachment 304344
 

Attachments

  • 8920A114-7A7C-49E9-B700-8D10328F6BDB.jpeg
    8920A114-7A7C-49E9-B700-8D10328F6BDB.jpeg
    3.3 KB · Views: 0
  • 15074E2C-1E5C-48DD-9819-9BC571F3D86B.jpeg
    15074E2C-1E5C-48DD-9819-9BC571F3D86B.jpeg
    3.4 KB · Views: 0
Hi Barry
Great progress. Really admire your organised, neat approach. Quality results show it is all worth while. Impressed with anyone who can spray yellow so well :thumb2:
Jim
 
Thread owner
A little more done.

The wheel wells painted RLM02.

I am hoping to spray the topside RLM79 tonight and may get a little more done tomorrow morning. But then I am flying off to Cyprus for a week and won’t get back to the bench for a bit. I am hoping to have the time to make another post before I go.
View attachment 304388
 

Attachments

  • F53CF42B-5639-4963-89B2-291A9663DE15.jpeg
    F53CF42B-5639-4963-89B2-291A9663DE15.jpeg
    3.5 KB · Views: 0
Thread owner
My final post before I am off to Cyprus today.

RLM79 and RLM80 done.

I will do the white band when I am back. The pictures I have seen suggest it was applied over the camo so I am doing the same.

View attachment 304448
 

Attachments

  • 093B5B9A-7A5D-411B-A5EA-7B73DD048E99.jpeg
    093B5B9A-7A5D-411B-A5EA-7B73DD048E99.jpeg
    3.3 KB · Views: 0
Thread owner
Back from Pafos today and unlikely to get some bench time before Monday night. I did manage to grab a few minutes while waiting to leave for the airport to mask up the white band.

I used Tammy tape cut for ‘spacers’ to set where my base line would be measured against a panel line.
View attachment 305215
With one good base line it makes positioning the other side easy. Then some tape to widen the mask. I may widen it more before spraying.
View attachment 305216
Only when the mask is removed will I be able to tell if it worked. Next post.
 

Attachments

  • BE217A32-571F-4372-BE66-FC0D096C8F80.jpeg
    BE217A32-571F-4372-BE66-FC0D096C8F80.jpeg
    2.7 KB · Views: 0
  • 6379E4B6-E6F8-4D75-A890-F827688DCE1B.jpeg
    6379E4B6-E6F8-4D75-A890-F827688DCE1B.jpeg
    3.1 KB · Views: 0
Hi Barry
Hope you had a great holiday. We love Cyprus - we stay in the Troodos Mountains.
Fingers crossed for the masking - always a nervous time unmasking.
Jim
 
Status
Not open for further replies.
Back
Top