
You are using an out of date browser. It may not display this or other websites correctly.
You should upgrade or use an alternative browser.
You should upgrade or use an alternative browser.
Dave Ward's 1/35 ICM Ford V3000
- Thread starter Dave Ward
- Start date
- Status
- Not open for further replies.
The chassis dried overnight. I've added the front springs, engine, radiator. and propshafts, connecting to the rear axles and springs....................
View attachment 309138View attachment 309139
The load bed rails have been added, with their very fiddly 'U' bolts. No real problems with fit, plenty of dry fitting..........
Next will be the exhaust, and the front axle
Dave
View attachment 309138View attachment 309139
The load bed rails have been added, with their very fiddly 'U' bolts. No real problems with fit, plenty of dry fitting..........
Next will be the exhaust, and the front axle
Dave
Attachments
The chassis is now complete, and awaiting priming - it's a bit hot at the moment, so that will have to wait. The assembly has fragile bits hanging off, so less handling the betterView attachment 309186
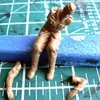
The exhaust is a bit tricky, 7 parts, with no real positive location - just a touch of filler to blend two of the jointsView attachment 309187
The wheels are assembled, and also await priming
View attachment 309188
Load bed will be next..................
Dave
The exhaust is a bit tricky, 7 parts, with no real positive location - just a touch of filler to blend two of the jointsView attachment 309187
The wheels are assembled, and also await priming
View attachment 309188
Load bed will be next..................
Dave
Attachments

Managed to prime the chassis and wheels last night, and basecoated this morning, before the temperature got too high.View attachment 309301
I'm using Lifecolor Dunkelgelb - it dried very quickly -too quickly - the nozzle was beginning to block, and made me do a deep clean on the airbrush. I see that I've bent one of the running board supports - they are very thin.
That may be it for the day, the temperature has hit 26C, and I'm going to sit and watch the Tour de France, with a few cold drinks..........................
Dave
Attachments

G
Guest
Guest
Great work on the chassis Dave, it does look complex to me, with some very thin parts.
John .
John .
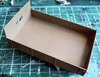
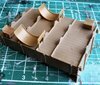
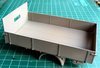
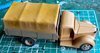
The load bed assembled - a minimum of clean up, and good fit.View attachment 309419View attachment 309420
Whilst looking for this - a leaning driver............................View attachment 309418
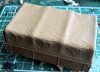
I found a one piece canvas tilt........................
View attachment 309421
No idea what it's from ( I suspect Italeri ), but it's a very good fit - another alternative
Dave
Whilst looking for this - a leaning driver............................View attachment 309418
I found a one piece canvas tilt........................
View attachment 309421
No idea what it's from ( I suspect Italeri ), but it's a very good fit - another alternative
Dave
Attachments
G
Guest
Guest
Who's lucky ?:smiling4:
G
Guest
Guest
Hi Dave great work, keep it coming.
Pete :thumb2:.
Pete :thumb2:.
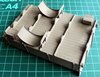
I was up early, and primed the load bed OK. I then basecoated - about 3 hours later, but the temperature had gone up enough to cause severe problems with the airbrush. Took me about 1/2 hour to complete, normally a 5 minute job! Then another deep clean of the a/b.
View attachment 309492View attachment 309493
Not sure if it's the Lifecolor paint, but it seems particularly prone to this tip drying
Dave
View attachment 309492View attachment 309493
Not sure if it's the Lifecolor paint, but it seems particularly prone to this tip drying
Dave
Attachments
G
Guest
Guest
Looks ok to me Dave, you should try brush painting a whole tank in this weather it's great fun "NOT".
Pete.
Pete.
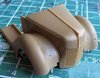
Just a short time at the bench today - the front bodywork, and bonnet assembled.View attachment 309630
Just TET run into the joints - everything fitting nicely
Dave
Just TET run into the joints - everything fitting nicely
Dave
Attachments
Dave,
I love these old Fords, in many ways they were the backbone of the Wehrmacht in supply and troop transport. Here are a few of mine. 1/87 scale mind you. Older and Bolder. Cheers Rick H.View attachment 309657
I love these old Fords, in many ways they were the backbone of the Wehrmacht in supply and troop transport. Here are a few of mine. 1/87 scale mind you. Older and Bolder. Cheers Rick H.View attachment 309657
Attachments

Always a slight moment of tension - the wheels - do they all touch the ground?View attachment 309688
The answer is yes - the care taken to ensure the chassis is square paid off.
Dave
The answer is yes - the care taken to ensure the chassis is square paid off.
Dave
Attachments
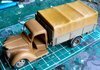
At the stage of dryfitting the bodywork to see if there are any problems..................View attachment 309761View attachment 309762
Don't think there are any major issue - so I can move onto the cab interior.
Temperature here has hit 30C, thunderstorms forecast. Bench time inversely proportional to temperature!
Dave
Don't think there are any major issue - so I can move onto the cab interior.
Temperature here has hit 30C, thunderstorms forecast. Bench time inversely proportional to temperature!
Dave
Attachments
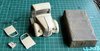
Had a bad day, yesterday, 10C cooler than Friday - decided to basecoat the bodywork.
I've come to the conclusion that Lifecolor paint doesn't like me, or perhaps my airbrush ( Iwata Neo CN ). No sooner than I started spraying, the tip choked, and again, and again. I deep cleaned the a/b and tried again - same result! I had to go and sit down to get my blood pressure back to normal.
I decanted the Lifecolor paint into a new bottle, leaving any solids in the bottom of the old bottle. Added a few drops of water, then got out my old cheap Chinese back up a/b ( <£12 from Amazon ). No problem..................View attachment 309893
It could be that the paint is rather old, but I mixed it thoroughly, and diluted it to the normal consistency. That I was able to eventually spray it, albeit with a cheap airbrush leaves me a bit puzzled. Anyway, I've cleaned the Iwata, and it sprays OK now - with different paint!
Dave
Attachments
1/3
Hi Dave
This might be a particle size issue? What sized nozzles do these brushes have? Could be the cheapo has a 0.4 mm nozzle and the Iwatta has a 0.2 mm nozzle?
Cheers
Tim
This might be a particle size issue? What sized nozzles do these brushes have? Could be the cheapo has a 0.4 mm nozzle and the Iwatta has a 0.2 mm nozzle?
Cheers
Tim
- Status
- Not open for further replies.
Legal Notice
scalemodelling.co.uk is a privately operated online discussion forum. All content posted by members reflects their own views and opinions and does not necessarily represent those of the forum owners or administrators. While reasonable efforts are made to moderate content, no responsibility is accepted for user-generated material. By using this site, you agree to comply with UK law and the forum rules.