Theme editor

Scale Model Shop

Dave Ward's 1/48 ICM Henschel Hs 126A-1 Condor Legion

Status
Not open for further replies.
Thread owner
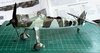
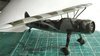
OK, approaching the critical point of the build, the mounting of the top wing. View attachment 306980

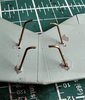
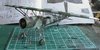
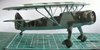
I had a tussle with the fuselage decals - there are supposed to be four angled lines per side of the fuselage - I ended up with 2. Despite painting with clear varnish, the others just disintegrated to dashes......View attachment 306981
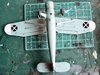
Ah well, they're not THAT visible. Next up is a coat of varnish, to seal everything in, and flatten things a little. Aside from the wing, the last major part is the bomb & carrier, but there are still a few minor details to go.
Dave
 

Attachments

  • nearly 01.jpg
    nearly 01.jpg
    2.4 KB · Views: 0
  • nearly 02.jpg
    nearly 02.jpg
    2.5 KB · Views: 0
Thread owner
I had hoped to have fitted the top wing, but.................................View attachment 307173
I fitted the struts to the fuselage - OK. Then, it all went pear shaped. The location pins to the top wing are really too small to give any positive fit. Out came the CA - it was one of those days that it would NOT stick. I tried for over an hour, and then, I managed to break the small struts on the fuselage top. I repaired those, then had another go - success! But no, the fuselage was not at 90 degrees to the wing, and rotated as well. My efforts to get it all straight - and it all came apart again. At that point I decided that I had better leave it for the day! Hopefully I will be able to sit down and sort this out. I'm not sure how, but that wing will be attached.
Dave
 

Attachments

  • strutz----.jpg
    strutz----.jpg
    4 KB · Views: 0
Thread owner
After a ponder on the problem, I realised that the thin struts on top of the fuselage were never going to be strong enough, so, using some brass wire I made 4 replacements - I'll have to add a cross brace from plastic after everything is aligned - 4 holes drilled in top wing to take the wire..............View attachment 307194
You can see that I've caused a bit of a mess around the strut locations.that'll need to be cleaned up.
The large 'y' struts had poor locations, so, I've drilled the ends, and added pins to really fix things
View attachment 307195

It's all going to need quite a bit of clean up - but at least nothing will fall apart!
This is really taking me back to the 70s & 80s, when vacform airplanes were my thing!
Dave
 

Attachments

  • strut pins.jpg
    strut pins.jpg
    3.8 KB · Views: 0
  • cabanes.jpg
    cabanes.jpg
    3.4 KB · Views: 0
It's fighting you all the way Dave, but your putting up one hell of a fight yourself . Keep it up and the pictures a coming.
 
Thread owner
The wing has been mounted - whew!
View attachment 307244View attachment 307245
I managed to bend the stbd. 'Y' strut, but there are additional struts that I hope will straighten that out.
This model is not for a beginner, The parasol wing is difficult to assemble, and get everything more or less lined up and straight ( more or less? ). I think the wing is mounted 4 or 5mm too high, but now it's fitted, it's tough!
Dave
I've just measured, and I think it's 2mm too high! - good enough! :thumb2:
 

Attachments

  • wing added 02.jpg
    wing added 02.jpg
    2.3 KB · Views: 0
  • wing added 01.jpg
    wing added 01.jpg
    2.3 KB · Views: 0
Dave,
See your having a problem with the struts. If you have some brass or aluminium tubing that is about half the width of the strut, cut it to just over length, enough to hold with your fingers and then squeeze it gently between plain vice jaws, and that should give you aerofoil strut material.
Great to see you have overcome the paint and decal problems.
Cheers, Mike.
 
Tough break on the wing Dave but you seem to have recovered well. From this angle it looks good!
Got er done.
Rick H.
 
Thread owner
I've added the final struts, and bomb carrier...........................View attachment 307346View attachment 307345

I'm going to put PVA on the metal struts, to make them less 'round'. I'm going to repair all the damage I caused by the strut saga. I'm not sure whether the finish is going to be matt or satin - which I'll have to decide before fitting the canopy............. These high temperatures really reduce my enthusiasm for benchtime!
Dave
 

Attachments

  • all struts 02.jpg
    all struts 02.jpg
    2.5 KB · Views: 0
  • all struts 01.jpg
    all struts 01.jpg
    2.4 KB · Views: 0
Thread owner
At this point in my builds, I am thinking about what comes next - I've been looking in my stash, and found 2/3 models that caught my attention 2 trucks by ICM The Ford V3000S in either all wheels or Maultier version ( I found both in the maultier box! ). The other is Hobby Boss ZTZ 99 Chinese MBT. I can't decide at the moment..................
Dave
 
Nice work to solve a difficult problem. Perseverance certainly pays off.
Tim
 
I'm with Tim,
You stuck with it and the end result is great. Looking forward to the Completed posting.
Rick H.
 
Hi Dave
You have certainly had more than your fair share of problems to overcome with this. You have done it though and it is looking great. That paint job is a real eye catcher.
Jim
 
That masking worked out well, nicely done!

Seeing the clear instrument panels was a surprise.
Got me thinking... perhaps one could paint the panel part as usual, leaving the instruments clear.
Then paint on the backside: first the markings in white and then the background of the gauges afterwards, leaving the clear plastic visible over the painted gauges to give the look of glass.
 
Thread owner
Kevin,
I put a drop of masking fluid on each of the instruments, then painted the panel front RLM 02. I then painted the back of the panel black. The masking fluid was removed - finish!
The dials are small, and once I get the canopy on, you won't be able to see a great deal! I'm afraid that I think that a decal would have been better & easier!
Dave
 
Well it looks like you finally won that battle Dave. It's looking great.
I like the idea of the Ford V3000s all wheeled. If you've not already chosen.
 
Yep, for all you see in 1/48 the extra work probably isn't worth it, but like the detailed cockpit interiors, it's more satisfaction that you know it's there I guess.
It would be great for larger scale, something like a 1/32 Huey control panel where you can really show it off with the doors open.

Lovely job, nevertheless, especially the scratchery to fix the struts.
 
Very nice looking paint job Dave, great to read that beside all the troubles this one gave you, you've overcome all.:thumb2:
Hope the last bits go on easily and looking forward to see the finished photo's.
 
Status
Not open for further replies.
Back
Top