Theme editor

Scale Model Shop

Dave Ward's Revell/ICM 1/48 Beech C-45F Expeditor

Status
Not open for further replies.

Dave Ward

New member
Joined
Apr 27, 2018
Messages
10,549
Reaction score
43
Points
0
1/3
Thread owner
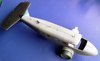
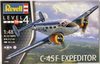
Feeling a need for a bit of a break, I've been away from the bench for a while. I don't feel like messing with the unfinished Gangut ( yet ), so I looked in the stash for something not too complicated, and I came up with this View attachment 323964
Revell reboxing of ICM's 2014 Beech C-45F
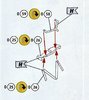
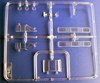
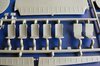
A few sprue & detail shots
View attachment 323962View attachment 323966
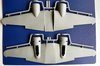
Nice clean mouldings, no flash. One piece wings will take care of dihedral, but may give a nasty joint to clear up around the engine cowlings.View attachment 323960View attachment 323965
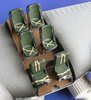
Seats, in several pieces for each, and decals for belts - not sure about how much will be seen!
View attachment 323961
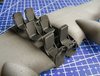
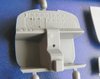
Single piece enginesView attachment 323963
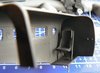
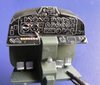
Control panel - again not sure how much will be seen......................
Choice of two decal sets, a RN version from Malta in 1949, and a USAF from 1948. Only difference, colour wise is that the USAF version has yellow cowls - which I think I'll go for.
An all metal finish is always a challenge!
Dave
 

Attachments

  • clear bits.jpg
    clear bits.jpg
    3.3 KB · Views: 0
  • engines.jpg
    engines.jpg
    2.8 KB · Views: 0
  • fuselage.jpg
    fuselage.jpg
    2.5 KB · Views: 0
  • panel.jpg
    panel.jpg
    2.5 KB · Views: 0
  • revell expeditor.jpg
    revell expeditor.jpg
    3.2 KB · Views: 0
  • seats.jpg
    seats.jpg
    3.4 KB · Views: 0
  • wings.jpg
    wings.jpg
    3.1 KB · Views: 0
Made me think of the "Sky King" tv series, although that private plane was all white. PaulE
 
this looks interesting, dont think ive seen one of these before, let alone one built
 
Thread owner
Revell seem to have a habit of buying small batches from ICM & putting them out reboxed, often at a lesser cost than the original maker! I've picked up quite a few ICM beauties this way, the best being the 1/48 Mig-25RBT, which I blogged recently. - I have a 1/48 Dornier Do215B-5, by ICM, reboxed by Revell lurking in the stash - there are others too! You have to be quick, though, they don't seem to be on sale for long.
Dave
 
Hi Dave this should be a nice build an it makes me think of the plane in a mad mad mad world where mickey roony couldn't land the plane as pilot was drunk a very funny film. Anyway lookin forward to the build chris
 
Thread owner
New scalpel blade in, and construction starts. I decided to start with the undercarriage - it looked the trickiest. It was!, not helped by an error in the instructions. View attachment 323976
Same numbers for the bottom two parts! Took a bit of figuring out, and I'm still not sure I've got the right parts in the right places, but it looks OK, if a bit fragile. I'll let it dry overnight, then maybe strengthen it with some CA
View attachment 323977
I think it was painted - the control surfaces were fabric coated - so it wasn't of an 'all metal' construction
Dave
 

Attachments

  • mistake.jpg
    mistake.jpg
    3 KB · Views: 0
  • uc bays.jpg
    uc bays.jpg
    2.3 KB · Views: 0
Thread owner
A little more assembly - I'll have to get the primer out, before the next stage - I'll have to detail paint the engines, before sandwiching everything between the wing halves
View attachment 324093View attachment 324094
I'll leave the mould seam on the engine, it'll be invisible when assembled.
Sadly, when you look from the underneath - even without the main undercarriage leg & doors - not a lot to be seen!
View attachment 324095
Dave
 

Attachments

  • P1050635.JPG
    P1050635.JPG
    2.3 KB · Views: 0
  • P1050634.JPG
    P1050634.JPG
    2.5 KB · Views: 0
  • P1050633.JPG
    P1050633.JPG
    2 KB · Views: 0
Hi Dave very neat build comin on great an there are no finger tip glue marks as I some times have on some of my builds as some times im in a hurry to join bits togeather hence glue marks but I gently sand them away with fine sand paper as im used to building a lot bigger models an it does not show chris
 
Nice start Dave:thumb2:, as I have this one too in the stash I'll follow along to see how you tackle it.
 
Thread owner
I use Revell Contacta - with the fine metal tube, and Tamiya Extra Thin, with its' fine brush applicator - to put the glue where it's needed! Any mistakes, I let dry, and scrape off with a scalpel blade.
Dave
 
Thread owner
Added bulkheads to fuselage, assembled all the seats - 5 x passenger ( 3 parts ), 2 x pilots (5 parts ), a bit over engineered! Added to the upper wing, then primed as much as I can at the moment....................
View attachment 324266View attachment 324267View attachment 324268View attachment 324270

The seats have decals for belts, lap for passengers, full harness for pilots, & the panel has a large decal...........View attachment 324269

I have to decide what colour to paint the interior - Revell have their usual crappy 'mix' instructions using their paint. I think that they have things wrong, they say the interior was similar to yellow zinc chromate, and the u/c bays and doors were grey-green. I would think it was the other way round! I've looked for pictures on the 'net, but can only find modernised & refurbished interiors ( giveaways are fancier seats! )
Fit so far has been very good, the instructions need careful study, as numbers are wrong, and some things are missed, but nothing a little commonsense can't solve
Dave
 

Attachments

  • engnes & panel primed.jpg
    engnes & panel primed.jpg
    2.7 KB · Views: 0
  • fuselage primed.jpg
    fuselage primed.jpg
    2.5 KB · Views: 0
  • rear seat.jpg
    rear seat.jpg
    2.9 KB · Views: 0
  • seatbelts.jpg
    seatbelts.jpg
    2.5 KB · Views: 0
  • seating.jpg
    seating.jpg
    3.4 KB · Views: 0
Looking good Dave wonder what those seat belts are going to look like are you going to use them?
 
Thread owner
Lee,
oh yes - but I don't think they are going to be visible, when it's all closed up :sad:
Dave
 
Thread owner
Decals added to instrument panelView attachment 324480
And the seat belt decals - not very good, but will only be vaguely seenView attachment 324481
The wings are joined, sandwiching the engines - clean up needed on the cowling sidesView attachment 324482
The fuselage joined, and the tailplane added - The seams need to be really flattened, as the overall silver will show up any flaws.View attachment 324479
I think I'm going to finish the wings & fuselage as much as I can before joining, leaving only 2 real joints on the underside to clean up - this will include the top coat, as far as possible. This will allow me to fit the windows after the silver finish, without any tricky masking.
Dave
 

Attachments

  • fuselage joined.jpg
    fuselage joined.jpg
    1.9 KB · Views: 0
  • panel decal.jpg
    panel decal.jpg
    3.3 KB · Views: 0
  • seats & belts.jpg
    seats & belts.jpg
    3.6 KB · Views: 0
  • wing joined.jpg
    wing joined.jpg
    2.2 KB · Views: 0
Nice work dave , aircraft like this are always tricky when it comes to the glazing , especially if the windows are fitted from the outside , difficult to get a seamless joint, looking forward to the next instalment , cheers tony
 
Hello dave the build is comin on fine an the detail is great I know at the build 's end most detail will not be seen but at least you know its in there great work an I will be following this build chris
 
Status
Not open for further replies.
Back
Top