Theme editor

Scale Model Shop

Dave Ward's Revell/ICM 1/48 Beech C-45F Expeditor

Status
Not open for further replies.
Thread owner
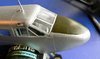
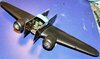
Seams attended to, and I've just primed the two parts - I'm using Stynylrez Black Primer for the first time ( what a lousy name ), and I must say, I'm impressed, sprayed nicely, covered well, and cleaned up easily from the a/b. SMS have a load of different colours * stynylrez * worth a lookView attachment 324704View attachment 324705
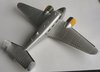
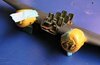
Next, I have Olive Drab anti-glare panels on the nose, and inner engine cowls. I'm going to hand paint these, before masking up for those yellow cowls..................
Dave
 

Attachments

  • fuselage primed.jpg
    fuselage primed.jpg
    1.9 KB · Views: 0
  • wings primed.jpg
    wings primed.jpg
    2.6 KB · Views: 0
Looking good Dave. Can I ask what you used to clean your A/B after using Stynylrez? I've tried it and it's an excellent primer but I've had nightmares getting my A/B clean afterwards.
 
Thread owner
Dave,
Errrr - I just use tap water. Flush through the cup, pull the needle back, remove & clean the nozzle cap, reassemble, and blow through with a water + a few drops of washing up liquid. That's it.
Dave
 
Hi Dave
Just had a catch-up. It looks to be a nice kit even with the iffy instructions. Fine, neat job you're doing. I am another who likes the Stynylrez primer.
Jim
 
Thread owner
First pass at the metal fuselage, the anti-glare panel, and the de-icer boots on the tail surfaces are masked...........View attachment 324810
I'm using Vallejo Metal Color Aluminium, misted on, I'll need a few coats, before sealing it all with gloss varnish.
I hand painted the Olive Drab anti-glare panels, then masked all up to spray the yellow on the cowlingsView attachment 324811
In retrospect, I should have primed the cowls with a neutral grey, as spraying yellow over black is not good, I'm going to need several passes at this before I get good coverage. I'm using AK RLM 04 Yellow, as I thought it may give better coverage than my Vallejo yellow!
Dave
 

Attachments

  • yellow 01.jpg
    yellow 01.jpg
    2.3 KB · Views: 0
  • silver 01.jpg
    silver 01.jpg
    1.9 KB · Views: 0
Spraying yellow over just about anything is asking for coverage trouble, really :( 
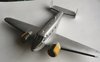
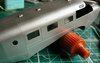
I usually begin with a white primer, then the yellow, and mask it off before painting the rest of the model. It’s really the only way to get a good, solid yellow that I’ve found.
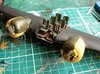
 
Thread owner
Applied a 3rd coat of yellow! Hmmmm I think I'll have to try and brush paint with normal Vallejo Model Color.....................
Dave
 
My experience is that four or five coats tend to cover reasonably adequately … but it might just be easier to mask off the rest of the model, spray some white primer over the yellow, and then apply one coat of yellow paint over that.
 
Thread owner
I've given the yellow a brush coat of Vallejo Model Color RLM 04, and although not perfect, another coat should finish it. I've removed the masking from the fuselage - a slight bleed under of aluminium over the olive drab, but a bit of a touch up has covered this. I'll have to add the glazing to the fuselage, then a gloss coat over all.
Dave
 
Ive found that too dave , the vallejo metal colors and modelair metallics are prone to finding their way under the edge of masking , i had the same problem on the Morava with the silver on the wings seeping onto the white of the fuselage and nacelles. Maybe these paints have a slightly different formulation that softens the masking tape glue a little? Or is it just that theyre more thinned than normal , cheers tony
 
Thread owner
Masking removed from the cowlings. Probably due to the number of coats of yellow, some bleeding has occurred.
View attachment 325071
Next, I'll have to mask off the cowls, and the de-icer boots on the wing, the I'll be able to get the wing sprayed aluminium.
I've added the fuselage windows - there are 3 remaining cockpit glazing bits, that I'm painting the frames before adding to the model.View attachment 325070
Not far off final assembly, it will all come together quickly
Dave
 

Attachments

  • yellow cowls.jpg
    yellow cowls.jpg
    3.8 KB · Views: 0
  • side widows.jpg
    side widows.jpg
    2.7 KB · Views: 0
That yellow has come out alright, and at least painting some green over it shouldn’t be any problem :)
 
Yellow is a so and so, I remember from my Warhammer 40k days.
The citadel paint had terrible coverage so I used to prime every thing in white!
 
All yellow has terrible coverage, even worse than red. It doesn’t really depend on which paint you use (though some are better than others) because it’s inherent to the colour/pigments. Priming in white, or some better-covering colour close to what you actually want, like sand, is the best way to get it to cover OK, if you ask me.
 
Thread owner
I masked the wings - using Tamiya masking film, and gave the wings a couple of misted coats of aluminium. Then, always a tense moment, the masks were removed....................View attachment 325305View attachment 325304
Not bad - no bleeding, I was very careful to press down the mask edges.
The cockpit is glazed - these were a tight fit, and once they had eventually clicked into place, I decided to leave well alone - I'll have to deal with the gaps & retouch the paint, especially the glare panel shortfall, but generally OKView attachment 325303
I don't know how I fouled that up - the other side is OK. I have the instrument panel to fit, and then I can think about uniting the 2 assemblies
Dave
 

Attachments

  • wing underside .jpg
    wing underside .jpg
    1.9 KB · Views: 0
  • wing topside.jpg
    wing topside.jpg
    2 KB · Views: 0
  • cockpit glazed.jpg
    cockpit glazed.jpg
    2.5 KB · Views: 0
Thread owner
Parts finally united. Glue, of any sort removes the aluminium paint, so more touch up required. I should have given an overall gloss varnish before joining!View attachment 325542View attachment 325543
After attending to the seams, I will have to gloss coat over all, before beginning the decal application. This is proving to be a challenging build, but I think will be worth it!
Dave
 

Attachments

  • joined 02.jpg
    joined 02.jpg
    2 KB · Views: 0
  • joined 01.jpg
    joined 01.jpg
    1.8 KB · Views: 0
Thread owner
Metal finishes look good, but they show up every flaw, and seem to mark very easily - I'll be glad when I can get a protective varnish coat over everything!
Dave
 
Thread owner
After a gloss varnish overspray, a light panel wash, and now ready for decals..............View attachment 326075
Taking much longer to make than I anticipated - but I'm still enjoying this build
Dave
 

Attachments

  • decal ready.jpg
    decal ready.jpg
    3.5 KB · Views: 0
Looking lovely now dave , its got very classic lines hasnt it? Cheers tony
 
Status
Not open for further replies.
Back
Top