
Sorry for the lack of attendance, but I've been away for a few weeks where internet is unheard of...Heaven! Just arrived home yesterday.
However, all was not lost, as I was allowed to take a kit to build between drinking disgusting wine and shovelling peanuts and crisps down me - and watching the sunsets.... Hell I know, but someone has to do it!
I wanted to do something different with the model and came across an interesting combat involving two U boats and two convoy escorts during WW2.
On the 11th March 1943, whilst escorting convoy HX 228, HMS Harvester, a British H Class destroyer, located and depth charged a U boat (U444) forcing it to surface. The submarine was subjected to gun fire from the warship, which then succeeded in ramming the U boat and sinking it.
Harvester was badly damaged during the ramming and was left wallowing in the sea. Later on U.432 came across the damaged destroyer and sank her with torpedoes. The French Corvette 'Aconit' which was accompanying Harvester, then rammed and sank U 432'
The action lasted the day and over 200 lives were lost....
This was my challenge....
To build a U boat that had been subjected to the kind of assault described above...Depth charged, shot at, rammed and finally sunk. Finally for her to be found and photographed deep down in the Atlantic, where not much marine life would grow on the wreck.......
So here is the start of the build...It's the Revell 1/125, U 99.
I made the boat whole before I started to do any damage.
I used a pair of snips, pliers and a hot needle and just generally went my merry way stabbing, bending and tearing the model to shreds!
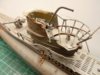
Here's the conning tower after depth charging and surface gun fire.... View attachment 108246
View attachment 108247
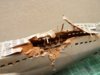
I wanted to do the ramming damage around the engine room, rear torpedo room area which caused a massive explosion, ripping the hull and pressure hull clean open......
Here's my attempt at such damage. The engine block is scrap sprue, the pressure hull tin foil and the cables etc. is thin electric wiring. The deck cross ribs are thin plastic card.
View attachment 108248
View attachment 108249
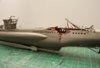
Because of the great depth the U boat lies in, it only needed a small amount of marine growth. Which is a bonus, because I wanted to keep some detail to the wreck.
This I did with sweepings from the drive. Then using some 'hit and miss' PVA applied to the hull, I threw the stuff at the model...Where it stuck it stuck!
View attachment 108250
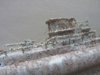
Here she is on the sea bed.
Like my previous U boat models and the British sub. HMS Trafalgar, I used my usual tile adhesive and bedded the hull into it.
View attachment 108251
Next up I need to try and give the illusion of depth...Kind'a spooky like!
Thanks for looking and it's nice to be back.
Cheers all,
Ron
Now I can have a look at all the builds I've missed!!!
View attachment 221269
View attachment 221270
View attachment 221271
View attachment 221272
View attachment 221273
View attachment 221274
However, all was not lost, as I was allowed to take a kit to build between drinking disgusting wine and shovelling peanuts and crisps down me - and watching the sunsets.... Hell I know, but someone has to do it!
I wanted to do something different with the model and came across an interesting combat involving two U boats and two convoy escorts during WW2.
On the 11th March 1943, whilst escorting convoy HX 228, HMS Harvester, a British H Class destroyer, located and depth charged a U boat (U444) forcing it to surface. The submarine was subjected to gun fire from the warship, which then succeeded in ramming the U boat and sinking it.
Harvester was badly damaged during the ramming and was left wallowing in the sea. Later on U.432 came across the damaged destroyer and sank her with torpedoes. The French Corvette 'Aconit' which was accompanying Harvester, then rammed and sank U 432'
The action lasted the day and over 200 lives were lost....
This was my challenge....
To build a U boat that had been subjected to the kind of assault described above...Depth charged, shot at, rammed and finally sunk. Finally for her to be found and photographed deep down in the Atlantic, where not much marine life would grow on the wreck.......
So here is the start of the build...It's the Revell 1/125, U 99.
I made the boat whole before I started to do any damage.
I used a pair of snips, pliers and a hot needle and just generally went my merry way stabbing, bending and tearing the model to shreds!
Here's the conning tower after depth charging and surface gun fire.... View attachment 108246
View attachment 108247
I wanted to do the ramming damage around the engine room, rear torpedo room area which caused a massive explosion, ripping the hull and pressure hull clean open......
Here's my attempt at such damage. The engine block is scrap sprue, the pressure hull tin foil and the cables etc. is thin electric wiring. The deck cross ribs are thin plastic card.
View attachment 108248
View attachment 108249
Because of the great depth the U boat lies in, it only needed a small amount of marine growth. Which is a bonus, because I wanted to keep some detail to the wreck.
This I did with sweepings from the drive. Then using some 'hit and miss' PVA applied to the hull, I threw the stuff at the model...Where it stuck it stuck!
View attachment 108250
Here she is on the sea bed.
Like my previous U boat models and the British sub. HMS Trafalgar, I used my usual tile adhesive and bedded the hull into it.
View attachment 108251
Next up I need to try and give the illusion of depth...Kind'a spooky like!
Thanks for looking and it's nice to be back.
Cheers all,
Ron
Now I can have a look at all the builds I've missed!!!
View attachment 221269
View attachment 221270
View attachment 221271
View attachment 221272
View attachment 221273
View attachment 221274
Attachments
-
 U 444 Revell sunken wreck 043.jpg2.9 KB · Views: 0
 -
 U 444 Revell sunken wreck 044.jpg2.8 KB · Views: 0
 -
 U 444 Revell sunken wreck 054.jpg2.4 KB · Views: 0
 -
 U 444 Revell sunken wreck 056.jpg2 KB · Views: 0
 -
 U 444 Revell sunken wreck.jpg2.1 KB · Views: 0
 -
 U 444 Revell sunken wreck 095.jpg990 bytes · Views: 0
") , did you thin the plastic to make the holes ?
, did you thin the plastic to make the holes ? My new wreck one, and then the superb 1/350 scale by Caledonia.
")