
You are using an out of date browser. It may not display this or other websites correctly.
You should upgrade or use an alternative browser.
You should upgrade or use an alternative browser.
Did you see them coming?
- Thread starter scottie3158
- Start date
- Status
- Not open for further replies.
All Hail 'Simon the Hacker'........:upside::thumb2:
- Joined
- Apr 27, 2018
- Messages
- 15,043
1/3
Don't know about that Scottie - have made a start on hacking mine about though as being an early 70's Tamiya it is not the most accurate jeep kit around (they didn't even get the jerrycans correct!), by a long way, but I have always liked the box art
chopped the dodgy seat bases out and scraped in the internal rolled edges to the body tub so far on mine
the windscreen scuttle panel edges don't fit very well to the body and will need fettling
I look forward to seeing your results with this oldie
Simon,
I wont be going that far I did look at the seats but decided it was to much work lol. It will be good to see what you achieve on yours.
- Joined
- Apr 27, 2018
- Messages
- 15,043
1/3
Jakko,Wouldn’t it be far simpler to begin with a better Jeep kit, for example by converting the Italeri SAS Jeep kit to a desert one, or to take something like the more recent Tamiya Jeep, and add the SAS modifications based on that Italeri kit?
There's no fun in that, that's what I like to do turn an old tired kit into something a bit better rather than pay the high prices of over engineered kit and hopefully improve my skills along the way:smiling:
- Joined
- Apr 27, 2018
- Messages
- 15,043
1/3
Ron,Looking good Paul.
I've been watching form the start hiding under the chairs, looking through a mass of legs.
Paul, can you tell 453 Race to change his socks? It's getting a bit ripe under here!
Good to see you. Yeah I will pass it on I did wonder where the whiff was coming from.
- Joined
- Apr 27, 2018
- Messages
- 15,043
1/3
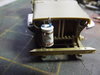
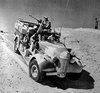
Managed a little bench time and added a bit more to the jeep. I have scratched a new condenser can and added the etch straps. Then using some wire added the condenser pipe and breather pipe. Bolt heads were added from pewter to the bumper.
View attachment 321744
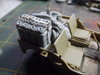
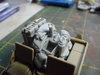
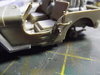
I decided to try the black dog stowage set to make it look busy. The MG pintle mount had a fine chain and lock pin added. Next the jerry cans had the moulded rack removed and a rack from evergreen added. The etch strap was then added. None of the stowage is fixed so it can be removed for painting.
View attachment 321745
View attachment 321746
View attachment 321747
Thanks for looking
Scottie
View attachment 321744
I decided to try the black dog stowage set to make it look busy. The MG pintle mount had a fine chain and lock pin added. Next the jerry cans had the moulded rack removed and a rack from evergreen added. The etch strap was then added. None of the stowage is fixed so it can be removed for painting.
View attachment 321745
View attachment 321746
View attachment 321747
Thanks for looking
Scottie
Attachments
G
Guest
Guest
Wow!
- Joined
- Apr 27, 2018
- Messages
- 15,043
1/3
Wow!
Thanks Peter.
- Joined
- Apr 27, 2018
- Messages
- 15,043
1/3
Nice work Scottie. Love the seat belts. PaulE
Thanks Paul, Glad you like it so far.
- Joined
- Apr 27, 2018
- Messages
- 15,043
1/3
Jim,Hi Scottie
Front end looking good. Stowage seems to fit well and looks the part.
Jim
Thanks mate it does need a bit of fettling here and there but it's not bad. But some of the smaller stuff isn't that good the MG's are terrible.
- Joined
- Apr 27, 2018
- Messages
- 15,043
1/3
Rick
thanks fella.
thanks fella.
- Joined
- Apr 27, 2018
- Messages
- 15,043
1/3
FANTASTIC... you will put .50 cal and twin vikers?
Hi Greg, Thanks mate. Not sure if I am going for the .50 or the triple Vickers
- Joined
- Apr 27, 2018
- Messages
- 15,043
1/3
Already ahead of you mate I have lots to add plus I will be adding a whole lot to the chevy when I get to it.By the way if i can give u a suggestion try to find a German/Italian jerrycan... the SAS used a lot of cannibalized equipment :smiling::smiling::smiling:
If I may.. go .50 cal Aerial version... it's rare to see that version...Hi Greg, Thanks mate. Not sure if I am going for the .50 or the triple Vickers
View attachment 321789
Attachments
On the Chevy you could put a 37mm Cannon Italian "Elefantino" (small elephant) taken from Italians... (the nemesis of the LRGD were the Arditi Camionettisti that used Solothurn 20mm rifle Breda 8mm/7.92mm and the Elefantino 37mm) some LRDG "liberated" those cannon and put them on their vehicles...
here is the picture with the 20mm Soloturn
View attachment 321791
here is the picture with the 20mm Soloturn
View attachment 321791
Attachments
- Status
- Not open for further replies.
Legal Notice
scalemodelling.co.uk is a privately operated online discussion forum. All content posted by members reflects their own views and opinions and does not necessarily represent those of the forum owners or administrators. While reasonable efforts are made to moderate content, no responsibility is accepted for user-generated material. By using this site, you agree to comply with UK law and the forum rules.