Theme editor

Scale Model Shop

Douglas Dauntless SBD-3/5 in 1/72 by Airfix

Status
Not open for further replies.

rickoshea52

Active member
Joined
Dec 20, 2011
Messages
4,106
Reaction score
72
Points
48
1/3
Thread owner
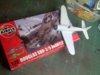
This is a kit I started a while back and put aside when I compared it to the new tool Airfix Zero. Sometimes I get to a point in a build and just stop for a couple of weeks or more, usually because I get distracted by something else. The result is a shelf full of half built kits that I revisit when I feel like it or more often I build a load of kits until I get to the primer/paint stage then blitz a load in a single spraying session. I don't have a permanently set up spray area.

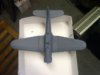
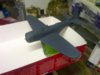
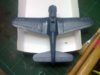
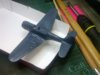
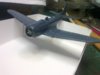
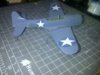
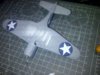
So here's one I started earlier, it will be the USN version with some weathering. I read Mig's shipping effect magazine yesterday and was intrigued by an IJN torpedo bomber with chipped painwork.

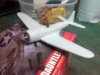
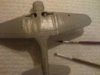
So far I have primed this and sprayed it silver then I used "chipping effects" sprayed with an A/B on the centreline and LG area of the underside and along the wing root walkways. I sprayed the underside light grey and it's drying as we speak.

View attachment 81898

View attachment 81899

View attachment 194921

View attachment 194922
 

Attachments

  • Rushmoor-20140503-00637.jpg
    Rushmoor-20140503-00637.jpg
    3.6 KB · Views: 0
  • Rushmoor-20140503-00638.jpg
    Rushmoor-20140503-00638.jpg
    3.5 KB · Views: 0
I don't know why, but I can never see any of your pictures Rick :(
 
\ said:
I don't know why, but I can never see any of your pictures Rick :(
Just click on the blue wording in the box and the pictures come up patrick
 
\ said:
Just click on the blue wording in the box and the pictures come up patrick
I tried that Ian & I only get a blank page - in the post the attachments look like text files.

Maybe its being on my phone that causes it.
 
Thread owner
I tried the chipping effect solution today with good results that I hope to improve in future builds.

After spaying with aluminium paint I sprayed the chipping effect solution and when dry applied the light grey. When this too is dry I took a small brush moistened with water and applied it over the area I sprayed with the chipping effect. With an old brush with cut down bristles I scrubbed the loosened top coat off to reveal the aluminium underneath. It's not hugely realistic but it definately is worth developing.

Next is the upper surface and we'll see how it works against the darker blue.

The only complaint I would make is the chiiping solution is clear and you can't see it so well against the aluminium paint.

View attachment 81900

View attachment 194923
 

Attachments

  • Rushmoor-20140505-00648.jpg
    Rushmoor-20140505-00648.jpg
    2.2 KB · Views: 0
Re the pictures, not sure how you are inserting them into your posts Rick but they are around 700kb to 1MB each and slow to load. You can insert the pictures into your posts and they are automatically scaled for the forum. Your Dauntless is looking good though, nice job.
 
Looking good.I can view your photos ok on my iPad and iPhone by the way.
 
Thread owner
\ said:
Re the pictures, not sure how you are inserting them into your posts Rick but they are around 700kb to 1MB each and slow to load. You can insert the pictures into your posts and they are automatically scaled for the forum. Your Dauntless is looking good though, nice job.
I add photo's from my Blackberry which is probably why they're so big. I've re-sized them.
 
Don't you just love masking, it's the best. Nice work Rick, thanks for fixing the photos, enjoying watching this build.
 
Thread owner
My little Dauntless gained a coat of intermediate blue on the upper surfaces. I added a blob of white to the mix after the first coat to make the finish a little more faded, particularly over the fabric covered control surfaces. When dry the chipping medium that I added after the silver undercoat will be removed to (hopefully) create a chipped effect.

View attachment 82052

View attachment 82053


View attachment 195075

View attachment 195076
 

Attachments

  • Rushmoor-20140509-00658.jpg
    Rushmoor-20140509-00658.jpg
    2.7 KB · Views: 0
  • Rushmoor-20140509-00657.jpg
    Rushmoor-20140509-00657.jpg
    3.3 KB · Views: 0
Thread owner

Attachments

  • IMG-20140509-00660.jpg
    IMG-20140509-00660.jpg
    2.9 KB · Views: 0
  • IMG-20140509-00659.jpg
    IMG-20140509-00659.jpg
    3.3 KB · Views: 0
  • IMG-20140509-00661.jpg
    IMG-20140509-00661.jpg
    2.5 KB · Views: 0
That turned out rather well, you're doing a fine job on this old kit Rick.
 
Nice work. I like seeing these old kits come to life.
 
Thread owner

Attachments

  • IMG-20140608-00702.jpg
    IMG-20140608-00702.jpg
    2.9 KB · Views: 0
  • IMG-20140608-00701.jpg
    IMG-20140608-00701.jpg
    2.6 KB · Views: 0
  • IMG-20140608-00703.jpg
    IMG-20140608-00703.jpg
    2.7 KB · Views: 0
Status
Not open for further replies.
Back
Top