Thanks Monica. Wermacht it is\ said:late with this but as Patrick said they would of been Wermach,as all the divisions had there owe,")

You are using an out of date browser. It may not display this or other websites correctly.
You should upgrade or use an alternative browser.
You should upgrade or use an alternative browser.
Dragon - Sd.kfz 251/6 Ausf. C
- Thread starter takeslousyphotos
- Start date
- Status
- Not open for further replies.
Don't forget the earth wire!!!! ( sorry do you have a permit to work on this ? Are you an electrician???\ said:I'm kind of "winging-it" on the wiring Robert........ I figure each one needs power in, antenna feed, com's in/out and maybe a couple are linked. So that is my basic plan........ Then there is power in, through the fuse boxes and junction boxes.
Hahahahaahahahaa
Apprentice Funktechniker\ said:Don't forget the earth wire!!!! ( sorry do you have a permit to work on this ? Are you an electrician???
Hahahahaahahahaa

G
Guest
Guest
It's looking great Peter! Absolutely agree about Dragon's instructions. My tiger has sub-assembly bits that have no indication as to where they actually fit, or for which version! But the detail is good, very good, and now mine is all primed, I can see where the money went! Looking forward to seeing it finished!
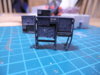
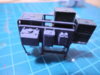
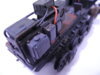
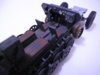
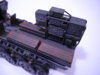
Radio Rack.......... It's sort of done, although I'm not 100% happy with it. I started off with Field Grey for the cases and a light grey for the front panels. I wanted the radio sets to contrast with the Dunklegrau on the rack and they main body colour. I detailed some of the controls in black (in honesty, picking all those out with a wee brush is beyond me....... I do know my limits) but that was too stark, and looked odd, so I gave the front panels a slightly darker grey wash. That has picked up some of the detail and toned down the black....... The cases have had a green wash. I didn't want any of them to have a bright and shiny finish as they are in an open vehicle, so they would get a bit grubby and maybe have a well used look to them.........The rack itself will get some wear and tear and some very light rust on the weld joints.......... Then I'll throw some wires around on the back.......
I'd like to know what you guys think so far.? honest please.
View attachment 243675
View attachment 243676
I'd like to know what you guys think so far.? honest please.
View attachment 243675
View attachment 243676
Attachments
G
Guest
Guest
That is one hell of a radio rig. Coming on nicely Peter.
Thanks Graham.......... But is it any good?\ said:That is one hell of a radio rig. Coming on nicely Peter.
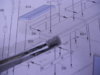
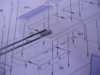
Question time......... I'm starting on the floor-pan. and I'm a bit stumped?
1. From Seats and Bench Seals. Would they have been covered in leather or a fabric / canvas type material.????
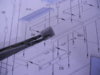
2. There is a box like thingamyjjg (possibly a tank of some sorts) that fits behing the right hand front seat. Does anyone know what it's supposed to be. As I have no idea where to begin with a colour ? The attached photos show it in the destructions. Diagram "K" top left (parts G9 & G10).
Grateful for any help.
View attachment 243758
View attachment 243759
View attachment 243760
View attachment 243758
View attachment 243759
View attachment 243760
View attachment 243761
1. From Seats and Bench Seals. Would they have been covered in leather or a fabric / canvas type material.????
2. There is a box like thingamyjjg (possibly a tank of some sorts) that fits behing the right hand front seat. Does anyone know what it's supposed to be. As I have no idea where to begin with a colour ? The attached photos show it in the destructions. Diagram "K" top left (parts G9 & G10).
Grateful for any help.
View attachment 243758
View attachment 243759
View attachment 243760
View attachment 243758
View attachment 243759
View attachment 243760
View attachment 243761
Attachments
G
Guest
Guest
Depends what you are aiming for to be honest. Yes, you could pick out every little knob and dial (best done with a cocktail stick by tapping a dot of paint onto the knobs etc). Trouble is, if you go over the top it can end up far too contrasts and a bit like something off a fairground ride. If you do start picking out, virtually all knobs would be black Bakelite type material and dial faces white. However, black and white are the last colours you want to use. An ivory and a dark grey would be a lot better. Just don't go for the 'modern jet cockpit' look. Hint at switches and knobs rather than in your face.
Usually radio rigs like these are tucked in a corner somewhere and not over visible so lower contrast can work well. The SdKfzs are very open so the higher contrast might be OK. It's all down to personal taste though.
Usually radio rigs like these are tucked in a corner somewhere and not over visible so lower contrast can work well. The SdKfzs are very open so the higher contrast might be OK. It's all down to personal taste though.
Thanks Graham ......... I definitely don't want the "in yer face" look. I have added a few low level indicator lamps using the cocktail stick method and some translucent red & orange. I think now I'll leave it as it is before I end up screwing it up totally.\ said:Depends what you are aiming for to be honest. Yes, you could pick out every little knob and dial (best done with a cocktail stick by tapping a dot of paint onto the knobs etc). Trouble is, if you go over the top it can end up far too contrasts and a bit like something off a fairground ride. If you do start picking out, virtually all knobs would be black Bakelite type material and dial faces white. However, black and white are the last colours you want to use. An ivory and a dark grey would be a lot better. Just don't go for the 'modern jet cockpit' look. Hint at switches and knobs rather than in your face.
Usually radio rigs like these are tucked in a corner somewhere and not over visible so lower contrast can work well. The SdKfzs are very open so the higher contrast might be OK. It's all down to personal taste though.
G
Guest
Guest
Just checked in re your comment on the water tank I mentioned in my opening gambit of the Tamiya kit Peter. The box on yours could be another bit of electronics. The water tank that appears in some kits is round, looks like a large German gas mask canister. Nothing like the one in your instructions.
G
Guest
Guest
Here we go, the errant part is B10. In the ref pic to the left, it clearly isn't there. The 'magneto' looking part that is in the ref pic is not in the kit however. Clearly different to the part in your kit I think you are referring to.
View attachment 243802
View attachment 243802
Thanks Graham......... Yes it is very different. I thought maybe it was some kind of water tank as it does have what seems to be a filler cap top centre........ probably is some random piece of electrical kit?\ said:Here we go, the errant part is B10. In the ref pic to the left, it clearly isn't there. The 'magneto' looking part that is in the ref pic is not in the kit however. Clearly different to the part in your kit I think you are referring to.
View attachment 143537
G
Guest
Guest
Could it be a battery of some sort?
G
Guest
Guest
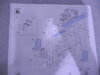
Sorry to go on but I have found this picture of what may be a SdKfz 222 radio vehicle. Just to the right of the drivers seat appears a dark box type item very similar to the kit part you have.
View attachment 243820
View attachment 243820
It is a water tank used in the 251/8 ambulance version.\ said:Thanks Graham......... Yes it is very different. I thought maybe it was some kind of water tank as it does have what seems to be a filler cap top centre........ probably is some random piece of electrical kit?
http://www.network54.com/Forum/433829/thread/1446076353/last-1446076353/Sd.Kfz+251-8
Thanks Joe....... That is going to be a big help. Particularly the photos. Even though they are black & white they are a good reference. The water tank in between the seats on the Ambulance version explains a lot. The kit has the mounting hole for that on the floorpan and I've been trying wo work out what might go in there from the destructions and came up with nothing........... So I'll fill them and press on..........\ said:It is a water tank used in the 251/8 ambulance version.
http://www.network54.com/Forum/433829/thread/1446076353/last-1446076353/Sd.Kfz+251-8
The part I'm trying to identify is a rectangular thing (sort of suitcase shaped) which mounts behind the right hand front seat right on the edge so it will be up against the side wall.........I think it'll just end up Dunklegrau and a dry brush to pick out the detail. I have circled it in red.
View attachment 243912
Attachments
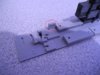
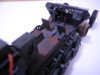
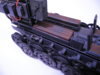
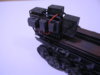
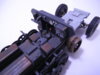
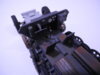
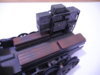
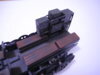
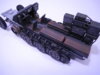
The Deck, Radio Rack & Front Bulkhead are done........ It's not fitted to the chassis yet. I had plenty of help from Eric, he is getting the hang of "Dry Brushing" with his tail. It'll need some more weathering and wear & tear before we are done with it.
Next will be the figures. Driver, Radio Operators and "The Boss". I want to get them in place before the vehicle sides.
Comments welcome along with any suggestions where I could have done better.
View attachment 243962
View attachment 243963
View attachment 243964
View attachment 243965
View attachment 243966
View attachment 243967
View attachment 243968
View attachment 243969
View attachment 243970
View attachment 243971
View attachment 243972
View attachment 243973
Attachments
-
 DSCN2471.JPG2.6 KB · Views: 0
 -
 DSCN2470.JPG2.8 KB · Views: 0
 -
 DSCN2469.JPG2.9 KB · Views: 0
 -
 DSCN2468.JPG2.2 KB · Views: 0
 -
 DSCN2467.JPG2.8 KB · Views: 0
 -
 DSCN2466.JPG2.5 KB · Views: 0
 -
 DSCN2465.JPG2.4 KB · Views: 0
 -
 DSCN2464.JPG2.6 KB · Views: 0
 -
 DSCN2463.JPG2.3 KB · Views: 0
 -
 DSCN2462.JPG2.7 KB · Views: 0
 -
 DSCN2461.JPG2.6 KB · Views: 0
 -
 DSCN2460.JPG2.7 KB · Views: 0
G
Guest
Guest
That looks rather nice Peter! Before you close it up, maybe add some detritus like leaves & dirt? I'd imagine those open topped vehicles got more than their fair share of c**p getting in there.
Thanks Patrick...... Good Suggestion on the rubbish getting in there. I'll bank that idea and collect some sweepings from the garage floor for the corners and stuff......\ said:That looks rather nice Peter! Before you close it up, maybe add some detritus like leaves & dirt? I'd imagine those open topped vehicles got more than their fair share of c**p getting in there.
- Status
- Not open for further replies.
Legal Notice
scalemodelling.co.uk is a privately operated online discussion forum. All content posted by members reflects their own views and opinions and does not necessarily represent those of the forum owners or administrators. While reasonable efforts are made to moderate content, no responsibility is accepted for user-generated material. By using this site, you agree to comply with UK law and the forum rules.
Currently on our website
Threads
36,622
Messages
700,200
Members
2,569
Latest member
planetdisplayukseo