Theme editor

Scale Model Shop

Eduard 1/72 Spitfire IXc

Status
Not open for further replies.
Thanks John. I bought the jig at a show a year or so ago, can't remember who the trader was. Maker is JH Models. Does John have them at SMS?

Pete
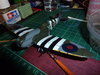
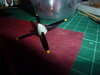
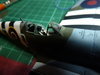
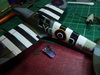
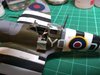
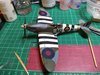
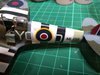
Don't know Pete, in my case don't think it would work on armour :worried:
John.
 
Thread owner
Yet more masking for the yellow leading edge strip, and while the yellow was in the airbrush a bit where the fuselage roundels will go, the reduce the chance of the white/black stripes showing through. Also did the prop tips. Most of it went alright:
View attachment 318276
but on the port wing the tape (Tamiya for curves) lifted the paint:
View attachment 318277
I should have made a better job of sanding that leading edge too.

Pete
 

Attachments

  • P1140585.JPG
    P1140585.JPG
    4 KB · Views: 0
  • P1140586.JPG
    P1140586.JPG
    3.3 KB · Views: 0
Thread owner
Touch ups done, and she has legs!
View attachment 318776At least I thought the touch-ups were done until I looked at that photo! I've repainted the undercarriage bays in the correct undersurface colour. Still a few little PE sticky-out bits left to add, but I think I'll leave those until after decalling or they'll only get knocked off.
So, next step is a clear coat, then decals...

Pete
 

Attachments

  • P1140588.JPG
    P1140588.JPG
    3.6 KB · Views: 0
Looking really good. I may have to get one of these at some point.
 
Thread owner
On to decals - 'undreds of stencils it seems! One wing finished, the other started - 26 decals already!
View attachment 319133
Shows up my terrible paintwork, and I hadn't noticed that wrinkle...
My eyes need a rest now though.

Pete
 

Attachments

  • P1140589.JPG
    P1140589.JPG
    3.6 KB · Views: 0
Hi Pete,
Great work on the Spit. This is why I don't do wingy things to many decals plus you cant throw mud at the mistakes:tongue-out3:
 
Thread owner
I quite enjoy decals - the nice thing about these tiny stencils is that you can leave them off if they misbehave!

Pete
 
Thread owner
32 stencils, plus 2 roundels, on the underside! 16 on the prop and spinner, but I need a lie down first!

Pete
 
Hi Peter
Paint job looks really nice. Lots of masking and it seems to have worked mostly fine - touch ups are par for the course. I have only ever built a couple of planes and the decals seem to go on for ever but do bring the whole thing to life. Turning out to be a cracker.
Jim
 
Thread owner
Phew! Finished the decals at last! Walkway lines were a struggle, but don't look too bad. Strange mistake by Eduard - according to the stencil instructions there should be one numbered 39 which says "ENGINE STARTER PLUG", but number 39 on the stencil sheet says "MAKE SURE COVER IS CLOSED BEFORE FLIGHT", and is too large to fit on the starter plug cover. Still, I'm sure the ground crew new where to plug in the starter, so I've just left it off. Don't tell anyone will you!
View attachment 319378View attachment 319379View attachment 319380
They can marinade overnight after a dose of Micro Sol, then tomorrow (after shopping duty) I can add the last few parts and repair the aerial, and give it another clear coat before some light weathering.

Pete
 

Attachments

  • P1140593.JPG
    P1140593.JPG
    3 KB · Views: 0
  • P1140592.JPG
    P1140592.JPG
    3.5 KB · Views: 0
  • P1140591.JPG
    P1140591.JPG
    2.5 KB · Views: 0
Thread owner
I'd used the closed cockpit canopies and door, fixed in place with Maskol to mask the cockpit, which will be open. I'd been a bit worried that some overspray might have got into the cockpit, but it looks OK:
View attachment 319496
The Eduard masks worked well too:
View attachment 319498
Needs a few touch-ups around the edges, but that can be done after I've fitted the door, and the canopies including the PE handle on the sliding canopy and the rear-view mirror. Then just the exhaust manifolds, pitot, and IFF aerial to be added, and the main aerial repaired.
The end is in sight!

Pete
 

Attachments

  • P1140595.JPG
    P1140595.JPG
    2.8 KB · Views: 0
  • P1140594.JPG
    P1140594.JPG
    3.3 KB · Views: 0
Thread owner
On the home straight now, all the gluing finished, just a couple of touch-ups and some light weathering.
View attachment 319837View attachment 319838View attachment 319839
Shame the Sky codes don't match the Sky tail band...
I fixed the PE handle for the sliding part of the canopy with CA, and it's fogged a small patch, which is a bit disappointing at this stage, but I'm not too displeased with the overall result.
Will do some weathering tomorrow then try to take some better photos!

Pete
 

Attachments

  • IMG_20181114_205150155.jpg
    IMG_20181114_205150155.jpg
    3.4 KB · Views: 0
  • IMG_20181114_205135348.jpg
    IMG_20181114_205135348.jpg
    3.5 KB · Views: 0
  • IMG_20181114_205156095.jpg
    IMG_20181114_205156095.jpg
    3.3 KB · Views: 0
At 1/72 scale , that's a pretty good job Peter. The paint lifts are always the annoying part but you've repaired them well. Will pop over to see the completed photos.

Cheers,
Richard
 
Thread owner
Thanks Richard. I tend to paint too thickly, which might have had something to do with the lifting, but it's covered up now so on to the next one and I'll try to do better.

Pete
 
The overall look is great Pete. I have enjoyed watching this come together. I will pop over and have a look at the completed pics. Well done sir:thumb2::thumb2:
 
Status
Not open for further replies.
Back
Top