Theme editor

Scale Model Shop

"Ernst, come on, we're pulling out"... A 1/35 street corner...

Status
Not open for further replies.

spanner570

New member
Joined
May 26, 2009
Messages
15,599
Reaction score
613
Points
0
1/3
Thread owner
Hi all,

Seeing the great street corner dioramas on here and after learning some great tips and ideas, I have decided to join in the fun!

I learned a lot when I did my recent 1/72 derelict farm, so I'm hoping to try and put it all into practice with this mini 1/35 diorama. I have not attempted a detailed, wrecked building before, so it should be a bit of an adventure.

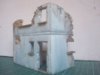
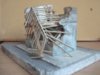
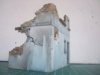
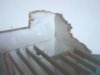
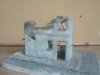
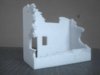
The building will be totally trashed, bombed, whatever, and is being used as a lookout post until.........

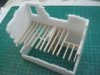
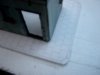
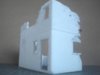
As usual I have eaten a Pizza to get at the polystyrene base which the 'meal' lay on!

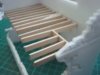
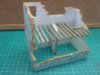
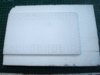
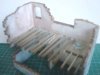
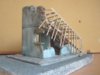
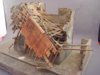
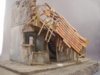
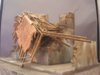
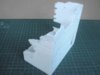
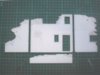
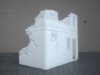
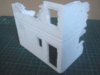
First, with a piece of A4 paper, I marked out the building using a 1/35 figure. I always start by outlining a doorway to the right size and then just work on the rest getting the proportions something like, just by eye. Then after a few false starts/ alterations, transfer the paper to the poly and gently scribe around the shape and cut out with a knife and steel rule. Then I add the damage and cut out the openings.

The building is a figment of my imagination. I find it so much easier than trying to copy something....Let it flow babe!

I started with the flat pack and then I mitred the corners and stuck the four walls together with UHU adhesive.

Because I have been quietly working at this during the hols, I am well in advance of the pictures, so it should be quite a swift presentation!lol

Here are the first stage set of pictures. As ideas come into my nut I will be altering the initial structure.

Thanks for looking and as usual all comments are well received.

Cheers,

Ron

View attachment 42598

View attachment 42599

View attachment 42600

View attachment 42601

View attachment 42602

View attachment 42603

View attachment 155624

View attachment 155625

View attachment 155626

View attachment 155627

View attachment 155628

View attachment 155629
 

Attachments

  • Hans quick. We are pulling out 005.jpg
    Hans quick. We are pulling out 005.jpg
    1.6 KB · Views: 0
  • Hans quick. We are pulling out 006.jpg
    Hans quick. We are pulling out 006.jpg
    1.9 KB · Views: 0
  • Hans quick. We are pulling out 001.jpg
    Hans quick. We are pulling out 001.jpg
    1.9 KB · Views: 0
  • Hans quick. We are pulling out 002.jpg
    Hans quick. We are pulling out 002.jpg
    1.5 KB · Views: 0
  • Hans quick. We are pulling out 003.jpg
    Hans quick. We are pulling out 003.jpg
    1.7 KB · Views: 0
  • Hans quick. We are pulling out 004.jpg
    Hans quick. We are pulling out 004.jpg
    2.1 KB · Views: 0
Ron, if that's what you can do with the remains of a pizza box, you should think about making these commercially. I'm not kidding, that's brilliant!

Of course, you might need help eating the pizza's! ;)

Can't wait to see the rest of it.

Patrick
 
Thread owner
Thanks for the encouraging posts fellas!

Ian, it's through picking up tips and watching you and the others having a go at a 1/35 building in the G.B. 'Sniper' that has given me the incentive to have a go at a corner house in that scale myself.

Patrick, this one will be easy on the waist line. Unlike my building a 1/72 Derelict Farm I did recently, that took two Pizza bases. (Who's been eating all the pies?......ME!)

Cheers,

Ron
 
Thread owner
Here's the next stage...I told you it would be a quicky at first! (No sniggering in the back)

I have added the floor joists made from gern's stirrers, made provision for a stairwell and fitted the window cills. Then I gave the walls a first coat of paint.

The base is made of old polystyrene packing, suitably scribed with paving slabs and kerbs. I like to go over the cuts with a pencil so it shows up the gaps better when painted.

I had a bit of luck with the road surface. I wanted a cobbled look, and when I was rooting in the loft for the base, I came across a perfect road in an old toaster box! (Yes I know..Why store an old toaster box? Don't ask me!)

Anyway, here are some more pictures of the progress:-

Cheers,

Ron

View attachment 42680

View attachment 42681

View attachment 42682

View attachment 42683

View attachment 42684

View attachment 42685

View attachment 155706

View attachment 155707

View attachment 155708

View attachment 155709

View attachment 155710

View attachment 155711
 

Attachments

  • Hans quick. We are pulling out 013.jpg
    Hans quick. We are pulling out 013.jpg
    2.7 KB · Views: 0
  • Hans quick. We are pulling out 012.jpg
    Hans quick. We are pulling out 012.jpg
    2.4 KB · Views: 0
  • Hans quick. We are pulling out 018.jpg
    Hans quick. We are pulling out 018.jpg
    1.9 KB · Views: 0
  • Hans quick. We are pulling out 009.jpg
    Hans quick. We are pulling out 009.jpg
    3 KB · Views: 0
  • Hans quick. We are pulling out 010.jpg
    Hans quick. We are pulling out 010.jpg
    1.7 KB · Views: 0
  • Hans quick. We are pulling out 011.jpg
    Hans quick. We are pulling out 011.jpg
    1.8 KB · Views: 0
I can see another master peice in the making Ron and some great tips to boot
 
stunning that's all i've got to say and give it to me that's another thing im going to say and that's it apart from keep it coming now i'm done

geegad
 
As always, Ron, your talent fills me with jealousy ;) You should do a video sometime showing how you manage to create something like that so quickly. I've had a go at something like this myself since you first posted the pizza-box idea, but so many little details I just can't get right. How do you thin the polystyrene sheet so evenly where you want to bare bricks to show through, for example?
 
Pure polystyrene pizza perfection!!! These things you create are just superb ron. The whole concept of making something out of nothing is right up my bombed out street! Another masterpiece in the making for certain. Keep on doing that Voodoo that you do so well! cheers mate tony
 
Absolutely superb Ron! The painted pic looks as good as anything I've seen & had you said it was store bought, I'd not have questioned it.

From corrugated cardboard snowy ploughed field's to houses made from pizza bases, this is true modelling skill! Really what defines our hobby.

Keep it coming maestro!

Patrick
 
Thread owner
Thanks all for your encouraging comments, boys.

The thread is a bit rushed at the minute 'cos I want to get up to date with the build pictures and get to real time, so to speak!...I hope you understand that gibberish, because I can't!

So I hope you will put up with almost daily updates at least for a few days.

Cheers,

Ron

PS. Wadda yer mean John? It's one after the other and can't keep up...

Our mate Tony has three builds going....All at the same time!!
 
From what you've created so far, this looks as if it's going to be an exciting build!
 
Thread owner
Barratt Holmes here!!!!!

This is the penultimate set of pictures to bring us up to date with the build.

O.K., here is the progress...

I have stained the floor joists and started to paint the walls different pastel shades. The house owners were very poor and couldn't afford wall paper! (honest)

I have also started the painting of the pavement and cobbled street.

I made a scale roof complete with spars, ridge board and purlins (the long heavy timbers that span the building, one end to t'other and support the roof spars) out of 1/16" scrap balsa and yet more of gern's (Dave) stirring sticks!

As I had no idea what would happen to a real collapsing roof, I placed this one on the top of the house, closed my eyes, and just kept pushing down until things started to break and snap. I was pleasantly suprised at the end result...and relieved too! I then gently removed the roof as I need to do other bits before finally fixing it in place.

I will start adding some detail next, the roof will have loads more stuff added, not to mention rubble!!

Here are the pictures of this stage. In one picture you can just make out the staircase and in another the thing broke in half.

You might also notice one purlin missing, that fell off during the crushing and will be replaced later! Also, I didn't fix any ceiling spars across the roof as I figured most would get ripped off anyway, so I will fit them loose at a later stage.

I hope you approve so far and thanks for all your previous comments,

Cheers,

Ron

Sorry forgot to mention, I have also punched a hole through the brickwork on the front elevation!

View attachment 42756

View attachment 42757

View attachment 42758

View attachment 42759

View attachment 42760

View attachment 42761

View attachment 42762

View attachment 155782

View attachment 155783

View attachment 155784

View attachment 155785

View attachment 155786

View attachment 155787

View attachment 155788
 

Attachments

  • Hans quick. We are pulling out 042.jpg
    Hans quick. We are pulling out 042.jpg
    2.3 KB · Views: 0
  • Hans quick. We are pulling out 019.jpg
    Hans quick. We are pulling out 019.jpg
    1.9 KB · Views: 0
  • Hans quick. We are pulling out 020.jpg
    Hans quick. We are pulling out 020.jpg
    1.8 KB · Views: 0
  • Hans quick. We are pulling out 023.jpg
    Hans quick. We are pulling out 023.jpg
    2.3 KB · Views: 0
  • Hans quick. We are pulling out 025.jpg
    Hans quick. We are pulling out 025.jpg
    1.9 KB · Views: 0
  • Hans quick. We are pulling out 038.jpg
    Hans quick. We are pulling out 038.jpg
    2.2 KB · Views: 0
  • Hans quick. We are pulling out 039.jpg
    Hans quick. We are pulling out 039.jpg
    1.9 KB · Views: 0
Thread owner
Whimpee Homes here!

I did a bit of roofing last night. I had considered tiling a bit of the other side too, but decided it would hide the stuff underneath too much so I contented myself with just the one. I have tried to show the roof having just quietly slid down the remains of the outer wall.

I also added an outside yard wall. I think it gives the model a bit more balance. I did a bit more painting too....

I hope you like this latest offering, and thanks for looking,

Cheers,

Ron

View attachment 42820

View attachment 42821

View attachment 42822

View attachment 155846

View attachment 155847

View attachment 155848
 

Attachments

  • Hans quick. We are pulling out 055.jpg
    Hans quick. We are pulling out 055.jpg
    2.6 KB · Views: 0
  • Hans quick. We are pulling out 056.jpg
    Hans quick. We are pulling out 056.jpg
    2.5 KB · Views: 0
  • Hans quick. We are pulling out 054.jpg
    Hans quick. We are pulling out 054.jpg
    2.4 KB · Views: 0
Excellent work as usual Ron... you really brought the house down with this one hehe.

Cheers

Andy
 
Just think of all those folks wasting stirrers by putting them in coffee cups when they could be put to such good use as this! That's almost as bad as putting Future on floors!

What happened to those 1/35 buildings you did a few months ago Ron? Last I heard you were still thinking of a suitable scene for them.

Gern
 
Status
Not open for further replies.
Back
Top