Hi all,
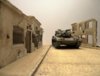
Here is the start of a diorama to compliment my IDF M60-A1' Blazer tank, which you might have seen on here recently.
I didn't want the tank to be a stand alone, so here's the build so far.
I've decided on a bit of a straight forward street scene.
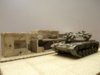
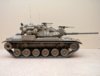
The M60- A1.
View attachment 266038
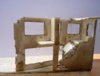
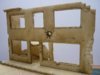
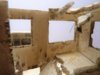
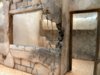
The initial design. I start with a correct scale figure in a doorway and work around that. Made from polystyrene, It's about 16" long. The detail is scribed in with a modelling knife.
View attachment 266026
View attachment 266027
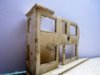
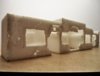
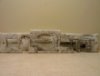
I stuck bits of polystyrene here and there to break up the back of the buildings, then a first wash of cheap children's acrylics, worked into the cracks to show the detail a bit more.
View attachment 266028
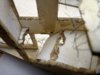
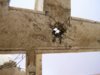
Here I've added some woodwork and reinforcing bars (coffee stirrers and electric cable wiring) I painted the back of the model to give a bit of depth.
View attachment 266029
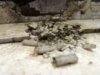
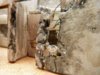
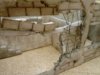
A close up of the re.bars
View attachment 266031
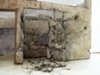
I've stuck some bits of polystyrene on the wire here and there to replicate chunks of concrete.
View attachment 266032
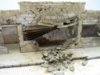
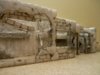
I had a play and made a broken concrete beam with a few blocks hanging on for dear life......
View attachment 266033
The finished section.
View attachment 266034
View attachment 266030
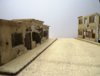
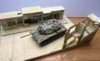
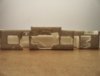
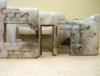
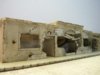
Here's the almost finished building and squeeky clean pavement.....All ready for perhaps more damage, rubble and all sorts of stuff. From this point it is up to the builder just what to add......all that is needed is a bit of imagination.
'Crack a can' time and have a think!
View attachment 266035
View attachment 266036
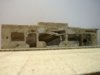
.....even got a roof - perhaps just for now, I'll see.View attachment 266037
That's it for this stage.
I hope you like the build so far, and thanks for looking in.
Ron
Here is the start of a diorama to compliment my IDF M60-A1' Blazer tank, which you might have seen on here recently.
I didn't want the tank to be a stand alone, so here's the build so far.
I've decided on a bit of a straight forward street scene.
The M60- A1.
View attachment 266038
The initial design. I start with a correct scale figure in a doorway and work around that. Made from polystyrene, It's about 16" long. The detail is scribed in with a modelling knife.
View attachment 266026
View attachment 266027
I stuck bits of polystyrene here and there to break up the back of the buildings, then a first wash of cheap children's acrylics, worked into the cracks to show the detail a bit more.
View attachment 266028
Here I've added some woodwork and reinforcing bars (coffee stirrers and electric cable wiring) I painted the back of the model to give a bit of depth.
View attachment 266029
A close up of the re.bars
View attachment 266031
I've stuck some bits of polystyrene on the wire here and there to replicate chunks of concrete.
View attachment 266032
I had a play and made a broken concrete beam with a few blocks hanging on for dear life......
View attachment 266033
The finished section.
View attachment 266034
View attachment 266030
Here's the almost finished building and squeeky clean pavement.....All ready for perhaps more damage, rubble and all sorts of stuff. From this point it is up to the builder just what to add......all that is needed is a bit of imagination.
'Crack a can' time and have a think!
View attachment 266035
View attachment 266036
.....even got a roof - perhaps just for now, I'll see.View attachment 266037
That's it for this stage.
I hope you like the build so far, and thanks for looking in.
Ron
Attachments
-
 P1160256.JPG1.7 KB · Views: 0
 -
 P1160276.JPG1.9 KB · Views: 0
 -
 P1160257.JPG2.1 KB · Views: 0
 -
 P1160270.JPG1.8 KB · Views: 0
 -
 P1160293.JPG2.3 KB · Views: 0
 -
 P1160301.JPG1.4 KB · Views: 0
 -
 P1160295.JPG2.8 KB · Views: 0
 -
 P1160296.JPG2.8 KB · Views: 0
 -
 P1160305.JPG2.5 KB · Views: 0
 -
 P1160306.JPG2.2 KB · Views: 0
 -
 P1160309.JPG2.2 KB · Views: 0
 -
 P1160310.JPG1.9 KB · Views: 0
 -
 P1160311.JPG2 KB · Views: 0