Theme editor

Scale Model Shop

Extraction unit

simontie

SMF Supporters
Joined
Jan 13, 2010
Messages
1,547
Reaction score
131
Points
63
1/3
Thread owner
A while back i build a small extractor unit based on a bathroom extractor fan and a plywood box, but in fairness just too small and not very efficient so i felt i needed something abit more substatial and not convinced the ready made ones suited what i wanted.
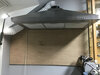
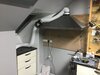
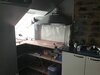
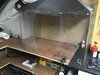
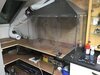
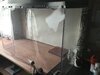
so I found on gumtree an almost new stainless steel cooker hood 900 wide, £20 well really what a bargain so i bought it took it home stripped it and cleaned it up not to much but wanted any residue removed so I gave it my best elbow and this evening thought about mounting it

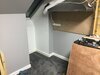
the ply is to protect the wall mainly and mount the unit on i will varnish it so it’s easy to clean and dust free ish
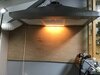
the 3 speed fan sucks up through the charcoal filters, and i have added an inline fan for extra umph ... suction, i will wire the 2 fans together eventually.
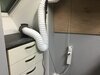
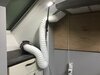
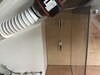
all i need is a 5 to 4inch reducer to connect up and for the moment I will still rely on putting the vent hose out the window allthough i have been thinking about a board that locks in to the window frame or drilling a hole through the wall but not sure i want to go that far yet!,!
the built in light is a bit week so i have bought a couple of 600 mm leds strip lights to illuminate the work area and will mount these underneath the stainless rim front and rear

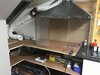
next i want to put a curtain around the unit so i can enclose the area Or open up in the unlikly event i build something bigger than 900mm but you never know
will keep you posted with up dates if you have any ideas please let me know
simon
 

Attachments

  • 5FF51CB6-985B-4A02-AC35-BFA49ED24F3D.jpeg
    5FF51CB6-985B-4A02-AC35-BFA49ED24F3D.jpeg
    3 KB · Views: 0
  • 918C0842-9049-4272-B69A-6BA2C20CD894.jpeg
    918C0842-9049-4272-B69A-6BA2C20CD894.jpeg
    2.7 KB · Views: 0
  • CBAAD2B2-8E51-498D-9BA7-87A2C3EBEB33.jpeg
    CBAAD2B2-8E51-498D-9BA7-87A2C3EBEB33.jpeg
    2.4 KB · Views: 0
  • 446F75FB-CABD-4964-89F9-7E8EC024E18E.jpeg
    446F75FB-CABD-4964-89F9-7E8EC024E18E.jpeg
    2.4 KB · Views: 0
Simon, £ 20 , wow that's a bargain, I used to supply those on jobs cost me more than that at trade !
Looks ok, what type of paint are you going to spray, hopefully acrylic ?
You'll certainly have enough power with another fan inline to keep the area clean .
Sound a good idea and a big saving .
 
Looks a good start on a set up Simon. You may find it performs even better if you take some of those bends out of the pipe. Each one reduces flow a little.

I'm using an old cooker hood myself, liberated from mum's house when I installed a new kitchen.

For now it's just propped at the back of a shelf but I intend to build some kind of enclosure for the new shed.
 
Thread owner
Simon, £ 20 , wow that's a bargain, I used to supply those on jobs cost me more than that at trade !
Looks ok, what type of paint are you going to spray, hopefully acrylic ?
You'll certainly have enough power with another fan inline to keep the area clean .
Sound a good idea and a big saving .
Hi john mainly acrylic the odd rattle can & a bit of enamel, you see loads of these on gum tree it seemed like a logical step to conver one and as you said a bargain at the price, not much to loose really so ill give it a try
 
Thread owner
Looks a good start on a set up Simon. You may find it performs even better if you take some of those bends out of the pipe. Each one reduces flow a little.

I'm using an old cooker hood myself, liberated from mum's house when I installed a new kitchen.

For now it's just propped at the back of a shelf but I intend to build some kind of enclosure for the new shed.
Andy i looked at a few vent options flat pipe and round but were it meets the combs of the roof i have just under 100mm so flexi seemed the easiest option, the solid pipe can add up once you sick a few bends in and it was probably alwas going to vent out the window
up side is the flexibility bendy stuff gives and i can bin it once it starts to build up residue and replace for a few quid
Simon
 
I've seen a few going free on our local Facebook pages - if you're fitting a new kitchen it can be a problem to get rid of the old appliances.
Pete
 
Nice one Simon :thumb2:
I'm also using a cooker hood for my airbrush work, those things work excellent.
Steven
 
Exactly the set up ive got simon ! My auntie was having a new kitchen so i said can i have your old extractor . Turned on its back it sits at the end of the workbench in my shed , with a couple of tumble dryer hoses venting it out through a hinged cut out in the shed door. The extractor was missing the bottom part with the grease filter but i just made a wooden frame the same size and tape filters to this . Once they get clogged i just bin them and put a new one on ,it saves the fan motor getting covered in paint . Another thing i did was to add an angled shroud from mdf to try and funnel the overspray a bit more .
 
Andy i looked at a few vent options flat pipe and round but were it meets the combs of the roof i have just under 100mm so flexi seemed the easiest option, the solid pipe can add up once you sick a few bends in and it was probably alwas going to vent out the window
up side is the flexibility bendy stuff gives and i can bin it once it starts to build up residue and replace for a few quid
Simon
Absolutely Simon. I didn't say there was anything wrong with the flexi pipe, I use it myself, but smoothing out it's path a bit might pay dividends.
 
Thread owner
Absolutely Simon. I didn't say there was anything wrong with the flexi pipe, I use it myself, but smoothing out it's path a bit might pay dividends.
Yep path is in progress mounted the inline motor to the wall tonight and wired 8n to the main switch on the unit think I have a couple of gutter brackets to support the rest of the hose to the window about a 1/2 meter or so
Exactly the set up ive got simon ! My auntie was having a new kitchen so i said can i have your old extractor . Turned on its back it sits at the end of the workbench in my shed , with a couple of tumble dryer hoses venting it out through a hinged cut out in the shed door. The extractor was missing the bottom part with the grease filter but i just made a wooden frame the same size and tape filters to this . Once they get clogged i just bin them and put a new one on ,it saves the fan motor getting covered in paint . Another thing i did was to add an angled shroud from mdf to try and funnel the overspray a bit more .
this one has a couple of charcoal filters clipped on either side of the motor, but i did notice the over spray build up on the inline one the few times i had used it by its self so that and the pre filters i am hoping will take a lot of the residue need to monitor it to see how long they last not sure what the replacement cost of these would be but i can always cut out the charcoal and use filter paper
sim9n
 
Thread owner
Progress motors in line & mounted to the wall wired into the main extractor unit, now I need to get hold of a sheet of ply and extend the work surface,
simon
 

Attachments

  • FC438A1F-C11C-45F9-8BDC-DEA77845667C.jpeg
    FC438A1F-C11C-45F9-8BDC-DEA77845667C.jpeg
    2.9 KB · Views: 0
Thread owner
So after spending the morning sledging, with our g-daughter & shopping with the boss i have been given the evening off to progress my project, ok not much but i have cleared out the area, cut the shelfs and support rails and put them in place, starting to take shape so now i am going to get a beer and have an early night
simon
 

Attachments

  • FE841E89-E6CE-4535-BE39-3C4E1BBF34AF.jpeg
    FE841E89-E6CE-4535-BE39-3C4E1BBF34AF.jpeg
    2.6 KB · Views: 0
  • 787F27E3-B3B8-4A5E-B2DE-8DA8C6373079.jpeg
    787F27E3-B3B8-4A5E-B2DE-8DA8C6373079.jpeg
    2.4 KB · Views: 0
  • 03BDB32E-D449-427D-82B5-93D8CAB50F08.jpeg
    03BDB32E-D449-427D-82B5-93D8CAB50F08.jpeg
    2.4 KB · Views: 0
  • 6E41CC95-79B7-49A8-A426-19A595BDEE04.jpeg
    6E41CC95-79B7-49A8-A426-19A595BDEE04.jpeg
    2.6 KB · Views: 0
So after spending the morning sledging, with our g-daughter & shopping with the boss i have been given the evening off to progress my project, ok not much but i have cleared out the area, cut the shelfs and support rails and put them in place, starting to take shape so now i am going to get a beer and have an early night
simon
Oh deep joy !
 
Thread owner
Hi reluctant to say finished, but it‘s try it and see time
had a couple of perspect sheets cut these to size and managed to borrow some clear flexible curtain they typically use in wearhouse for forklifts to move in and out off doorways.
lastly i put 2 old clip board clips on the outside face luck rather than good judgment but on Saturday while shopping i noticed some scrap wall paper being binned from a large diy store and asked if i could have it help your self was the reply so i took 3 rolls, my plan was to pin it inside the booth to act as an overspray catcher.. but noticed there was just enough room to slip it in the sides and i used the clips to hold in place simple but looks like it will work and preserve the back board a little.
will see how it performs over the next few days and tweek were required
 

Attachments

  • 9F1E0574-5261-48B7-89EA-2D53297426FB.jpeg
    9F1E0574-5261-48B7-89EA-2D53297426FB.jpeg
    2.3 KB · Views: 0
  • 4B4C64D3-21EE-4997-A2E2-84B31D3558C9.jpeg
    4B4C64D3-21EE-4997-A2E2-84B31D3558C9.jpeg
    2.4 KB · Views: 0
  • 26FC48F1-A17B-4127-AC17-640E55AC80AA.jpeg
    26FC48F1-A17B-4127-AC17-640E55AC80AA.jpeg
    3.2 KB · Views: 0
  • 973F3E22-8F36-4575-BF28-C24525F06D36.jpeg
    973F3E22-8F36-4575-BF28-C24525F06D36.jpeg
    3.3 KB · Views: 0
  • FBEAE0EA-3B70-4322-95BE-C5BF580779DA.jpeg
    FBEAE0EA-3B70-4322-95BE-C5BF580779DA.jpeg
    3.4 KB · Views: 0
  • 6CA446AF-522F-4FC2-8A07-D011510C9782.jpeg
    6CA446AF-522F-4FC2-8A07-D011510C9782.jpeg
    2.5 KB · Views: 0
Back
Top