Theme editor

Scale Model Shop

Gern's bug

Status
Not open for further replies.
Thread owner
\ said:
I think I'm about in the ball park with whats happening ... Could be way off though so I'll wait till its finishedApart from that ... All looking good Dave!
Thanks Col, but I might just surprise you yet!

Gern
 
Thread owner
Got a lot done today!

Having seen what Ron does with his pizza bases, I figured I ought to have a go. I don't do pizza so I bought some insulating foam board off ebay. This is better than expanded polystyrene as it has a finer texture. It's a bit more expensive (5 pieces 1200x600x10mm cost me £20), but still not too bad.

I tried an experiment a few days ago and learned a couple of useful things.

1) DON'T use Halfords primer. It's a lovely stone grey colour but it melts the foam (Pic2)

2) Make sure your measurements are accurate or your corners won't match (Pic3)

Otherwise it looks OK for a first attempt.

View attachment 71818

View attachment 71819

View attachment 71820


Anyway, I made a floor for part of my dio.

View attachment 71821


I've also done some 'pimping' to my bug. Some extra markings and some spiky bits (I know I said I wasn't going to do them, but I changed my mind).

View attachment 71822

View attachment 71823

View attachment 71824


Still not finished with him though.

Gern

View attachment 184841

View attachment 184842

View attachment 184843

View attachment 184844

View attachment 184845

View attachment 184846

View attachment 184847
 

Attachments

  • Test1.JPG
    Test1.JPG
    1.7 KB · Views: 0
  • Spiky bits.JPG
    Spiky bits.JPG
    3.2 KB · Views: 0
  • Pimped2.JPG
    Pimped2.JPG
    2.5 KB · Views: 0
  • Pimped1.JPG
    Pimped1.JPG
    2.2 KB · Views: 0
  • Floor1.JPG
    Floor1.JPG
    1.9 KB · Views: 0
  • Test3.JPG
    Test3.JPG
    1.9 KB · Views: 0
  • Test2.JPG
    Test2.JPG
    2.1 KB · Views: 0
Thread owner
Here's a thought. Both Alan and Col reckon they've sussed out what I'm doing here. How 'bout if they (or anyone else who might want a go) PM their ideas of what I'm going to prove to someone now, and we can see if they're right when I'm done?

Just for fun mind, I'm not offering prizes!

Gern
 
Dave i like the arachnid a lot nicley painted, this is going to be one cracker of a dio when it is done and i for one cant wait to see it.

scott
 
OK .... Now you've added buildings ....and a floor.... I thought it was all going to be rough open ground,

I'm lost!
 
Thread owner
Nothin' special about the building Col. The beastie is about 18 inches long and 8 inches wide, add in the figures and the scout and I'm using a board that's 24" x 12".

That's a big bit to cover with just grass an' dirt so I thought I'd use up a corner with a ruined building - just a floor and a couple of walls. I'm going to have a go at moulding some rocks too. Might as well try everything while I'm in dio mode!

Gern
 
Regarding the rocks ....If you'll accept a tip ... If you have any old bits off polystyrene knocking around then break them up and glue them to the base with PVA, when they're dry use a mini Bunsen or ciggy lighter to melt them into 'rock shapes' any big gaps can be filled with polyfiller or plasticine .... Paint them mid grey then use a mid brown dry brush over the raised surfaces, just slap a heavy black wash over them to finish them off, ifn you want you can sprinkle some scatter over them when they're wet and it'll soak up a bit of the wash making it blend in a bit and it'll be stuck on OK when everything's dry.
 
That is a good looking building Dave.

You mentioned Halfords Primer.....You're dead right, it does melt polystyrene, but sometimes it can work with you. I sprayed the model sub base with the stuff, knowing the effect it would have....

In fact anything that requires 'cratering' I heartily recommend the stuff....Hubble bubble!

Ron
 
Thread owner
Thanks guys.

So for making rocks then, I can take some polystyrene and set fire to it or melt it with cellulose spray! Here was me thinking the easy way was wIth a mould and some plaster of Paris!

I'll try all three and let you know how I get on.

Gern
 
Yes Dave, burn and melt !!

One of the times you can be destructive and creative at the same time :)
 
Thread owner
I shall blame you pair if I end up burning my house down or poisoning myself on the fumes!

Meanwhile, back at the ranch:

I've coloured the floor I made and found this foam stuff soaks up paint like a sponge. I already knew I'd got to thin it considerably and I'm happy with what I got, but I still used a lot of paint. Can I make up a thin paint mix using much cheaper powder paint and use that?

Gern
 
powder paint might be a good idea as it'll have a rougher finish when dried, will add to the texture realism.

And i shall be stealing that idea by the way ta! :)
 
Thread owner
\ said:
powder paint might be a good idea as it'll have a rougher finish when dried, will add to the texture realism.And i shall be stealing that idea by the way ta! :)
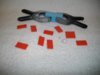
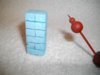
Off to the kitchen to start mixing then .....

I'll post what I get, good or bad.

Gern
 
Thread owner
I'd better do the 'before' pics before I start splashin' paint everywhere.

View attachment 71855


View attachment 71856

View attachment 71857


I remembered to keep the 'bricks' I'd cut out of the walls. These will form the base of the rubble. They gotta be OK 'cos they're the real bricks that fell out - right?

The red bits will be coping stones and the beads will form a decorative feature on top of the pillar.

I 'distressed' the brickwork by bashin' it with things - corner of a ruler, end of my knife etc. Looks better than unmarked perfection.

Gern

View attachment 184878

View attachment 184879

View attachment 184880
 

Attachments

  • Walls2.JPG
    Walls2.JPG
    2.1 KB · Views: 0
  • Walls1.JPG
    Walls1.JPG
    1.8 KB · Views: 0
  • Painted floor.JPG
    Painted floor.JPG
    1.8 KB · Views: 0
Thread owner
\ said:
powder paint might be a good idea as it'll have a rougher finish when dried, will add to the texture realism.And i shall be stealing that idea by the way ta! :)
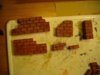
Not sure it's worth copying Col. Powder paint doesn't seem to have the pigment density to cover foam. Unless I didn't add anough powder and made a rinse instead of a wash of course! It might work as a paint using more powder, but I don't want a uniform colour. I think I'll invest in a few of those cheap acrylic tubes that Ron uses and give them a try. They surely work for him!

I remember seeing a video series by a guy who calls himself Kamloopian. He's come up with some mixture he calls 'goop' which he uses as textured paint. I'll see if I can find it.

Gern

Here you go:


It's very long but full of useful stuff.
 
Dave, it's difficult to cover foam, pizza bases, whatever, if you dilute your paints too much for that first coat. Try a good thick mix, that should do the trick.

When this is dry, go over the whole thing with a dark colour, then immediately wipe it off, this should leave a dark join between the stones and give the illusion of a gap between them.

Then alter the shade of your initial paint and pick out random stones, this will add a bit of contrast to the walls.....

If you want to be really posh, mix a bit of well diluted dk. green and paint - hit and miss - around the bottom and edges of the wall, it'll make it sort of mossy like.

If you're not too sure, have a play on a bit of scrap stuff before committing to the model.

Ron
 
Thread owner
The results of my attempts to colour the bricks with powder paint. It's brought out the mortar lines pretty well, but it's pants at colouring the bricks.

Also a shot of the mould I'm using to make rocks (assuming I don't burn the house down or poison myself using Ron and Col's ideas of course!) and shots of the decorative finial I made for my brick pillar. It's just two beads stuck on a cocktail stick and sprayed with Halfords Red Primer.

View attachment 71893

View attachment 71894

View attachment 71895

View attachment 71896


I think it looks pretty good!

Gern

View attachment 184916

View attachment 184917

View attachment 184918

View attachment 184919
 

Attachments

  • Pillar1.JPG
    Pillar1.JPG
    1.7 KB · Views: 0
  • Pillar parts.JPG
    Pillar parts.JPG
    2.1 KB · Views: 0
  • Mould.JPG
    Mould.JPG
    2.2 KB · Views: 0
  • Failed wash.JPG
    Failed wash.JPG
    1.9 KB · Views: 0
Thread owner

Attachments

  • Painted walls2.JPG
    Painted walls2.JPG
    3.2 KB · Views: 0
  • Painted walls1.JPG
    Painted walls1.JPG
    2.5 KB · Views: 0
  • Painted walls3.JPG
    Painted walls3.JPG
    2.5 KB · Views: 0
Status
Not open for further replies.
Back
Top