Theme editor

Scale Model Shop

Gern's D-day

Status
Not open for further replies.
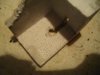
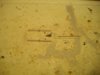
This is looking good so far dave the barber wire looks good although a few more strands will do the trick.

scott
 
Top work dave , i reckon the barbed wire looks spot on and the pill box is off to a great start , lovely stuff! , cheers tony
 
Thread owner
I've run into a small problem painting my figures. I use small crocodile clips to hold them at one end while I paint the other end. Once painted, I spray with Humbrol Matt varnish and leave them to dry overnight. Then I wrap a small piece of kitchen roll around the painted end to protect it and put that end into a clip while I paint the other end.

I did that with the latest batch but when I came to swap ends, I noticed little white spots all over the bits I'd painted and varnished.

Am I right in thinking this is most likely due to me not shaking the rattle can enough? If so, can I just paint over the spots or do I have to strip and re-paint from scratch?

I was pleased with my attempt at a pillbox. Alas, I primed it with a cheap household emulsion using a large, cheap brush. This has left brush marks everywhere which I can't cover up (I've said it before, and I'll say it again: my brush painting leaves a lot to be desired. I could leave brush marks using just water!). I tried a coat of watered down PVA with some baking soda sifted on. The baking soda just brushed off completely when I tried to remove the excess. Maybe my PVA was too thin. I'll give it one more try and if that doesn't work, I'll make another pillbox.

Gern
 
Hi Gern,

I used to put my cans in some warm water for 5 minutes and then I would shake for 1 or 2 minutes, that did it for me.

As for the pillbox I like it allot.

Cheers Richi
 
No probs. Dave.....The last picture was, I'm sure you realised, just a bit of a leg pull really....but the other two could work.

Is the first picture no use? You would only have to make a sort of mound and cut a slot in it.....

Your pillbox looks fine. If you coat the thing with fairly thin pva, let it dry or at least go sticky, then mix some polyfilla and plaster the polystyrene, that won't come off, and then you can scribe some cracks, whatever, into your 'Concrete' Might be worth a try.....

Or, again using pva, try putting dry polyfilla powder in a sieve and tapping it over your pillbox.

Can't help with your paint problem 'cos I don't use spray cans.
 
Thread owner
Duh! Don't know why I've been pithering about with baking soda when I've got a BIG bag of plaster in the cupboard. A coating of that over PVA will do the trick for sure.

My idea for a layout isn't that big Ron. I just thought some cliffs and a pillbox/bunker either side of a gap with some small sand dunes protected by barbed wire:

View attachment 76079


Gern

View attachment 189102
 

Attachments

  • IMGP1108.JPG
    IMGP1108.JPG
    2.5 KB · Views: 0
Looks great. My son is working on a diorama for a history project. What material did you use for your hedgehogs? Any hints on making those would be appreciated.
 
hi Dave looking real nice your little guys have come out very well in deed

sorry of i missed most on making the wire use the copper wire from phone cable, it works quite well ,around a pencil

, them just add some drops off sliver and rust , but to add some thickness do 2 bits off wire
 
don't know if this will help with a clear finish , but try a couple off coats off hair spray seems to work for me
 
Thread owner
\ said:
Looks great. My son is working on a diorama for a history project. What material did you use for your hedgehogs? Any hints on making those would be appreciated.
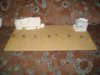
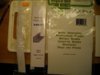
Hi Henny. I'll see if I can do a 'how to' with some pictures.

Gern
 
Hi Dave, I've been watching your trials, tribulations and eventual progress from the wings. It looks to be coming along nicely now. I like the concept of featuring a protected draw. It will be a point of focus in the finished diorama.

Cheers

Steve
 
Thread owner
OK. I've done a 'how to' for the hedgehogs I made. I've guessed at all the sizes and used the one I showed earlier as a pattern.

Materials used:

2mm x 2mm angle, microstrip and 0.010 Evergreen sheet. You could use just the sheet and cut and fabricate all the parts - but I'm a lazy b****r!

Cut three pieces of the angle 30mm long. Mark the centre of the length on the outside of the angle and mark 3mm in from each end on the inside.

Cut a small notch in each side at the 3mm marks you made. I used a small triangular file. Do this before you assemble the cross pieces (ask me what happens if you do it after!).

Join the flat faces of two of the cross pieces at right angles. Make sure you line up the centre marks on the inside as shown. I used superglue for speed although any glue suitable for styrene is OK.

Add the third cross piece at right angles to the other two - again make sure that the centre lines meet on the inside of the join.

Cut three pieces of the sheet into rectangles 10mm x 3mm. Mark the centre line and a line 2mm from the centre line as shown.

Cut two of the corners from this piece as shown.

Fix each piece in turn to one of the three cross beams. Line up the centre lines as shown.

Cut small squares from either the microstrip or the sheet material (I used microstrip because I managed to find a piece that was exactly the right width).

Fit these at each end of the cross piece as shown. Any excess can be easily trimmed with your knife once the glues has set.

View attachment 76081


View attachment 76082

View attachment 76083

View attachment 76084

View attachment 76085

View attachment 76086

View attachment 76087

View attachment 76088

View attachment 76089

View attachment 76090


Gern

View attachment 189104

View attachment 189105

View attachment 189106

View attachment 189107

View attachment 189108

View attachment 189109

View attachment 189110

View attachment 189111

View attachment 189112

View attachment 189113
 

Attachments

  • Hedgehog10.JPG
    Hedgehog10.JPG
    2.3 KB · Views: 0
  • Hedgehog9.JPG
    Hedgehog9.JPG
    2.3 KB · Views: 0
  • Hedgehog8.JPG
    Hedgehog8.JPG
    2.2 KB · Views: 0
  • Hedgehog7.JPG
    Hedgehog7.JPG
    1.6 KB · Views: 0
  • Hedgehog6.JPG
    Hedgehog6.JPG
    1.8 KB · Views: 0
  • Hedgehog5.JPG
    Hedgehog5.JPG
    2.2 KB · Views: 0
  • Hedgehog4.JPG
    Hedgehog4.JPG
    2.3 KB · Views: 0
  • Hedgehog3.JPG
    Hedgehog3.JPG
    2.2 KB · Views: 0
  • Hedgehog2.JPG
    Hedgehog2.JPG
    1.7 KB · Views: 0
  • Hedgehog1.JPG
    Hedgehog1.JPG
    2.2 KB · Views: 0
Thread owner
OK! Enough already!

This is getting beyond a joke. I tried Ron's suggestion last night to try and cover up the brush marks on this pillbox I'm trying to make. A good coating of PVA, allow to get tacky, cover with a layer of plaster dusted on through a sieve and leave to dry overnight. Sounds good yeah?

Brushed off the excess plaster this morning and NONE of it has stuck! None! Not so much as a single grain of it!

Somebody pleeeeeaaaase tell me why my PVA isn't working.

Gern
 
Hi Gern, I cant tell you why it isn't working but, most Bunkers are made out of poured concrete, and this was done with mostly wooden outside plates and after the concrete was cured they were removed.

So on most of the real bunkers you could find a wood grain on the surface, so I think when you take a brush and go over your diluted pva glue it would simulate a wood grain?

but that's what I think .

Cheers Richi
 
Thread owner
Hi Richi. I painted the thing originally to hide this:

View attachment 76093


I was hoping to get away with just a couple of coats of paint and I wouldn't care if a few tiny brush marks showed up - as you say, it could be taken for the wood grain from the shuttering. Unfortunately, the cheap paint and brush has left HUGE marks which I can't get away with in this small scale.

Gern

View attachment 189116
 

Attachments

  • IMGP1119.JPG
    IMGP1119.JPG
    2.2 KB · Views: 0
Looking goods Dave very informative conserning the hedge hogs and they look much better than the kit ones
 
Dave , I'm totally baffled as to why the pva doesn't work......

Brain storm.....PVA too thin / sprinkle the filla powder on whilst the pva is still wet / prime the polystyrene first (acrylic primer!) before the 'dusting' / use powdered grey floor adhesive as a brushed on slurry.

I can't think of anything else you could try....

On the positive side, thanks for the Hedgehog how to. Excellent tutorial
 
Thread owner
Ron, it's a complete mystery to me too. I figured that even if the PVA didn't work, then the water I diluted it with would react with the plaster and cause it to set. I also thought the emulsion I first used would have provided an adequate seal for the polystyrene.

Anyway, I'll try one more time with neat PVA. If you hear a loud scream tomorrow, you'll know it didn't work!

Richi - I've got a couple of spare spray bottles and I had thought of mixing up some PVA in water to use as a spray adhesive. How do you stop the glue setting in the nozzle after using it?

Gern
 
Status
Not open for further replies.
Back
Top