
Just a quicky so you all don't think I have given up building on the 74 squadron project.
I didn't do build photos this time. I was 'under the weather' and just got on with it a couple of hours a day (read when I was awake and not blasting buckets of snot everywhere!!!)
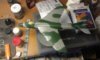
The build was pretty simple. Academy cocked up and put a 1/72 scale bang-seat on the tool! Just happened to have an Aires cockpit and seat for this so no problem there.
Having previously had dealings with NeOmega resin, then grabbing this set from Aires, was like a trip in a time warp. In future, NeOmega will be the first place I look for seats and cock pits!!!!
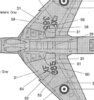
Fast forward to the end of the film and we have this.
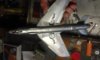
Top painted with Vallejo; dark sea grey, and Military green, which is a very good match to RAF Dark Green, even though it looks a bit to green on the photo, it is a lot better in the flesh. Honest. I have my DIY paint chips and it is just a fraction lighter than Xtracrylix RAF Dark Green. I just didn't have enough to use it!!!!!
View attachment 30555
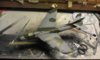
Bottom is with Alclad II, in various shades of Aluminium.
View attachment 30554
Whats the verdict? I confess to being totally lazy. I could not be chuffed to scan the paint plan into the PC, resize and print out to make a mask. Sooooo I just grabbed the AB and got on with it.
OK its a bit feathery in the edges, and the such. I am hoping that a quick tour with a polishing pad will sort out the worst. If not there is always break fluid...... or is it bleach?
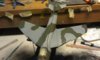
Just need to build the UC, which is a pain on this kit. Four doors and four activators on each of the main legs! (onto which the serial number for the Aircraft needs cutting into four parts each side!!!)
A bit of clearcoat then decals and more clear then a light weathering before the final clear.
Any comment welcome
Ian M
View attachment 35696
View attachment 35697
View attachment 148722
View attachment 148723
I didn't do build photos this time. I was 'under the weather' and just got on with it a couple of hours a day (read when I was awake and not blasting buckets of snot everywhere!!!)
The build was pretty simple. Academy cocked up and put a 1/72 scale bang-seat on the tool! Just happened to have an Aires cockpit and seat for this so no problem there.
Having previously had dealings with NeOmega resin, then grabbing this set from Aires, was like a trip in a time warp. In future, NeOmega will be the first place I look for seats and cock pits!!!!
Fast forward to the end of the film and we have this.
Top painted with Vallejo; dark sea grey, and Military green, which is a very good match to RAF Dark Green, even though it looks a bit to green on the photo, it is a lot better in the flesh. Honest. I have my DIY paint chips and it is just a fraction lighter than Xtracrylix RAF Dark Green. I just didn't have enough to use it!!!!!
View attachment 30555
Bottom is with Alclad II, in various shades of Aluminium.
View attachment 30554
Whats the verdict? I confess to being totally lazy. I could not be chuffed to scan the paint plan into the PC, resize and print out to make a mask. Sooooo I just grabbed the AB and got on with it.
OK its a bit feathery in the edges, and the such. I am hoping that a quick tour with a polishing pad will sort out the worst. If not there is always break fluid...... or is it bleach?
Just need to build the UC, which is a pain on this kit. Four doors and four activators on each of the main legs! (onto which the serial number for the Aircraft needs cutting into four parts each side!!!)
A bit of clearcoat then decals and more clear then a light weathering before the final clear.
Any comment welcome
Ian M
View attachment 35696
View attachment 35697
View attachment 148722
View attachment 148723
")