
Neil Merryweather
Active member
1/3
I am still a little bit khaki’d out at the moment, and I’ve been promising myself for AGES that I would make a start on my collection of Historex figures. I really don’t want to lose momentum with the GIs but the temptation has been too great and so I have decided to go for some COLOUR , in the form of this little chap.

This is the Historex colour illustration for the Dutch Grenadiers, which doesn’t, unfortunately, show the Chapeau Chinois(Chinese Hat) player.

So I had to do a bit of googling , and thank goodness for the internet, because I found these two great, albeit slightly conflicting, pictures.


I wanted to do one straight out of the box (more or less...) so I had to pick something relatively simple to make. The only things I intend to do much work on are the always awful Historex arms and hands, and the Chapeau Chinois itself will need some refining.
So here are all the bits

Everything went together rather nicely, thus far.

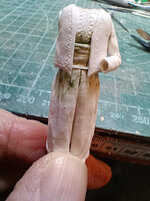
I have separated his head and drilled the collar out, but it’s going to need rebuilding as the plastic melted with the heat from the Dremel.
DOH! Rookie mistake.
I like to have the head separate for painting, which means I don’t have to strip the whole figure if I c*ck up the face.
The next step was the sash, and I spent a while trying to figure out which of these bits was the front and which was the back, assuming the squarer folds are for the mameluke sword.

Then I decided to dry fit the waistcoat to see how much would actually be seen, and I found there was no need for the weird bit at all because the whole back of the sash is covered.
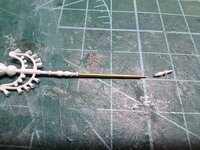
Next up are the arms and, as I said, the Historex ones are not that great

I don’t really want to get into sculpting new arms for this one so I just dumped the hands and fettled the arms a bit . I drilled out the cuffs ready for a couple of better, 3D printed hands.

I used a length of brass rod to line up the hands, but whether I use it for the actual instrument I haven’t decided yet. It was quite a fiddle getting all four connections to work, but I got there in the end.

So now it’s time to break out the Magic Sculpt to make the collar and the wrists, and don’t worry, I will use it to do some work on the GIs at the same time - they haven’t been completely forgotten...
Well that’s it for now
Cheers
Neil
This is the Historex colour illustration for the Dutch Grenadiers, which doesn’t, unfortunately, show the Chapeau Chinois(Chinese Hat) player.
So I had to do a bit of googling , and thank goodness for the internet, because I found these two great, albeit slightly conflicting, pictures.
I wanted to do one straight out of the box (more or less...) so I had to pick something relatively simple to make. The only things I intend to do much work on are the always awful Historex arms and hands, and the Chapeau Chinois itself will need some refining.
So here are all the bits
Everything went together rather nicely, thus far.
I have separated his head and drilled the collar out, but it’s going to need rebuilding as the plastic melted with the heat from the Dremel.
DOH! Rookie mistake.
I like to have the head separate for painting, which means I don’t have to strip the whole figure if I c*ck up the face.
The next step was the sash, and I spent a while trying to figure out which of these bits was the front and which was the back, assuming the squarer folds are for the mameluke sword.
Then I decided to dry fit the waistcoat to see how much would actually be seen, and I found there was no need for the weird bit at all because the whole back of the sash is covered.
Next up are the arms and, as I said, the Historex ones are not that great
I don’t really want to get into sculpting new arms for this one so I just dumped the hands and fettled the arms a bit . I drilled out the cuffs ready for a couple of better, 3D printed hands.
I used a length of brass rod to line up the hands, but whether I use it for the actual instrument I haven’t decided yet. It was quite a fiddle getting all four connections to work, but I got there in the end.
So now it’s time to break out the Magic Sculpt to make the collar and the wrists, and don’t worry, I will use it to do some work on the GIs at the same time - they haven’t been completely forgotten...
Well that’s it for now
Cheers
Neil


.jpg")
.jpg")
.jpg")
.jpg")