G
Guest
Guest
Lovely detail on that engine.....very nice indeed.
scott
scott

")
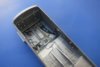
That looks good Steve, and most of the colour call-outs I've seen on late war Eduard kits offer aluminium as probable colour for wheel wells.\ said:I've started to detail the front wheel well. I've a first coat of paint on most of the bits I intend to paint, obviously being an 'enamelist' it will be a while before the next coat goes on and I tidy everything up.
I am not striving for historical accuracy, I have gone for an aluminium wheel well rather than RLM 02* which actually makes the detail harder to do, so I've just tried to add a bit of interest.
Later I'll do some washes etc.
View attachment 147125
Cheers
Steve
* Just my opinion. This was a late war prototype, built in late 1944, and unpainted wheel wells seems viable to me. I haven't found an image to show one way or the other. Of course someone will now produce a beautiful colour image to prove me wrong
It definitely depends on the manufacturer and the type. Like most things Luftwaffe, late war particularly, there are rarely cut 'n' dried answers. A lot of people seem to do Do 335s with RLM 02 wells etc, which is fine by me.\ said:That looks good Steve, and most of the colour call-outs I've seen on late war Eduard kits offer aluminium as probable colour for wheel wells.
It's a great solution. This is not a cheap kit, but it is fairly new, seems very nicely engineered (so far) and looks fairly accurate. You get what you pay for I suppose.\ said:Great solution to the nose weight issue, wish more manufacturers would think like this.

Only one cuppa allowed, and that whilst I had to wait for some bits to dry\ said:Limit your intake of tea???? What is it with time and motion studies that always hits the intake of tea
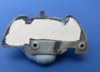
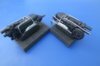
Tamiya do a similar thing with there 1/48 version but it's just a round cylinder that fits into the front engine.\ said:The first (rear) engine has now been sprayed black.
View attachment 147134
There is a strange light in the sky here in Brum which makes it look a lot greyer than it is.
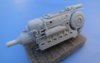
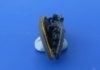
That will be dry for detailing tomorrow and in the meantime I will make a start on the second (front) engine. The Do 335 had a tricycle undercarriage and anyone who has built an aircraft model with this landing gear configuration will be aware of the dangers of tail sitting. The Do 335 was nick named 'ant eater' which gives an idea of how little room there is up front for weighting. HK models have come up with a very neat solution. Two weights, one of which is shaped to fit inside the front engine, and another smaller one which fits under the cannon bay.
Here's how it works in the front engine.
View attachment 147135
Very nice!
Cheers
Steve
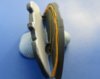
They are basically painted and just need a bit more detail and some suitable weathering.scalemodelling.co.uk is a privately operated online discussion forum. All content posted by members reflects their own views and opinions and does not necessarily represent those of the forum owners or administrators. While reasonable efforts are made to moderate content, no responsibility is accepted for user-generated material. By using this site, you agree to comply with UK law and the forum rules.