Theme editor

Scale Model Shop

HK Models 1/32 scale D. H. Mosquito

Status
Not open for further replies.

BarryW

Active member
SMF Supporters
Joined
Jul 23, 2011
Messages
6,147
Reaction score
462
Points
83
Age
70
1/3
Thread owner
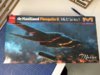
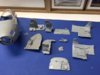
I will start cutting plastic Wednesday but this is what I will be building.


View attachment 256039


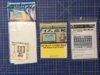
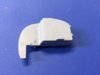
it will be largely out of the box but I will be using these.


View attachment 256037


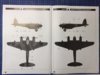
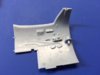
This is the aircraft I will be building, with the 'cookie' bomb and 'expanded' bomb bay with long range fuel tanks fitted.


View attachment 256038


I cannot wait to start cutting plastic but a dentist appt tonight and a school directors meeting Tuesday puts it off until Wednesday....


During the period of the move I have obtained a whole load of new tools and materials that I will be using for the first time.  All will be revealed during the build.
 

Attachments

  • Mossie bits.jpg
    Mossie bits.jpg
    2.9 KB · Views: 0
  • Mossie scheme.jpg
    Mossie scheme.jpg
    2.7 KB · Views: 0
  • Mossie.jpg
    Mossie.jpg
    2.9 KB · Views: 0
Nice.


I just noticed on the box art that little bit of text in the bottom right corner. That could be interesting....the Mossie series


Now that to me says there will be others.....bummer. lol


I will look forward to seeing this one Barry.
 
Thread owner
Yes Ian - from  their past record I am sure there will be a number of different versions.  This is in direct competition with the Tamiya one who, I am sure, will bring out their bomber version later this year.  Both the Tammy and HKM are nice kits with different engineering and both are worth building.
 
Does it include the bomb with the stencil writing on it? The writing would be a nice addition to the ordnance.


Looking forward to see this go together


The eduard detail sets and airscale stuff look really nice mate


John
 
I look forward to this one Barry. Ive just about finished the Tamiya kit which is superb. Will have to get one of these to go with it.
 
Thread owner
I have not looked closely yet at what stencilling is included.  The decals are Cartograph so they are pretty good, I just dont know how comprehensive.
 
always good to know they are cartograph. The Tamiya super kits in 1/32, despite being fantastic have atrocious decals
 
Thread owner
LOL - I have to agree about Tamiya's decals.  I have them all in my stash to work through after this HKM build and I have made a point of getting aftermarket decals or masks for all of them.  There are some great schemes out there...
 
Looks like this will be an interesting one Barry. So Wednesday is there big day then?
 
Thread owner
Well, I got home earlier than expected from the dentist and managed to grab 30 mins at the bench doing some prep


As is normal for a large kit with lots of sprues I used small post-it notes to label the sprues to help identifying them a lot easier and quicker.  There is about 20 sprues for this kit.


View attachment 256085


Above the sprues are back in the box with those I will be accessing first on top.


The plastic is good quality, crisply molded much by the slide molding method, not a trace of flash anywhere and the mold seams are minimal.  Not much cleaning up to do, Airfix this is not!!!


Here is a pick of the main components, I have clipped off a small sprue from the aircraft nose.  Once I have removed the spue 'nubs' the pieces will just need a swipe of a fine sanding stick to remove all trace of mold seams.   I just love the engineering, no fuselage halves to sand smooth!!


View attachment 256086


Roll on Wednesday to make a proper start....
 

Attachments

  • IMG_1213.jpg
    IMG_1213.jpg
    2.5 KB · Views: 0
  • IMG_1214.jpg
    IMG_1214.jpg
    3.1 KB · Views: 0
you always know if an aircraft is huge when the fuselage is in parts and is not single piece halves.


The post it notes are a good idea. I should do that with my Zoukei Mura Horten when I build it
 
Thread owner
The fuselage is designed that way so you can build up the cockpit and slide it in.  The join between the two halves follows a panel line and there are not many of those on a wooden wonder!!   reviews suggest the fit is spot on, something I will soon see for myself...
 
Oooh you tricked us Barry. It's a good job I popped in today otherwise I would have missed the start.


That looks like a very big box of plastic, should keep you busy for a while.
 
Thread owner
I managed an hour and half on the bench last night...


Put together some sub-assemblies for the cockpit. You can see where I have filled an extractor pin mark that needs sanding down of the bulkhead.


View attachment 256217


I have decided to add some extra detail.  Behind the instrument panel, I think it may be visible from the transparent nose, not a big deal some round sprue and lead wire will do it plus a bit of plastic card.  


View attachment 256218


I will also add some lead wire to one side of the cockpit wall.  Overall though the detail is good but some fairly basic simple work will make it better.  Oh - what look like extractor pin marks are not, the Mossie had round wooden bases in the cockpit to fix instruments to.


View attachment 256219


Still getting used to new routines living with my lady.  I will be staying at my old house tonight, which has still not completed, as I need to be up at 4.30am for a business breakfast meeting I have every Friday morning, so the earliest I can progress this further is Friday but it may not be until Sunday...Its great to be back with a build though.
 

Attachments

  • IMG_1216.jpg
    IMG_1216.jpg
    2.7 KB · Views: 0
  • IMG_1217.jpg
    IMG_1217.jpg
    1.5 KB · Views: 0
  • IMG_1218.jpg
    IMG_1218.jpg
    1.9 KB · Views: 0
Excellent detail, but the ejector pin marks will be a pain to sand down and fill, as they look to be numerous
 
Status
Not open for further replies.
Back
Top