Theme editor

Scale Model Shop

HMS Hood 1/200 Amati Models

Thread owner
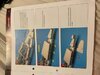
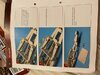
HMS Hood 1/200 Hachette /Amati Wooden kit Build Parts 20 and a review so far
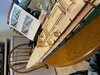
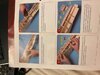
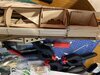
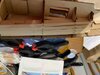
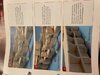
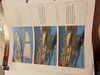
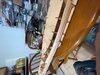
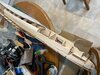
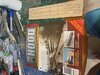
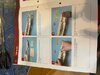
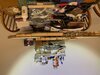
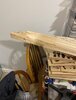
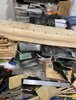
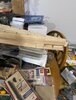
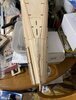
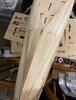
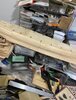
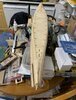
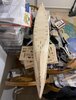
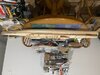
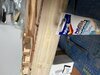
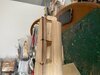
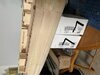
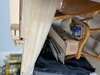
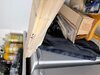
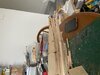
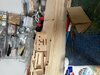
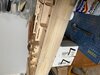
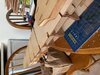
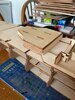
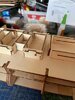
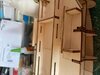
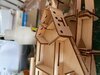
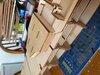
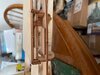
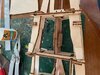
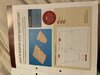
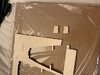
So as I stated previously this is part or stage 20 depending on how you word it
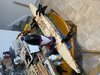
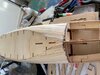
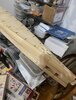
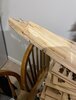
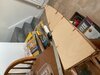
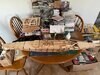
This was fitting out the rear decking and then I took some overall views of the model so far as the 1st layer of decking has been applied
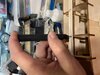
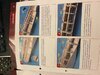
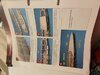
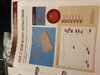
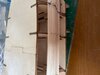
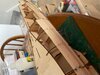
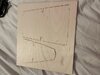
This also bought my first real problem to solve namely with part 20 should have been 2 deck pieces check and 2 spacers ok where are the spacers do you see them no neither did I so I made some from the left over spru from those deck pieces just a little challenge whether they forgot to add them to the spru or mine didn’t get done correctly who knows if it’s their mistake they might include them in a later issue but it doesn’t matter as making replacements was easy anyway here are the pictures
View attachment 439793View attachment 439794View attachment 439795
View attachment 439776View attachment 439777View attachment 439778View attachment 439779View attachment 439780View attachment 439781View attachment 439782View attachment 439783View attachment 439784View attachment 439785View attachment 439786View attachment 439787View attachment 439788View attachment 439789View attachment 439790View attachment 439791View attachment 439792

That’s it you’re up to date with where I’m at till I do some more probably tonight depending on how much each issue contains
This is turning into an impressive size wise and construction quality wise model so long as it keeps like this it will be an enjoyable build

Regards

Colin
 

Attachments

  • 61D5A82E-2517-455A-8E96-0BA6C8DE0B49.jpeg
    61D5A82E-2517-455A-8E96-0BA6C8DE0B49.jpeg
    33.1 KB · Views: 0
  • 6CFCA2AE-6197-4F58-9CAD-09D886F595A3.jpeg
    6CFCA2AE-6197-4F58-9CAD-09D886F595A3.jpeg
    3.7 KB · Views: 0
  • B4D9FE8B-DE63-482D-A2D8-CD22E428FF74.jpeg
    B4D9FE8B-DE63-482D-A2D8-CD22E428FF74.jpeg
    3.8 KB · Views: 0
  • 18797503-E9A0-4AD5-A2B3-D2B780BC4E2A.jpeg
    18797503-E9A0-4AD5-A2B3-D2B780BC4E2A.jpeg
    3.3 KB · Views: 0
  • 154CF654-F9BC-4F0A-A932-5E21FAA28EDE.jpeg
    154CF654-F9BC-4F0A-A932-5E21FAA28EDE.jpeg
    2.9 KB · Views: 0
  • 994B5CA7-5717-41DC-A523-D22BDDE0FEA0.jpeg
    994B5CA7-5717-41DC-A523-D22BDDE0FEA0.jpeg
    3.3 KB · Views: 0
  • 1CE070E3-39EF-4375-9697-98488D982E89.jpeg
    1CE070E3-39EF-4375-9697-98488D982E89.jpeg
    3.7 KB · Views: 0
  • 4BCD89CF-9E83-4C02-8023-5DA4CE9AE3B6.jpeg
    4BCD89CF-9E83-4C02-8023-5DA4CE9AE3B6.jpeg
    3.1 KB · Views: 0
  • C11F0EE3-42A3-4721-B828-6AD56E7650B8.jpeg
    C11F0EE3-42A3-4721-B828-6AD56E7650B8.jpeg
    3.1 KB · Views: 0
  • 2D47FD79-3959-4892-88D8-152F78AF1ABD.jpeg
    2D47FD79-3959-4892-88D8-152F78AF1ABD.jpeg
    3.5 KB · Views: 0
  • C2163C69-3A9B-4725-9F6E-F1CEDDCA347C.jpeg
    C2163C69-3A9B-4725-9F6E-F1CEDDCA347C.jpeg
    33.1 KB · Views: 0
  • 36DEF4F4-0D87-41E3-9449-9EBB8EE0475B.jpeg
    36DEF4F4-0D87-41E3-9449-9EBB8EE0475B.jpeg
    3.1 KB · Views: 0
  • C4A3FB0D-FCBA-43DD-B4A9-17CF2EC7BEB7.jpeg
    C4A3FB0D-FCBA-43DD-B4A9-17CF2EC7BEB7.jpeg
    2.9 KB · Views: 0
  • 4A244BE8-AE56-4EB3-9307-C56DDA17C71B.jpeg
    4A244BE8-AE56-4EB3-9307-C56DDA17C71B.jpeg
    3.3 KB · Views: 0
  • D5DF5BA4-1E00-4D93-87D7-90AA7DB59876.jpeg
    D5DF5BA4-1E00-4D93-87D7-90AA7DB59876.jpeg
    2.7 KB · Views: 0
  • 1905AEEF-6589-426F-9612-DCEC313DFEC9.jpeg
    1905AEEF-6589-426F-9612-DCEC313DFEC9.jpeg
    3.6 KB · Views: 0
  • 2FD4A649-CBD8-4451-AA1E-DE32A0784D7B.jpeg
    2FD4A649-CBD8-4451-AA1E-DE32A0784D7B.jpeg
    2.7 KB · Views: 0
  • F150CF7A-7858-40C6-AEF8-B740F2D2B0A5.jpeg
    F150CF7A-7858-40C6-AEF8-B740F2D2B0A5.jpeg
    2.6 KB · Views: 0
  • 9390AC8B-7E41-46FF-B1E9-76E90C32B442.jpeg
    9390AC8B-7E41-46FF-B1E9-76E90C32B442.jpeg
    2.1 KB · Views: 0
  • 146EA685-4BE0-47C0-9B06-18AC16643FCE.jpeg
    146EA685-4BE0-47C0-9B06-18AC16643FCE.jpeg
    3.3 KB · Views: 0
Thread owner
HMS Hood 1/200 Hachette /Amati Wooden kit Build Parts17-18
Ok this is where it starts to get more like it we now start fitting some of the sub assemblies previously built so on with the pictures
View attachment 439742View attachment 439743View attachment 439744View attachment 439745View attachment 439746View attachment 439747
As you can see I had to resort to various methods of clamping and holding parts in place overnight for the various adhesives to set and do their thing
View attachment 439748View attachment 439749View attachment 439750View attachment 439751View attachment 439752View attachment 439753View attachment 439754View attachment 439755View attachment 439756
Part 18
Adding more substructures
 
Hi Colin
She's really starting to take shape now. The size is quite intimidating. The instructions look very clear.
Jim
 
Thread owner
HMS Hood 1/200 Hachette /Amati Wooden kit Build Parts 21 & 22

Ok so there’s not a lot to do in 21 or 22 which starts the 1st session of planking as it’s main topic and an apology from Hachette with regards missing parts in part 20 ie the 2 spacers that I made from scrap well they supplied them in part 22 but as my replacements fit perfectly well I’m ignoring them so here are the requisite pictures after fitting the 2 decks I clamped everything down & placed a suitable weight on the decking to force it to contact the other deck below it and left it overnight
View attachment 439815
View attachment 439816View attachment 439817View attachment 439818View attachment 439819View attachment 439820

Part 22
This is start of the planking so 1st time I’ve used a pin pusher in anger apart from pins they didn’t fit the tube mostly an enjoyable experience just hope the pva glues the planks firmly into place as I don’t want any popping when I pull out the pins
View attachment 439821View attachment 439822View attachment 439823View attachment 439824View attachment 439825View attachment 439826View attachment 439827View attachment 439828

Regards

Colin
 

Attachments

  • 6A44D5FF-9207-46AC-9146-82CD10C0AD10.jpeg
    6A44D5FF-9207-46AC-9146-82CD10C0AD10.jpeg
    33.3 KB · Views: 0
  • 8CE62DD3-4103-418A-89F0-8EE5A2036409.jpeg
    8CE62DD3-4103-418A-89F0-8EE5A2036409.jpeg
    3 KB · Views: 0
  • 6202B015-1DCE-4F56-8A26-7E3622B9A8CE.jpeg
    6202B015-1DCE-4F56-8A26-7E3622B9A8CE.jpeg
    3.7 KB · Views: 0
  • F757BF86-9747-48ED-A520-169BBDD14304.jpeg
    F757BF86-9747-48ED-A520-169BBDD14304.jpeg
    3.3 KB · Views: 0
  • 68FC1631-D7C0-4B09-8EBC-38E2F31F628E.jpeg
    68FC1631-D7C0-4B09-8EBC-38E2F31F628E.jpeg
    2.7 KB · Views: 0
  • 546983D5-F811-4C79-B59F-82ABB85105BE.jpeg
    546983D5-F811-4C79-B59F-82ABB85105BE.jpeg
    3.3 KB · Views: 0
  • EAEEE6BA-446B-4798-AA28-ED79D3770116.jpeg
    EAEEE6BA-446B-4798-AA28-ED79D3770116.jpeg
    3.2 KB · Views: 0
  • EF2B9F5F-CB4B-471C-986D-F20D56ED6914.jpeg
    EF2B9F5F-CB4B-471C-986D-F20D56ED6914.jpeg
    3.1 KB · Views: 0
  • C1415B3B-6C65-457F-9601-2502F2345D7A.jpeg
    C1415B3B-6C65-457F-9601-2502F2345D7A.jpeg
    3.5 KB · Views: 0
  • 56A6C916-45D1-40D8-87B1-8278DD459946.jpeg
    56A6C916-45D1-40D8-87B1-8278DD459946.jpeg
    32.5 KB · Views: 0
  • E3088455-FEC0-4692-B247-F69485F0BB9B.jpeg
    E3088455-FEC0-4692-B247-F69485F0BB9B.jpeg
    2.9 KB · Views: 0
  • 3BCB14D2-8871-4170-87DC-A04D23650F08.jpeg
    3BCB14D2-8871-4170-87DC-A04D23650F08.jpeg
    2.7 KB · Views: 0
  • 4FD3E371-484E-479B-A11E-DE18808677FA.jpeg
    4FD3E371-484E-479B-A11E-DE18808677FA.jpeg
    2.8 KB · Views: 0
  • 426E69E3-E7D5-4FA6-9F41-DD348D79BFE5.jpeg
    426E69E3-E7D5-4FA6-9F41-DD348D79BFE5.jpeg
    3.6 KB · Views: 0
Thread owner
HMS Hood 1/200 Hachette /Amati Wooden kit Build Parts 23-25
Hello everybody not much to say about this at present as all it involves is measuring cutting gluing & pinning the planks to the external ribbing of the model and when they are dry and fully stuck remove the pins and sand smooth then move onto the next section and repeat
Any gaps that appear I fill with a piece of plank specifically cut to the shape of the gap and if possible pin it into place other than just relying on the pva to do its job which it has done so far providing you give it around 12 hours to set and harden so here are the requisite photos

Regards

Colin
View attachment 440048View attachment 440036View attachment 440037View attachment 440038View attachment 440039View attachment 440040View attachment 440041View attachment 440042View attachment 440043View attachment 440044View attachment 440045View attachment 440046View attachment 440047
 

Attachments

  • 89EFF246-5159-487C-B2E7-90BAFCF01000.jpeg
    89EFF246-5159-487C-B2E7-90BAFCF01000.jpeg
    3.7 KB · Views: 0
  • CDFF02F1-BAC0-4A6F-AA6E-E5BA49F13E73.jpeg
    CDFF02F1-BAC0-4A6F-AA6E-E5BA49F13E73.jpeg
    3.2 KB · Views: 0
  • F5A460FF-7EC5-4AFF-94DC-BD2CBEFD1DDA.jpeg
    F5A460FF-7EC5-4AFF-94DC-BD2CBEFD1DDA.jpeg
    3.5 KB · Views: 0
  • FE29DC48-98AA-4EF9-BAA6-B5574D84D2C8.jpeg
    FE29DC48-98AA-4EF9-BAA6-B5574D84D2C8.jpeg
    3.6 KB · Views: 0
  • F1473BCB-684D-4F68-B594-02EF21986612.jpeg
    F1473BCB-684D-4F68-B594-02EF21986612.jpeg
    3.6 KB · Views: 0
  • 01A6E3DB-4316-4609-A1AA-AACEB7BF6452.jpeg
    01A6E3DB-4316-4609-A1AA-AACEB7BF6452.jpeg
    2.3 KB · Views: 0
  • 76F94F75-FA1E-42A9-B87E-B5BD95F4688E.jpeg
    76F94F75-FA1E-42A9-B87E-B5BD95F4688E.jpeg
    33 KB · Views: 0
  • 52776412-AD6A-483B-8356-0D887FC339CB.jpeg
    52776412-AD6A-483B-8356-0D887FC339CB.jpeg
    2.7 KB · Views: 0
  • EC8703D5-F8FF-4CF1-BE32-6C9BC7952C1C.jpeg
    EC8703D5-F8FF-4CF1-BE32-6C9BC7952C1C.jpeg
    3 KB · Views: 0
  • 332FB55B-A37E-42DD-8A5F-97550A878AEB.jpeg
    332FB55B-A37E-42DD-8A5F-97550A878AEB.jpeg
    3.3 KB · Views: 0
  • 528B4121-B618-4417-8C0E-DE30ED8B944F.jpeg
    528B4121-B618-4417-8C0E-DE30ED8B944F.jpeg
    32.5 KB · Views: 0
  • 22C47B95-FEF7-4220-AF94-7C0EABDF8BA8.jpeg
    22C47B95-FEF7-4220-AF94-7C0EABDF8BA8.jpeg
    32.5 KB · Views: 0
  • 314FA3D6-9378-4E78-903D-8F9A78A41962.jpeg
    314FA3D6-9378-4E78-903D-8F9A78A41962.jpeg
    3.1 KB · Views: 0
Hi Colin
More good progress. Although I have never made a wooden ship I always imagine that the planking would be very difficult. So many quite complex curves. Is there a risk of splitting the planks with the pins.
Jim
 
Thread owner
Jim
The key to the complex curves etc is the bulkheads supplied with the model they are shaped to the contours of the hull and all you do is the lay planking on top of them to keep the same contour as the original supplied this is why it is crucial the initial building if the keel and the bulkheads are not done totally upright and at right angles to the false keel if these are in any way out of the true then when you go to fit the planking on which gives you your hull contours you might end up with a misshapen hull contour I hope that makes sense
Occasionally you might have to do some additional shaping / contouring but none of that has been required so far but it’s early days still so who knows what this might throw up in later stages
There is a chance of the planks splitting but from my experience so far that hasn’t happened and as this is only the 1st layer of planks any that do split will be covered by a second layer which normally hides all the blemishes from the 1st layer including damaged planking which if it does occur can be patched with either glue , filler or a specially cut piece of scrap from the planking off cuts
I have found using the pin pusher and providing your are straight and firm that the pins go into the planks and the bulkheads and do no split anything and once the glue has dried usually overnight when you remove the pins the hole that is left I smear pva over it to seal it up then after that has set the whole area is sanded smooth before moving onto the next section

Regards

Colin
 
Thread owner
HMS Hood 1/200 Hachette /Amati Wooden kit Build Parts 26-29

Hello all I haven’t bothered with magazine pictures this time as all it shows is more planking pieces so instead here are the photos up to the current stage which I can’t go no further as I need wood filler and sandpaper which I’m waiting for a delivery sometime next week
At least you can now see the hull taking shape along with its graceful line reminiscent of an old clipper ship in places just need sanding down then any gaps filled another sanding and that will complete the 1st layer of planking I assuming there are separate pieces for the bow and stern that are added later as there’s no mention of adding any planking to these areas other than what I have done

Regards

Colin

View attachment 440364View attachment 440365View attachment 440366View attachment 440367View attachment 440368View attachment 440369View attachment 440370View attachment 440371View attachment 440372View attachment 440373
 

Attachments

  • 5E4DD711-857E-4E20-AF6F-F09653C11888.jpeg
    5E4DD711-857E-4E20-AF6F-F09653C11888.jpeg
    2.7 KB · Views: 0
  • 524A471E-A920-4DD8-BA4D-5F6F9F6439FC.jpeg
    524A471E-A920-4DD8-BA4D-5F6F9F6439FC.jpeg
    3.8 KB · Views: 0
  • FA070173-325E-485E-9BDF-128D738D2ACB.jpeg
    FA070173-325E-485E-9BDF-128D738D2ACB.jpeg
    3.4 KB · Views: 0
  • 0B0F3228-502A-4934-8676-33983E515B8B.jpeg
    0B0F3228-502A-4934-8676-33983E515B8B.jpeg
    3.4 KB · Views: 0
  • 8386E92E-DB88-4198-9658-73179D572B8D.jpeg
    8386E92E-DB88-4198-9658-73179D572B8D.jpeg
    3.1 KB · Views: 0
  • 58F3F2F1-9906-4855-B999-B7ADC26A8104.jpeg
    58F3F2F1-9906-4855-B999-B7ADC26A8104.jpeg
    3.8 KB · Views: 0
  • 0049BBFC-2680-453E-980C-2D6D14D0F96D.jpeg
    0049BBFC-2680-453E-980C-2D6D14D0F96D.jpeg
    3.8 KB · Views: 0
  • 97CD85D8-62A4-4173-8F48-4ABB0CD6A88E.jpeg
    97CD85D8-62A4-4173-8F48-4ABB0CD6A88E.jpeg
    3.6 KB · Views: 0
  • D17DB00E-A000-4DBC-88D8-68A30E6C2097.jpeg
    D17DB00E-A000-4DBC-88D8-68A30E6C2097.jpeg
    2.6 KB · Views: 0
  • A0E44B87-8881-44DC-BE6D-5E71F96A2A3D.jpeg
    A0E44B87-8881-44DC-BE6D-5E71F96A2A3D.jpeg
    3.4 KB · Views: 0
HI Colin yes i know what you are goin through on makin this hull as when i was makeing my nr 8ft tiger hull all the sanding down i had to do on that as in my opinion its the worst part of building a wooden ship an have you used sanding sealer as that fills all the tiny holes in the wood an tiny gaps in the plankin but on my tiger i used a easyier method of covering the hull i called it ply wrap a round doin it in sections an i suppose this is a static display model ? as im really enjoying seeing it come to form the nice sleek hull that it will be well done so far as its very hard work but you are getting there
chris
 
Thread owner
HMS Hood 1/200 Hachette /Amati Wooden kit Build Parts 30-31

Not much to show at present as only the sand paper arrived no filler apparently it’s delayed anyway it will get here sometime
Meanwhile I have sanded the hull down ready for the filler and then another sanding ready for the second planking which should have started in parts 30 to 31 but without the filler that’s impossible so here’s a couple of pictures in nautical terms port & starboard

Regards

Colin
View attachment 440683View attachment 440684
 

Attachments

  • 103883EB-123F-493E-B648-4807AB3B3E73.jpeg
    103883EB-123F-493E-B648-4807AB3B3E73.jpeg
    2.6 KB · Views: 0
  • 9427A1A0-F769-4B90-B0CC-E0BDDDA68713.jpeg
    9427A1A0-F769-4B90-B0CC-E0BDDDA68713.jpeg
    2.9 KB · Views: 0
Thread owner
HMS Hood 1/200 Hachette /Amati Wooden kit Build Parts 30-31 Wood filler arrived

Yea the filler has arrived yesterday afternoon so in the evening I went over the entire hull filling in all the gaps left by the planking
This morning I sanded down the said hull which is completely smooth and ready for the 2nd planking layer to be added

Regards

Colin

View attachment 440845View attachment 440846View attachment 440847View attachment 440848View attachment 440849View attachment 440850View attachment 440851View attachment 440852
 

Attachments

  • 466B4687-0C5B-4FAE-B5B5-B8C9889595F6.jpeg
    466B4687-0C5B-4FAE-B5B5-B8C9889595F6.jpeg
    3 KB · Views: 0
  • 1A263D75-3758-438E-AD2B-8344AFAE0009.jpeg
    1A263D75-3758-438E-AD2B-8344AFAE0009.jpeg
    2.7 KB · Views: 0
  • 9CA86168-4780-4473-93CC-C852EF7F64F3.jpeg
    9CA86168-4780-4473-93CC-C852EF7F64F3.jpeg
    2.8 KB · Views: 0
  • B8754925-EC6F-4A12-B73B-9EBBBEC70FA8.jpeg
    B8754925-EC6F-4A12-B73B-9EBBBEC70FA8.jpeg
    3 KB · Views: 0
  • 4A30F103-0E4C-42E1-B81A-DCADBC028EBE.jpeg
    4A30F103-0E4C-42E1-B81A-DCADBC028EBE.jpeg
    3.1 KB · Views: 0
  • EB40DB8D-F856-4652-930B-5F411526B3FB.jpeg
    EB40DB8D-F856-4652-930B-5F411526B3FB.jpeg
    2.7 KB · Views: 0
  • 130C6D81-4D67-4150-AF8B-B73DACCFB4C9.jpeg
    130C6D81-4D67-4150-AF8B-B73DACCFB4C9.jpeg
    3.1 KB · Views: 0
  • F3FED665-1EDD-448A-B65C-F0E2A932F4DF.jpeg
    F3FED665-1EDD-448A-B65C-F0E2A932F4DF.jpeg
    3 KB · Views: 0
Hi Colin
That's a lot of filling and sanding but I imagine it's an important step. The better this job is done the better the finish of the next layer :thumb2:
Jim
 
Thread owner
HMS Hood 1/200 Hachette /Amati Wooden kit Build Part 32

Hello again sorry for lack of any posting but I have a good excuse that is Christmas Holidays whereupon I contracted COViD which knocked me for 6 until now when I was just able to start building again so I have finished Part 32 not that there was much to do just 10 planks which I’m now waiting to dry before moving onto Part 33 and beyond

Regards

39812AA5-EE11-474E-82E6-6F9FC75CECF6.jpeg
 
Hi Colin
Glad you're recovering from this dreadful virus. Looking forward to more progress on this.
Jim
 
Back
Top