Firstly a happy new year to one and all. I hope 2019 proves to be a great year.
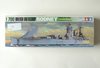
The last couple of months have been very frustrating for me. A whole load of silly life issues cropped up, none very serious but dented my modelling mojo and restricted bench time. I am looking forward to joining in with two light-hearted, fun GBs this year (The Toon Challenge and the Starter Kit build) but felt I needed a more serious project as well. I went to my rather small stash and found this. A Tamiya kit from the 1970s.
View attachment 324484
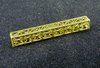
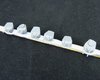
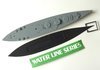
I bought it at a show for the grand sum of £6 and put it away and forgot it was there. When I opened it the other day I found this at the bottom of the box.
View attachment 324487
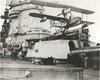
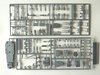
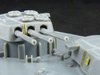
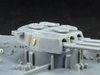
That was an surprise and so I decided to give it a go. You don't get much in the kit - basic but nice.
View attachment 324485
View attachment 324486
A single sheet with a bit of history and instructions and a couple of decals.
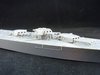
Just for any one interested. HMS Rodney was build in Birkenhead in the mid 1920s. Unusual in that all her main armament (9 16inch guns) were at the pointy end. She had quite a history in WW2. In 1941 she torpedoed the Bismark, she was part of Operation Torch, the invasion of Sicily and the D-Day landings as well as escorting convoys on the Murmansk run. She was scrapped in 1948.
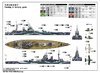
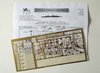
The kit is of the ship before the war but the PE set allows it to be made as a WW2 version. It underwent many upgrades during its service and it is very difficult to figure out what was altered and when. I'll kind of muddle through to make something close to how she looked towards the end of WW2. Also by choosing that period I think I can get away with a camo paint job rather than just grey. (The chart here is from a different kit, Trumpeter I think, a later incarnation of HMS Rodney)
View attachment 324483
I hope some of you will feel it worth following along. Those who know me will know I model at a snails pace so be patient.
Jim
The last couple of months have been very frustrating for me. A whole load of silly life issues cropped up, none very serious but dented my modelling mojo and restricted bench time. I am looking forward to joining in with two light-hearted, fun GBs this year (The Toon Challenge and the Starter Kit build) but felt I needed a more serious project as well. I went to my rather small stash and found this. A Tamiya kit from the 1970s.
View attachment 324484
I bought it at a show for the grand sum of £6 and put it away and forgot it was there. When I opened it the other day I found this at the bottom of the box.
View attachment 324487
That was an surprise and so I decided to give it a go. You don't get much in the kit - basic but nice.
View attachment 324485
View attachment 324486
A single sheet with a bit of history and instructions and a couple of decals.
Just for any one interested. HMS Rodney was build in Birkenhead in the mid 1920s. Unusual in that all her main armament (9 16inch guns) were at the pointy end. She had quite a history in WW2. In 1941 she torpedoed the Bismark, she was part of Operation Torch, the invasion of Sicily and the D-Day landings as well as escorting convoys on the Murmansk run. She was scrapped in 1948.
The kit is of the ship before the war but the PE set allows it to be made as a WW2 version. It underwent many upgrades during its service and it is very difficult to figure out what was altered and when. I'll kind of muddle through to make something close to how she looked towards the end of WW2. Also by choosing that period I think I can get away with a camo paint job rather than just grey. (The chart here is from a different kit, Trumpeter I think, a later incarnation of HMS Rodney)
View attachment 324483
I hope some of you will feel it worth following along. Those who know me will know I model at a snails pace so be patient.
Jim
 !
!")