Theme editor

Scale Model Shop

Humvee Resuscitated to life.

Status
Not open for further replies.

rtfoe

Well-known member
Joined
Apr 29, 2018
Messages
9,251
Reaction score
542
Points
113
Location
Shah Alam, Malaysia
1/3
Thread owner
Hi,
Lately I have been posting WIP builds that I had already completed so for a change an actual WIP before completion from me would sort things out. This also gives me an opportunity to continue where I had left off.

The Kit
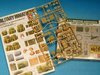
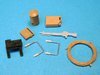
1/35 scale Humvee by ESCI was a kit given to me by a fellow modeler. He had basically assembled the body and on finding how wrong the shape was decided if I should have a go with it. Like most manufacturers at the time trying to beat the market race normally worked on prototype drawings or rare snap shots so dimensions and scale were often iffy. The obvious signs that was wrong on this particular kit was the pronounced curvature of the bonnet and wheels. With some references and real photos I proceed with the corrections...

View attachment 313040View attachment 313041View attachment 313058

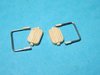
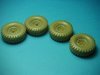
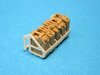
Above are the resin tyres I would use and am not sure of the brand but did look near enough to some reference photos and looked more beefy than the kit tyres that tend to be too rounded at the edges.

View attachment 313042View attachment 313043View attachment 313044

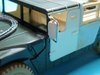
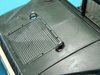
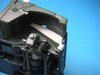
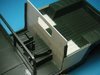
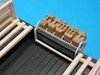
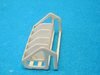
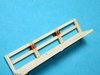
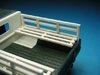
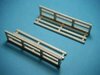
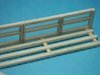
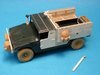
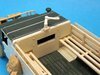
I was going for the open back truck bed version and scratched false platforms to cover the holes left from the backseats. The side doors were replaced with pla card...interior and back cabin was built up with pla card as well.

View attachment 313045View attachment 313046

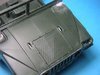
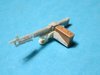
I don't have a shot of the bonnet before the correction to show curved it was but it had a very pronounced dip....you can just see the amount of lifting from the plastic wedge beneath the bonnet and the side joint where putty would be added and sculpted.

View attachment 313047View attachment 313048

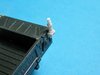
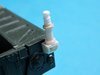
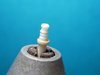
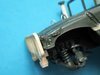
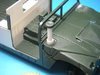
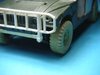
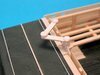
The front was cut and angled forward Side signal indicators had to be sliced off and repostioned...a snorkel for the air filter was added with tubing.

View attachment 313049View attachment 313050

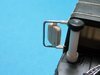
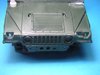
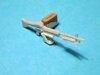
At this angle the bonnet now has the distinctive flatter top...gaps have been covered and sculpted, lights repositioned and the lifting hooks that have disappeared by the height of the bonnet are repaced with wire.

View attachment 313051View attachment 313052

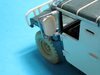
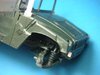
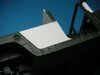
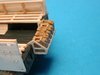
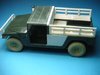
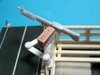
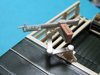
The kangaroo bar was made up of pla strips...later on I had to correct the height as it didn't look right. It's removable for easy painting.

View attachment 313054View attachment 313055View attachment 313056View attachment 313057

More later as I organise the images. You're welcome to comment

Cheers,
Richard
 

Attachments

  • 10b.jpg
    10b.jpg
    2.9 KB · Views: 0
  • 10a.jpg
    10a.jpg
    2.4 KB · Views: 0
  • 10.jpg
    10.jpg
    2.4 KB · Views: 0
  • 9.jpg
    9.jpg
    2.6 KB · Views: 0
  • 8.jpg
    8.jpg
    2.7 KB · Views: 0
  • 7.jpg
    7.jpg
    2.6 KB · Views: 0
  • 6.jpg
    6.jpg
    2 KB · Views: 0
  • 5.jpg
    5.jpg
    2.7 KB · Views: 0
  • 4a.jpg
    4a.jpg
    3.3 KB · Views: 0
  • 4.jpg
    4.jpg
    3 KB · Views: 0
  • 3.jpg
    3.jpg
    2.8 KB · Views: 0
  • 2.jpg
    2.jpg
    2.8 KB · Views: 0
  • 12.jpg
    12.jpg
    2 KB · Views: 0
  • 15.jpg
    15.jpg
    2.5 KB · Views: 0
  • 11.jpg
    11.jpg
    1.9 KB · Views: 0
  • 17.jpg
    17.jpg
    2.5 KB · Views: 0
  • 16.jpg
    16.jpg
    2.4 KB · Views: 0
  • 1.jpg
    1.jpg
    3.5 KB · Views: 0
Nice work so far Richard:smiling4:
Most of us would of slung it or built as is! Great to see a kit being tweaked up:thumb2:
 
Nice work Richard. As Si said most would have binned it. Are we looking at a Black Hawk Down scenario>
 
Hi Richard
Always enjoy your work so I'll enjoy following this. Definitely not the best of kits to start with but I'm sure you will turn out a great model. Neat and tidy work already.
Jim
 
Thread owner
Hey Guys...nice to have you along. This Humvee build was left on the shelf of shame for the last 3-4 years but I intend to finish it unfortunately not for an enthusiastic scenario as Peter has suggested...sorry Peter I'm thinking of a little smaller vignette.
Steve...when you're on a roll just as I did at the time adding details came at a fast pace. These days I need to push myself.
Si...I marvel at the amount of kits that I see in forums that get binned with a bit of heartache that it could have been saved...I mean in the first place a kit is in pieces that we need to put together. I don't go overboard to correct a 1-2mm size difference or an extra rivet that is missing. Only really obvious flaws...I draw a line somewhere. :tongue-out3:
Peter...if it's worth the pain I'd do it. I don't have a Humvee in my collection and Generation Kill mini series just got me interested to do one.
Jim...I hope the enjoyment picks up where I left off...so much time has been invested would be a shame not to finish it. Neat and tidy?....looks can be deceiving.:smiling2:

Thanks for the lovely comments...more to come.

Cheers,
Richard
 
Thread owner
The flatbed version meant that a lot had to be scratch built after the driving compartment like the wooden seats. I'm guessing that these were field conversions especially the armour protection.

View attachment 313090 View attachment 313091

Pla strips were cut to length and were easily done keeping the angles straight was the challenge. Each seat had 40 individual strips not counting the side supports.

View attachment 313092 View attachment 313093View attachment 313094 View attachment 313095

Copper was used for the brace attaching the armour plate sheet later.

View attachment 313096View attachment 313097

The armour plate sheets were made from pla sheet and bolts added from styrene rod. Holes were drilled out for petrol, exhaust and signal indicators. Masking tape straps for the rucksacks that will be draped over the sides.

View attachment 313098

Accesories and extra detail were made separately...some coming from a box of Tamiya Modern accesories equipment set...

View attachment 313099

Exhuast with muffler covering fashioned from two styrene tubes...the smaller one bent over a flame and drilled out.

View attachment 313100

Thin stretched sprue glued and roughed up with a drill bit for welding on the muffler. The tape is to keep the bent end of the exhaust in shape.

View attachment 313101

The rear end of the tailgate has a frame that was probably a field modification to hold extra jerrycans. Using the kit jeerycans as measurements I scratched it with pla card and strips. You can see the pencil measurements on the scratched frame.

View attachment 313102
View attachment 313108
View attachment 313104View attachment 313105

The frame was hung on the rear tail flap door.

View attachment 313106View attachment 313107

Comments welcomed...

Cheers,
Richard
 

Attachments

  • 27.jpg
    27.jpg
    2.3 KB · Views: 0
  • 34.jpg
    34.jpg
    3.2 KB · Views: 0
  • 33.jpg
    33.jpg
    2.2 KB · Views: 0
  • 29.jpg
    29.jpg
    2 KB · Views: 0
  • 28.jpg
    28.jpg
    2.4 KB · Views: 0
  • 26.jpg
    26.jpg
    2 KB · Views: 0
  • 25a.jpg
    25a.jpg
    2 KB · Views: 0
  • 24.jpg
    24.jpg
    1.9 KB · Views: 0
  • 23.jpg
    23.jpg
    3.7 KB · Views: 0
  • 29b.jpg
    29b.jpg
    2.6 KB · Views: 0
  • 29a.jpg
    29a.jpg
    2.5 KB · Views: 0
  • 22a.jpg
    22a.jpg
    2.5 KB · Views: 0
  • 22.jpg
    22.jpg
    2.8 KB · Views: 0
  • 21.jpg
    21.jpg
    2.6 KB · Views: 0
  • 20.jpg
    20.jpg
    2.5 KB · Views: 0
  • 18.jpg
    18.jpg
    2.6 KB · Views: 0
  • 14.jpg
    14.jpg
    2.5 KB · Views: 0
  • 13.jpg
    13.jpg
    2.3 KB · Views: 0
Thread owner
Dry fitting some of the accessories to the Humvee... these shots were taken before I puttyied and fitted the shaved off signal lights on the bonnet side.

View attachment 313214View attachment 313225

Some close up of the crude armoured door handle and hinges.

View attachment 313216

More accessories...

View attachment 313217

The Pig and pintle mount...

View attachment 313218View attachment 313219

The swerving mount for the Pig to ride on.

View attachment 313220

The cabs rear mounted armour plate bolted on.

View attachment 313221View attachment 313222View attachment 313223

Everything is removable for easy painting.

View attachment 313224

Just a reminder that these modifications are not finely detailed, I'm only winging it.

Cheers,
Richard
 

Attachments

  • 39.jpg
    39.jpg
    2.8 KB · Views: 0
  • 38.jpg
    38.jpg
    1.8 KB · Views: 0
  • 37.jpg
    37.jpg
    1.8 KB · Views: 0
  • 36.jpg
    36.jpg
    2.4 KB · Views: 0
  • 35.jpg
    35.jpg
    2.7 KB · Views: 0
  • 31.jpg
    31.jpg
    2.6 KB · Views: 0
  • 40.jpg
    40.jpg
    3.5 KB · Views: 0
  • 40a.jpg
    40a.jpg
    2.5 KB · Views: 0
  • 32.jpg
    32.jpg
    2.9 KB · Views: 0
  • 42.jpg
    42.jpg
    2.7 KB · Views: 0
  • 41.jpg
    41.jpg
    3.1 KB · Views: 0
Hi Richard
Huge amount of progress and it all looks neat and tidy. Looks great.
Jim
 
That looks very good, and especially impressive considering you could just have bought an Italeri kit that avoids most of the problems of the Esci ones :)
 
Thread owner
very nicely converted... its gonna be a SF Humvee.?

Greg, thanks. I'm a bit of a ditz when it comes modern day military stuff so I don't know if it's a SF Humvee.:thinking::smiling6:

Jim, thank you too. Those days I was particular about presentation so everything needed a blue background, nowadays I pretty much photograph in situ.

Scottie(Paul), preferred the flatbed rather than the slopped back and the front just didn't look like a Humvee. Not totally improved but should suffice for a vignette.

That looks very good, and especially impressive considering you could just have bought an Italeri kit that avoids most of the problems of the Esci ones :smiling3:

Jakko, thanks. This too was done before the Italeri kit came out. It's always the case after spending time on a kit modifying then the very same thing comes out in the market. Besides I wanted a challenge or you could say torture. :smiling6:

Cheers,
Richard
 
That's some excellent scratch building Richard but it's what we've come to expect from a man of your talents :smiling2:
 
Very nicely done so far. 'Hillbilly armor' was quite common early on. Only limited by availability of raw material and imagination. PaulE
 
Thread owner
Hi, thanks Mick, Ian and Paul,

I hope it turns out ok after painting and I like the way it's called "Hillbilly armor". Nice to know something new.

The reference showed wing mirrors that didn't come with the kit so out came the wire, pla strips, rod and putty. The wire was bent with a flat nosed plier.

View attachment 313302View attachment 313303View attachment 313304View attachment 313305

I lathed a piece of rod inserted in a power drill for the antenna base.

View attachment 313306View attachment 313307View attachment 313308View attachment 313309

Thanks for looking in.

Cheers,
Richard
 

Attachments

  • 50.jpg
    50.jpg
    1.9 KB · Views: 0
  • 49.jpg
    49.jpg
    1.9 KB · Views: 0
  • 48.jpg
    48.jpg
    1.5 KB · Views: 0
  • 47.jpg
    47.jpg
    1.6 KB · Views: 0
  • 46.jpg
    46.jpg
    2.5 KB · Views: 0
  • 45.jpg
    45.jpg
    2.1 KB · Views: 0
  • 44.jpg
    44.jpg
    3 KB · Views: 0
  • 43.jpg
    43.jpg
    1.9 KB · Views: 0
Hi Richard
Great scratching. I do like the little turned aerial base.
Jim
 
Well Richard in the early days of IRAQ 2003 you could see Humvees like this...
Either in the Army or in the Marines (2nd pic 1St Recon Marines)
 

Attachments

  • marines-hmmwvs.jpg
    marines-hmmwvs.jpg
    3.1 KB · Views: 0
  • Sans titre.jpg
    Sans titre.jpg
    2.7 KB · Views: 0
Status
Not open for further replies.
Back
Top