Theme editor

Scale Model Shop

Ian M Faun Tank transporter with a PhZ 2000 as the load

Status
Not open for further replies.
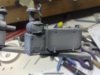
Ian mate this is lookin good so far some nice detail there, keep up the the good work.

scott
 
Looking real good Ian, i like the added touches. Keep up the good work mate.

Andy
 
Thread owner
Thanks Chaps!

I have got the glass in and the lid on now. The doors are painted inside and will be going on later this evening after I have masked the windows up as I am bound to pop on out in the process!!!

Have moved on to the out side details now and have just spent half an hour bending up four parts of PE that will form the steps!!!

Photos later.

Ian M
 
The long and the short of it is that You have the instructions from the kit AND three sets of instructions from Eduard. The trick is to look at them all at the same time so not to miss any of the PE that has to be used!
A nightmare isn't it. I've found that downloading the instructions from Eduard's website helps, they're generally much better than those that come with the fret

Your model's looking fantastic by the way, it's gonna be a real show winner this one
 
Thread owner
Thanks!

I did actually start off with the Trumpy instructions, and the Eduard ones, reading both and noting on the kits instructions when I had to remember PE parts. Helped a bit but I still have to keep an eye on all the plans!

Spent this morning putting loads of diamond plates on the bed of the tractor and the mudguards etc., I had a few problems getting them to stick, but got there in the end. I remembered to take photos this time of the process of turning a bit of plastic into a bit of metal. Once I have got one of the mudguards finished, I will post the process in a little series.

Ian M

PS happy Easter!
 
Thread owner
Well I said I would put some photos up next time so I better keep my word.

As I said last time I was attacking the diamond or chequer plate. Here is sort of how it went:

First take the part that is to be done over:

View attachment 27554

Remove any lumps, bumps and other detail that some poor guy spent a month working up to the moulded part:

View attachment 27552

Then you take a sheet of Eduard PE and get busy with the scissors! Yes I said scissors. I have a rather nice pair of fine pointed scissors that are perfect for the job and leave no trace of the joining tabs thus save the job of smoothing the edges. You cab see them in one of the pictures.

View attachment 27555

The part is then folded and wrapped around the plastic part. The mudguard in this case. Careful use of CA did the job of sticking it together:

View attachment 27553 View attachment 27551

The bed of the tractor unit was also treated to a nice big bit of plate which was a total pig to get stuck down. The size prohibited the use of CA so the gator glue came out for that one. Together with about twenty grips to hold it in place while the glue set!!!

View attachment 27559

The cab has been finished off and the doors and windows masked with some very well fitting masks, also Eduard.

View attachment 27556

I also made a start on the trucks drive train and bed. Four axles, all different. That was fun. I now have the decision to make as to paint now and then build or build then paint. I think the first one will be the most prudent...and easiest.

View attachment 27557 View attachment 27558

That's it for now.

Ian M

View attachment 33397

View attachment 33398

View attachment 33399

View attachment 33400

View attachment 33401

View attachment 33402

View attachment 33403

View attachment 33404

View attachment 33405

View attachment 146423

View attachment 146424

View attachment 146425

View attachment 146426

View attachment 146427

View attachment 146428

View attachment 146429

View attachment 146430

View attachment 146431
 

Attachments

  • 220420111017.jpg
    220420111017.jpg
    2.4 KB · Views: 0
  • 210420111011.jpg
    210420111011.jpg
    2.1 KB · Views: 0
  • 210420111010.jpg
    210420111010.jpg
    2.1 KB · Views: 0
  • 210420111008.jpg
    210420111008.jpg
    2.4 KB · Views: 0
  • 210420111012.jpg
    210420111012.jpg
    2.3 KB · Views: 0
  • 220420111016.jpg
    220420111016.jpg
    2.4 KB · Views: 0
  • 220420111015.jpg
    220420111015.jpg
    2.7 KB · Views: 0
  • 220420111014.jpg
    220420111014.jpg
    2.4 KB · Views: 0
  • 220420111013.jpg
    220420111013.jpg
    2.3 KB · Views: 0
Thread owner
I forgot to mention that there are LOADS of ejector pin marks on the bed and some of the detail in the drive train. Most will not be seen, some will and are getting filed. Others that are in very nasty places I will just have to live with or hid with a blob of crud!!!

Ian M
 
Wow Ian, that is some fantastic work you did there with the plate, got it perfect, this is looking real good, keep up the good work mate.

Andy
 
Thread owner
Wheeeeeeeeeeeee! Today, after a solid week (well a couple of hours every day), I have reached a big moment in this build.

I have emptied two sprue's!!! OK OK they where only two of the small ones but they are empty! Only 14 left! Groan.

Still I have built a lot of the bits that go to busy up the deck of the Truck. My desk looks like, well a mess. Bits of primed tanks, winches, tool boxes, motor cover etc., etc.. Might start a bit of paint tomorrow and or put some pictures up.

Ian M
 
Keep going mate you'll get there in the end, keep up the good work.

scott
 
Thread owner
Agh! I managed to bend the nozzle on the airbrush cleaning it this morning. I just could not figure out why it was splattering all the time. A total strip down clean and try again. The same!

A hunt for the magnifier and I could see that the needle is rubbing on the top edge of the nozzle and not coming out the centre! So not a lot happening here until I can get a new one which will most likely be Friday!

Any way. Here are a few piccies of what we have so far.

View attachment 27813 View attachment 27815

An overview of the truck and the motor cover.

View attachment 27809 View attachment 27817View attachment 27821 View attachment 27820 View attachment 27814

The two winches and the winch drums.

View attachment 27811 View attachment 27824View attachment 27810

The Air cleaners and tool boxes.

View attachment 27825 View attachment 27818 View attachment 27812

A pair of cable guides, I think an Oil tank and some other pump like gizmo.

View attachment 27819 View attachment 27823 View attachment 27816

I made a start on the trailer last night. You need a lot of clips to hold things flat while the glue dries for that one! Also making six axles and twelve double wheel sets was almost as much fun as individual track links!!

Ian M

PS this build would go a lot quicker if every little part did not need trimming, sanding, cutting or filling. Dude they had a bad day the day they passed this one through quality control!

View attachment 33608

View attachment 33609

View attachment 33610

View attachment 33611

View attachment 33612

View attachment 33613

View attachment 33614

View attachment 33615

View attachment 33616

View attachment 33617

View attachment 33618

View attachment 33619

View attachment 33620

View attachment 33621

View attachment 33622

View attachment 33623

View attachment 146634

View attachment 146635

View attachment 146636

View attachment 146637

View attachment 146638

View attachment 146639

View attachment 146640

View attachment 146641

View attachment 146642

View attachment 146643

View attachment 146644

View attachment 146645

View attachment 146646

View attachment 146647

View attachment 146648

View attachment 146649
 

Attachments

  • 270420111035.jpg
    270420111035.jpg
    2.5 KB · Views: 0
  • 270420111028.jpg
    270420111028.jpg
    2.6 KB · Views: 0
  • 270420111031.jpg
    270420111031.jpg
    2.5 KB · Views: 0
  • 270420111036.jpg
    270420111036.jpg
    2.7 KB · Views: 0
  • 260420111020.jpg
    260420111020.jpg
    3.2 KB · Views: 0
  • 270420111029.jpg
    270420111029.jpg
    3 KB · Views: 0
  • 270420111032.jpg
    270420111032.jpg
    3.1 KB · Views: 0
  • 270420111027.jpg
    270420111027.jpg
    2.8 KB · Views: 0
  • 270420111033.jpg
    270420111033.jpg
    2.6 KB · Views: 0
  • 270420111039.jpg
    270420111039.jpg
    2.8 KB · Views: 0
  • 270420111038.jpg
    270420111038.jpg
    2.1 KB · Views: 0
  • 270420111026.jpg
    270420111026.jpg
    2.8 KB · Views: 0
  • 270420111030.jpg
    270420111030.jpg
    2.6 KB · Views: 0
  • 270420111034.jpg
    270420111034.jpg
    2.8 KB · Views: 0
  • 260420111022.jpg
    260420111022.jpg
    2.2 KB · Views: 0
  • 270420111037.jpg
    270420111037.jpg
    2.4 KB · Views: 0
Ian sorry to hear about the lack of quality control but hey you did'nt really have anything else to do right? Looking great so far!
 
Thread owner
\ said:
Ian sorry to hear about the lack of quality control but hey you did'nt really have anything else to do right? Looking great so far!
Well now you mention it. Not really.

I have worn out a Sanding stick on it. The worst was all the contact points for the suspension mounts, not one of them was flat on flat and with all those axles and wheels its a good thing if every thing reaches the ground!

Thanks for the kind words.

I sort of managed to get the airbrush to behave a bit. Not perfect enough to do free hand camouflage but fine for primer and base colour. So now all those bits of grey are now Deep green. :-)

Ian M
 
Ian ate soildering on i see, now i know what you meant about the many axles...lol anyway dude this is coming on real nice your painting is looking very nice so keep up the good work mate nice one.

scott
 
Thread owner
Well then. I went to the model shop today to get a new nozzle for my airbrush. That is now on order as he did not have any in the shop. Coming from China, your guess is as good as mine as to when it will arrive!!! So what does a guy do?

Yes I bought a new airbrush. Took a wide berth from the very good but cheap Sparmaxes and splashed out on a Badger Cressendo set, Air brush three jars, paint cup and three needle/nozzle sets.

Tried it out earlier and must say its "rather good", So I dug out the Anthem again and will be using the Badgers again. (one has the fine needle the other the medium, saves having to change them all the time).

Any way the build.

Spent three hours on it yesterday assembling the swan neck for the trailer and adding some of the finer detail parts from Eduard. I also started filling the deck of the truck. Partly to get thing done, partly to make some room on the desk!

Things are looking very green at the moment. The camo goes on later.

View attachment 27932 View attachment 27933 View attachment 27934

I see I managed to knock one of the work lights off moving the truck to take the picture!!!

Ian M

Ian M

View attachment 33699

View attachment 33700

View attachment 33701

View attachment 146725

View attachment 146726

View attachment 146727
 

Attachments

  • 300420111046.jpg
    300420111046.jpg
    3.2 KB · Views: 0
  • 300420111045.jpg
    300420111045.jpg
    2.8 KB · Views: 0
  • 300420111044.jpg
    300420111044.jpg
    2.8 KB · Views: 0
Looking good Ian. It seems we both have had more than our fair share of fettling with our respective builds.

I too have knocked off fiddly bits on my unimog truck. Luckily the old carpet has not claimed any...yet!

I hope you still have the work light to refix.

Cheers,

Ron
 
Status
Not open for further replies.
Back
Top