
You are using an out of date browser. It may not display this or other websites correctly.
You should upgrade or use an alternative browser.
You should upgrade or use an alternative browser.
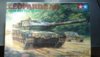
Ian M's 1/35 Tamiya Leopard 2 A6
- Thread starter Ian M
- Start date
- Status
- Not open for further replies.
Well I got the top of the box. Always a good start!
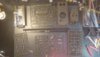
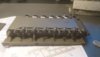
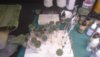
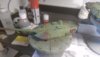
Compared to my last build this will be a lot more simple: The sprues, all of which fitted in one photo!
View attachment 272339
The detail is good and sharp. Rubber band tracks... Hmm I will survive those. A few grabs and handles will be changed out for wire but otherwise this will be out the box.... Unless the barrel for the gun is naff. Then I might find a new one...
More later when the sprue cutters start clipping.
Attachments
G
Guest
Guest
Isn't that typical? You wait ages for a Leopard & then 2 come along at once!
Looks a nice kit Ian - no worries about the rubber band tracks coz the skirts will hide most of them!
Looks a nice kit Ian - no worries about the rubber band tracks coz the skirts will hide most of them!
G
Guest
Guest
Ian mate! Looks much easier to build than your last one - I can relate after building a Dragon kit. Sometimes simpler is just more fun. Good luck with the build!
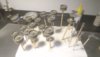
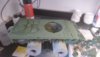
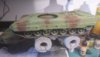
Well I am having fun:
View attachment 272388
Running gear on
View attachment 272389
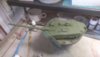
Rear end minus the lights...
View attachment 272390
A whole bunch of wheels. (but still less than the famo")
View attachment 272388
Running gear on
View attachment 272389
Rear end minus the lights...
View attachment 272390
A whole bunch of wheels. (but still less than the famo
Attachments
G
Guest
Guest
I will be watching Ian. ")
I'm really interested on this GB
I'm really interested on this GB
Hej Jim. You snowed in yet?
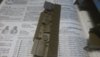
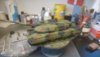
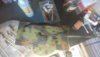
Right then. Been at it for a couple of hours today. Looks like a tank now. Sort of. View attachment 272542
First order of the day; remove the moulded on handles! The domed hatches in the middle have actually tab handels so they are OK, all the others have to go.
View attachment 272543
Ta daaaaa. That looks a bit better!
The observant will note that I have put all the tools on before painting! Most odd for me. However the moder German army are not afraid to (re)paint their tanks with the tools in place! I will most likely pick them out with a hairy stick once the thing is painted though.
View attachment 272544
The turret is just short of a few bits and bobs, Hatches, smoke launchers (Did you know that the A2's can fire actual weapon type grenades from their smoke launchers! Typically non lethal anti personal grenades...)
One last picture for today. It was mentioned in another thread that modern armour is much the same as WWII stuff, just bigger. LOL
View attachment 272541
Hope you like so far. More in the morrow
Attachments

G
Guest
Guest
Clean work so far Ian
Well I primed it yesterday, but forgot to take a photo... Duh! Today it is Green again.
View attachment 272716 View attachment 272717 View attachment 272718
Was pretty sure I had bought the three NATO colours in Model Air, but only the black apparently, anyway I think this is the same green as I have used for the other West German bits I have done, so it should be OK.
Did this this morning so now having eaten lunch, I might just go throw some brown at it
Attachments


G
Guest
Guest
Coming along nicely Ian, looking forward to the next update
Well its eight below brass monkey weather here today, so I hid myself away in the cave with a pack smokes and a pot of coffee.
This is what happens when you over thin Vallejo model color. Pigment separation! Grr. This was due to being lazy. Just needed to stretch the paint enough to spray this sides reactive armour!
View attachment 272775 View attachment 272776 View attachment 272777
So today I got stuck in to the camo. A process that is for me a bit like a cat chasing its own tail. I normally end up loading the tree colours into the airbrush at least five or six times, Moving shapes and eliminating overspray.
View attachment 272778 View attachment 272779 View attachment 272780
The score today was only four! So I call that a success lol. It is not 100% true to life, Tamiya made sure of that as the different views of the scheme contradict eachother. The top view showing the colours one way, the side another and the front back something totally different!!! Still the kit was 'published' in 2006 (I think). So things like that are expected. Maybe if they had used three more different shades of grey in the plan, they might have seen the issue.
Why not White, grey and dark grey instead of grey, a tiny bit darker grey and just a bit more dark grey!!! lol
The new fangled colour diagrams are much easier to follow. ( though they can also be wrong!)
This will probably sit the weekend to cure fully and Monday I will get the decals down and weather it a little bit.
Attachments


- Status
- Not open for further replies.
Legal Notice
scalemodelling.co.uk is a privately operated online discussion forum. All content posted by members reflects their own views and opinions and does not necessarily represent those of the forum owners or administrators. While reasonable efforts are made to moderate content, no responsibility is accepted for user-generated material. By using this site, you agree to comply with UK law and the forum rules.