Theme editor

Scale Model Shop

Ian M's 1920 Rolls Royce Armoured car.

Status
Not open for further replies.

Ian M

Administrator
Staff member
Joined
Dec 14, 2008
Messages
18,334
Reaction score
571
Points
113
Location
Falster, Denmark
1/3
Thread owner
Well the postie came with my kit for this GB, so I can make a start on it soon.

Just need to get the Bishop finished and try to get rid of this flue before I get stuck in.

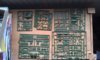
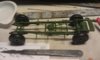
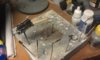
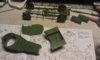
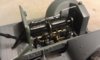
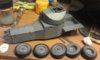
He are the sprues and box. I'm not to sure about the vinyl tyres, but we will see what they are like.

View attachment 57834

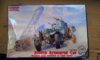
The box art. looks rather nice.

View attachment 57835

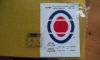
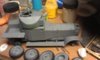
A tiny decal sheet, and a clear film which I guess is for the lights.

View attachment 57836 View attachment 57837

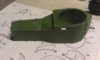
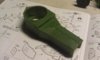
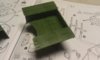
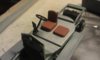
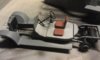
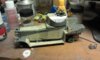
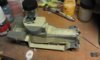
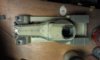
A small pile of hard green pastic sprues fill the box along with six vinyl tyres.

there are a couple that are not in the photos, but they are ones of which there are two of, so I only took the picture with one of each.

While getting ready for this one, I will be contemplating the camouflage....

Ian M

View attachment 59730

View attachment 59731

View attachment 59732

View attachment 59733

View attachment 172756

View attachment 172757

View attachment 172758

View attachment 172759
 

Attachments

  • IMAG0822.jpg
    IMAG0822.jpg
    2.3 KB · Views: 0
  • IMAG0823.jpg
    IMAG0823.jpg
    1.9 KB · Views: 0
  • IMAG0824.jpg
    IMAG0824.jpg
    2.6 KB · Views: 0
  • IMAG0825.jpg
    IMAG0825.jpg
    2.3 KB · Views: 0
That looks interesting Ian...Hope you feel better soon... Danny
 
Glad you got this one Ian i wanted this for the GB will watch with interest
 
this looks like a really interesting subject and its a rolls lol,strangely looking forward to seeing this come together

mobear
 
Interesting choice Ian ... I'd quite like a go at one of these myself.

\ said:
While getting ready for this one, I will be contemplating the camouflage....
From what i've just seen after a quick search on google the remaining examples in museums seem to be either solid green, grey or sand.

There's a few model examples shown with varied camo patterns ... there's one in black/green/sand that has a black pin stripe around the camo edges ... looks very sharp & tidy but i wouldn't know if it's an authentic pattern.
 
Thread owner
Right then. Got a bit more done on this as I was feeling a bit better today. So with the small bits I got did yesterday, things are moving along quite well considering.

Considering the kit that is. The instructions are pretty basic and some things leave you guessing as to which part to use and which way round it should go. One drawing will show it the one way. The next one shows it the other way!!! Very much a read well before glue hits plastic.

A few words about the kit. The plastic is rather odd. Some sprues are quite hard, and others softer. All makes for good fun cutting and sanding! A few sink marks and ejector marks as well. Most of which will be out of sight, so out of sight out of mind. If they show they will be attended to. Most are OK but I think I'll have a couple to hide.

Nuff waffle here are some pictures.

View attachment 58341

The rather nice RR straight six engine that will never be seen again once the kit is together!

View attachment 58340

Still not sure about the vinyl type tyres. And I doubt how smart I was putting them on already... I might just melt them off again.

View attachment 58342 View attachment 58343

The main body shell was fun. Not one locating pin or lug and a good deal of test fitting needed

View attachment 58344 View attachment 58345

The rear deck and a quick group photo

Bit of a re-group and onwards.

Ian M

View attachment 60204

View attachment 60205

View attachment 60206

View attachment 60207

View attachment 60208

View attachment 60209

View attachment 173230

View attachment 173231

View attachment 173232

View attachment 173233

View attachment 173234

View attachment 173235
 

Attachments

  • IMAG0832.jpg
    IMAG0832.jpg
    2.3 KB · Views: 0
  • IMAG0833.jpg
    IMAG0833.jpg
    2.5 KB · Views: 0
  • IMAG0834.jpg
    IMAG0834.jpg
    1.9 KB · Views: 0
  • IMAG0835.jpg
    IMAG0835.jpg
    2.1 KB · Views: 0
  • IMAG0836.jpg
    IMAG0836.jpg
    2 KB · Views: 0
  • IMAG0837.jpg
    IMAG0837.jpg
    2.4 KB · Views: 0
Great start Ian Even with the problems you say the kit as i may still get one
 
Thread owner
\ said:
Great start Ian Even with the problems you say the kit as i may still get one
Its a good enough kit with some good, of a little soft at times, detail- just not a Tamigawa type of thing. A kit you have to build, rather than just put together.

Ian M
 
Nice start Ian and an interesting subject, looking forward to seeing more of this build.

Tom
 
Thread owner
Well I have had a good run at this yesterday and today. My good lady has spent the most of the weekend sleeping off a cold, one which I'm afraid I gave her!!

Any way it gave me loads of time to get on with this build.

View attachment 58441 View attachment 58442

Well I got the straight six stuck together,

View attachment 58443 View attachment 58444

And even managed to get it in the chassis. Say goodbye, 'cause this ain't going to get seen again. :-(

View attachment 58439 View attachment 58438

Inside, painted up very basic as well as this to will not be getting seen much once the lid goes down.

The paint guide calls for silver grey, but we all know that for the period, it would of been painted with an Anti rust Aluminium type dope. Alclad dull aluminium worked well for this. Not to fussy as, as I said not a lot to see once the top is on...

View attachment 58440 View attachment 58445

See, nothing to see here, I now have the dubious joy of painting the Caunter camouflage.

Ian M

View attachment 60301

View attachment 60302

View attachment 60303

View attachment 60304

View attachment 60305

View attachment 60306

View attachment 60307

View attachment 60308

View attachment 173327

View attachment 173328

View attachment 173329

View attachment 173330

View attachment 173331

View attachment 173332

View attachment 173333

View attachment 173334
 

Attachments

  • IMAG0858.jpg
    IMAG0858.jpg
    2.5 KB · Views: 0
  • IMAG0859.jpg
    IMAG0859.jpg
    2.3 KB · Views: 0
  • IMAG0860.jpg
    IMAG0860.jpg
    2.4 KB · Views: 0
  • IMAG0861.jpg
    IMAG0861.jpg
    2.3 KB · Views: 0
  • IMAG0862.jpg
    IMAG0862.jpg
    2.5 KB · Views: 0
  • IMAG0857.jpg
    IMAG0857.jpg
    2.7 KB · Views: 0
  • IMAG0856.jpg
    IMAG0856.jpg
    2.3 KB · Views: 0
  • IMAG0855.jpg
    IMAG0855.jpg
    2.2 KB · Views: 0
I think this lid is a jewel for a weathering paint work Ian....

Cheers

Polux
 
Great work Ian we all know the engine's there looking forward to the rest of the build
 
Thread owner
So its masking tape hell week!

I learned some thing new today. Alclad is not a great undercoat. I Primed the kit with alclad primer and sprayed it with steel here and there. Then Attacked it with liquid mask using a crushed cocktail-stick as a brush.

I then painted the whole thing with track pads, Portland Stone and left it for a day or three.

masked up for the Slate colour, and painted that. removing the tape, removed loads of the stone coloured paint. All where the Alclad steel is!! Its just that smooth the paint just cant grab hold.

Live n learn.

Photos. (after the touch ups)

View attachment 58667View attachment 58668View attachment 58669

Sunday or Monday I have to mask it all again, to get the Silver Grey down. I just hope the paint holds!

Ian M

View attachment 60529

View attachment 60530

View attachment 60531

View attachment 173555

View attachment 173556

View attachment 173557
 

Attachments

  • IMAG0863.jpg
    IMAG0863.jpg
    2.5 KB · Views: 0
  • IMAG0864.jpg
    IMAG0864.jpg
    2.4 KB · Views: 0
  • IMAG0871.jpg
    IMAG0871.jpg
    2 KB · Views: 0
Thread owner

Attachments

  • IMAG0885.jpg
    IMAG0885.jpg
    2.5 KB · Views: 0
  • IMAG0886.jpg
    IMAG0886.jpg
    2.4 KB · Views: 0
Status
Not open for further replies.
Back
Top