
You are using an out of date browser. It may not display this or other websites correctly.
You should upgrade or use an alternative browser.
You should upgrade or use an alternative browser.
Ian M's Famo
- Thread starter Ian M
- Start date
- Status
- Not open for further replies.

Great start Ian, such a fantastic kit, I'm proper jealous ¬¬ With so much detail I wonder if you were considering building it with a kind of "body lift off" for lack of a better phrase to showcase all the wonderful assets of this fine kit? Would be a shame IMO to bury all the excellent painting and weathering I'm sure you will render to it ") .....Jim
.....Jim ")
.....Jim
G
Guest
Guest
Great photo tutorial of the tracks there Ian, might come back to this one day if I ever use such tracks
I wonder if you were considering building it with a kind of "body lift off" for lack of a better phrase
Thinking about it Jim I just need to figure out how. I have ordered some PE for the Famo and would be a shame to hide it all. We must wait and see.
Thanks Bob.
Just wondering, does the video in the link a couple of posts up work for you lot? I never posted a video before.
Great photo tutorial of the tracks there Ian,very much appreciated you taking the time to show us your way, 
off doing them,
the pics are very good as it dose show were you place the glue,on each,and I can see how the glue looper is much better to use than a brush, 9_9
thank you so very much for this,
off doing them,
the pics are very good as it dose show were you place the glue,on each,and I can see how the glue looper is much better to use than a brush, 9_9
thank you so very much for this,
G
Guest
Guest
Just wondering, does the video in the link a couple of posts up work for you lot? I never posted a video before
Didn't see a link mate!
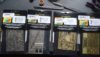
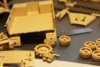
Well after an initial hiccup. I managed to find a shop that had the brass sets that I need to 'pift things up a bit'. Ordered Monday night, had them Wednesday lunch time!
Anyway...View attachment 263678
Two packs are for the Famo and the two others for the trailer!! There are though a considerable number that will be "forgotten" as they are so very tiny and will never be seen.
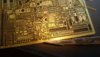
View attachment 263680
Did I say tiny... I ment microscopic!
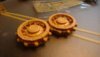
View attachment 263679
Two drive wheels, one with PE one without...You can just about see it on the inner rim. Its the bolts and plates that hold the rubber blocks on the wheel.
As a by the way kind off thing. Anyone considering buying Aber PE there web site has all the assembly instructions as pdf files so you can see what you are getting into.
What really sold them to me was that they have some very 'in your face' parts that are absent from the Tamiya kit, and some bits that are just so much better.
Like the pram hood canopy frames for both the drivers cab and the rear steering cab... They should be fun. Also there are propper steering connection rods for the trailer so I don't need to use the "bits of wire" from the kit! It's very well planed from Aber that the crucial parts are placed on two different sets.... Smart move guys!
Anyway...View attachment 263678
Two packs are for the Famo and the two others for the trailer!! There are though a considerable number that will be "forgotten" as they are so very tiny and will never be seen.
View attachment 263680
Did I say tiny... I ment microscopic!
View attachment 263679
Two drive wheels, one with PE one without...You can just about see it on the inner rim. Its the bolts and plates that hold the rubber blocks on the wheel.
As a by the way kind off thing. Anyone considering buying Aber PE there web site has all the assembly instructions as pdf files so you can see what you are getting into.
What really sold them to me was that they have some very 'in your face' parts that are absent from the Tamiya kit, and some bits that are just so much better.
Like the pram hood canopy frames for both the drivers cab and the rear steering cab... They should be fun. Also there are propper steering connection rods for the trailer so I don't need to use the "bits of wire" from the kit! It's very well planed from Aber that the crucial parts are placed on two different sets.... Smart move guys!
Attachments
G
Guest
Guest
Loads of extras there Ian, I cant really see the difference between the two wheels though, maybe a photo of another part would be more conclusive.
Not the best photo's Ian but you can see the difference, and when painted and given a wash should stand out a treat. Unless your going to muddy the whole thing up on a base.
Yeah sorry about the photo. T'was a quick snap. I will take a couple of better ones. Got a sty on my eye right now so close up work is a pain. So I'll have to give it a rest until I can see again... Grrrr
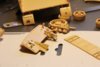
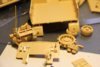
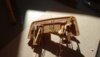
Well I have been working on this on and off for a couple of days. To be honest my eyes are not happy with the micro PE and after an hour or two I need to walk away and do something else.
I have tried to get some better photos of the bits I have done but it is rather hard to see the PE on the sand coloured plastic.
View attachment 264044
View attachment 264045
View attachment 264046
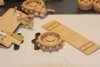
The hindges on the mud guards are three parts and could actually work. As the Mud guards where already glued on its a bit late, I thought about chopping them off again but thought better of it.
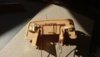
View attachment 264047View attachment 264048
Here you can actually see the fixings for the rubber pads on inner rim of the drive wheels. The step ups on the tailgate are three parts and the hindges for them are tiny.
I have made a start on detailing the firewall inside the motor and have added some pipes and tubes to the motor as well. The brackets that hold the bonnet vents open where more than my eyes could handle and after the third attempt I settled for the support runners and left the rest. Some of the parts are 1x1 mm and to be honest will not be seen or missed!
I have tried to get some better photos of the bits I have done but it is rather hard to see the PE on the sand coloured plastic.
View attachment 264044
View attachment 264045
View attachment 264046
The hindges on the mud guards are three parts and could actually work. As the Mud guards where already glued on its a bit late, I thought about chopping them off again but thought better of it.
View attachment 264047View attachment 264048
Here you can actually see the fixings for the rubber pads on inner rim of the drive wheels. The step ups on the tailgate are three parts and the hindges for them are tiny.
I have made a start on detailing the firewall inside the motor and have added some pipes and tubes to the motor as well. The brackets that hold the bonnet vents open where more than my eyes could handle and after the third attempt I settled for the support runners and left the rest. Some of the parts are 1x1 mm and to be honest will not be seen or missed!
Attachments
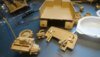
Been giving my self a headache again today, :S
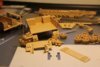
View attachment 264091
Found a photo that shows the motor a bit better. The blue and Yellow are NOT for battery power, they are just for the radiator pipes.
View attachment 264092
View attachment 264093
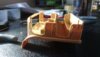
Got the pipes, rods and levers onto the Firewall. Lost one of the tiny levers and had to scratch one up from plastic! Grr.
View attachment 264094
Made the entry rails out of brass wire as the kit ones all have gates on the out side along the rail. (NOT FUNNY TAMIYA)!
Finally got to mount all the built up wheels ready for primer, the wheels for the tracks are going to get painted on the sprues, and then I will paint the rubber rims on afterwards.
Now considering my next move.....
View attachment 264091
Found a photo that shows the motor a bit better. The blue and Yellow are NOT for battery power, they are just for the radiator pipes.
View attachment 264092
View attachment 264093
Got the pipes, rods and levers onto the Firewall. Lost one of the tiny levers and had to scratch one up from plastic! Grr.
View attachment 264094
Made the entry rails out of brass wire as the kit ones all have gates on the out side along the rail. (NOT FUNNY TAMIYA)!
Finally got to mount all the built up wheels ready for primer, the wheels for the tracks are going to get painted on the sprues, and then I will paint the rubber rims on afterwards.
Now considering my next move.....
Attachments
By the way. If you thought that Dragon instructions are bad.... Aber knock them into a cocked hat! They are totally confusing.
Parts are show one way in the one drawing and another in the next....Parts where you need to use a length of wire give NO indication of how long the wire should be...
So a word of advice, if you are considering a Set from Aber, have a look at the PDF of the plans on their web site. Some are better than others.
The Brass work is Top Quality though and IF you know what you are doing should pose no real problem.
Typical of ALL PE manufactures there are a lot of parts that could be better configured and you sit wondering 'why do that in three parts when it could be folded from one?' or just so tiny and will never be seen (OK some will use every last bit on the frame and add more if they can). Also I am pretty sure that war time machines did not have padlocks on storage boxes so watch out for that one.... :/
G
Guest
Guest
This is looking the dogs doodahs Ian loving the extra detailing mate top job.
G
Guest
Guest
Ian, this is looking very good so far, kudos to you with all that PE I hope the carpet monster doesn't chew any of it!!
- Status
- Not open for further replies.
Legal Notice
scalemodelling.co.uk is a privately operated online discussion forum. All content posted by members reflects their own views and opinions and does not necessarily represent those of the forum owners or administrators. While reasonable efforts are made to moderate content, no responsibility is accepted for user-generated material. By using this site, you agree to comply with UK law and the forum rules.
Currently on our website
Threads
37,405
Messages
707,858
Members
2,652
Latest member
Waffenträger Auf E-100