Theme editor

Scale Model Shop

Ian M's German thing..Insert name here....

Status
Not open for further replies.
Thread owner
Right then, I got a bit of room on the bench so lets 'ave a look at this Flakpanzer.

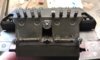
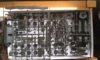
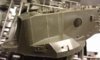
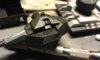
An older kit but still the mouldings look crisp and clean. Quite a good level of detail.

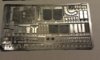
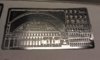
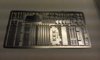
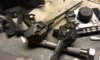
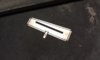
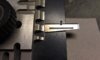
Three frets of PE in the set from Eduard. Should keep me quiet for a couple of hours!

View attachment 47189 View attachment 47188 View attachment 47187

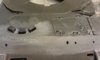
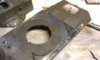
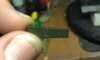
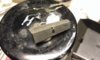
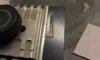
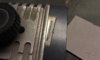
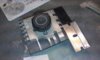
For an older kit the detail is pretty good. Like the weld seams on the turret

View attachment 47186View attachment 47190 View attachment 47191 View attachment 47192 View attachment 47193

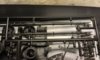
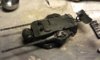
And just to prove I have started:

View attachment 47194

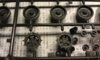
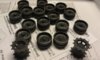
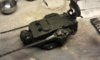
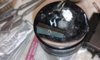
Wheels. Why do tanks have so any bloody wheels!!!

Ian M

View attachment 50160

View attachment 50161

View attachment 50162

View attachment 50163

View attachment 50164

View attachment 50165

View attachment 50166

View attachment 50167

View attachment 50168

View attachment 163186

View attachment 163187

View attachment 163188

View attachment 163189

View attachment 163190

View attachment 163191

View attachment 163192

View attachment 163193

View attachment 163194
 

Attachments

  • Gepard03.jpg
    Gepard03.jpg
    2.8 KB · Views: 0
  • Gepard04.jpg
    Gepard04.jpg
    2.2 KB · Views: 0
  • Gepard05.jpg
    Gepard05.jpg
    2.1 KB · Views: 0
  • Gepard06.jpg
    Gepard06.jpg
    1.9 KB · Views: 0
  • Gepard07.jpg
    Gepard07.jpg
    2.2 KB · Views: 0
  • Gepard08.jpg
    Gepard08.jpg
    2.5 KB · Views: 0
  • Gepard09.jpg
    Gepard09.jpg
    2.5 KB · Views: 0
  • Gepard10.jpg
    Gepard10.jpg
    2.9 KB · Views: 0
  • Gepard11.jpg
    Gepard11.jpg
    2.6 KB · Views: 0
Thread owner
Well due to a false Alarm on our house alarm, got home a couple of hours earlier than normal, so I managed to get started on the PE.

View attachment 47290 View attachment 47291

Here is a before and after of the Vision block thingies around the main hatch of the turret.

View attachment 47292 View attachment 47293 View attachment 47294

New peep holes for the driver. New Exhaust guard and mesh for the cooling fan. That was three hours worth!!!

Ian M

View attachment 50255

View attachment 50256

View attachment 50257

View attachment 50258

View attachment 50259

View attachment 163281

View attachment 163282

View attachment 163283

View attachment 163284

View attachment 163285
 

Attachments

  • Gepard16.jpg
    Gepard16.jpg
    1.9 KB · Views: 0
  • Gepard12.jpg
    Gepard12.jpg
    2.4 KB · Views: 0
  • Gepard13.jpg
    Gepard13.jpg
    2.3 KB · Views: 0
  • Gepard14.jpg
    Gepard14.jpg
    1.8 KB · Views: 0
  • Gepard15.jpg
    Gepard15.jpg
    2.3 KB · Views: 0
those pe parts certainly make for improvements on the models,i`m getting this felling sometimes its well worth it

mobear
 
Oh cool, you went with the flakpanzer! Looking good so far.....

P.S. you're right, road wheels are the most boring part!
 
Nice choice Ian and will look great with the add-ons.

I must remember the old "Got to go, the alarm's gone off." ploy, when I want a flyer!

Cheers,

Ron
 
Thread owner
\ said:
Nice choice Ian and will look great with the add-ons.I must remember the old "Got to go, the alarm's gone off." ploy, when I want a flyer!

Cheers,

Ron
If only it was just a ploy. No one broke in, there are signs on the doors of the house, but not on the shed. So some one thought they should just try the shed door instead. Lucky for me its got a double dead bolt lock and a 1/4 angle iron inner door frame....

Ian M
 
Thread owner
Well Friday is POETS day, even in Denmark, so I had a couple of hours at the bench today as well.

View attachment 47350 Got SOME of the PE on the guns sorted. Still more to go on.

View attachment 47351 And I even remembered to work on them both at the same time!!!

View attachment 47352 Got the Radars sorted and the guns in the turret.

View attachment 47353 The large dish at the back can still be rotated and laid down (transport poss.) The smaller one at the front can also still turn and elevate. It can also be taken off for painting.

Even though I have used a lot of the PE I am barely half way through the three frets!!!! Now the fun of finding out where all the other bits go....?

Thats the only thing I don't like that much with extensive PE sets: working with two sets of instructions at the same time. The chances of missing a bit are doubled.

Ian M

View attachment 50304

View attachment 50305

View attachment 50306

View attachment 50307

View attachment 163330

View attachment 163331

View attachment 163332

View attachment 163333
 

Attachments

  • Gepard19.jpg
    Gepard19.jpg
    2.3 KB · Views: 0
  • Gepard20.jpg
    Gepard20.jpg
    2.3 KB · Views: 0
  • Gepard18.jpg
    Gepard18.jpg
    2.7 KB · Views: 0
  • Gepard17.jpg
    Gepard17.jpg
    2.5 KB · Views: 0
looking bloody good Ian i must say,and the other prob check it twice lol

mobear
 
Thread owner
Well after three days of fishing and a day cutting the hedge I felt the need for some therapy.

Here is a little run down on using some PE to improve storage bins.

Well the first bit is to find the kit part to be enhanced. View attachment 47694 In this example one of six stores bin. Then sand off the hinges and the lip of the lid.View attachment 47695

Then find the PE part that will be the new lid. View attachment 47697

My preferred tool for folding PE is a Hold and Fold the one I use is if I recall called the bug. View attachment 47704 a good size and sits nice in the hand!

When folding PE that has folds all around the edge, start by folding the LONG sides first. Just place it in the hold and fold until the etched line is just under the tools folding edge.

View attachment 47699 slide the folding blade under the part and fold the part to the needed angle. Repeat for the other side.View attachment 47698

Unscrew the knob and turn the plate around so you can use the narrower folding prongs and find one that fits the narrow end of the part to be folded. Now you can see why its best to fold the LONG side first then the SHORT sides last... View attachment 47701 View attachment 47700 For tiny bits I normally use CA to glue them in place, for larger parts I use Gator Grip acrylic glue as its easier to work with. For real big bits or structural bits its out with the soldering iron....but only to hold the PE together, Soldering Iron and plastic = big mistake!!

Anyway after the glue has had a few mins to grab hold you should have a storage bin with a nice thin lipped lid,

View attachment 47703 View attachment 47702

So thats it really, Easy in it?

I will just say that things such as handles and single fold bits like a hinge or bracket, I cheat and use a couple of folding blades and or a pair of Tamiya PE pliers..... but I would be lost with out the hold and fold.

Right I'm off to make some more storage bins, Oh and fold the feet on 20 grab handles.....

Ian M

View attachment 50601

View attachment 50602

View attachment 50603

View attachment 50604

View attachment 50605

View attachment 50606

View attachment 50607

View attachment 50608

View attachment 50609

View attachment 50610

View attachment 163627

View attachment 163628

View attachment 163629

View attachment 163630

View attachment 163631

View attachment 163632

View attachment 163633

View attachment 163634

View attachment 163635

View attachment 163636
 

Attachments

  • IMAG0482.jpg
    IMAG0482.jpg
    2 KB · Views: 0
  • IMAG0483.jpg
    IMAG0483.jpg
    2.6 KB · Views: 0
  • IMAG0485.jpg
    IMAG0485.jpg
    1.5 KB · Views: 0
  • IMAG0486.jpg
    IMAG0486.jpg
    2 KB · Views: 0
  • IMAG0487.jpg
    IMAG0487.jpg
    1.8 KB · Views: 0
  • IMAG0488.jpg
    IMAG0488.jpg
    1.8 KB · Views: 0
  • IMAG0489.jpg
    IMAG0489.jpg
    2.1 KB · Views: 0
  • IMAG0490.jpg
    IMAG0490.jpg
    2.5 KB · Views: 0
  • IMAG0491.jpg
    IMAG0491.jpg
    2.7 KB · Views: 0
  • IMAG0492.jpg
    IMAG0492.jpg
    2.1 KB · Views: 0
Nice work there Ian and it looks like them Hold and Fold thingys come in handy too (mental note, i need one lol).

Have fun, John
 
Thread owner
\ said:
Nice work there Ian and it looks like them Hold and Fold thingys come in handy too (mental note, i need one lol).Have fun, John
Cheers John. They do make life a bit easier. The one I use is only the small one but you can get them right up to 6inch I think.

Now for a shameless plug: If you want one look no further than Johns shop. He has them on the site at a good price I might add. (less than I paid for my one!!! :-(

Ian M
 
You'll be PE crazy by the time you finish this by the looks of it Ian :)

I'm plucking up the courage to have a go at some, I have a minute jewelers vice with attachments somewhere in the loft which is basically like that bug thing of yours (but side on:))

Three days fishing? .... i wish .... the rivers are flowing to fast cos of the rain, the trout are at the bottom of the lochs because of the rain ..... the seas too rough for the boat ..... bugger!!!!!
 
Thread owner
Colin I AM PE crazy, still cant complain. 120 bits so far and I have only managed to lose one tiny bit...

Well here is the result of two and a half hours cutting, shaving, sanding, cutting and folding I got the rear end sorted.

View attachment 47715

The German style ID plate is a bit buggered, so I'm saying he has reversed into something lol.

The long row of 'handles' have yet to have even more PE stuck on, some straps each one made from three parts, the strap a buckle and a loop thing that closes the end of the strap....

Funny thing is I have still got plastic parts to go on yet and have yet to fit the top to the hull. Will this ever end???

Ian M

View attachment 50619

View attachment 163645
 

Attachments

  • Gepard21.jpg
    Gepard21.jpg
    2.4 KB · Views: 0
\ said:
Cheers John. They do make life a bit easier. The one I use is only the small one but you can get them right up to 6inch I think. Now for a shameless plug: If you want one look no further than Johns shop. He has them on the site at a good price I might add. (less than I paid for my one!!! :-(

Ian M
Not a shameless plug at all Ian, i was just looking at them lol. Going to get one next week as i have a lot of etching to do, i've gone mad on the stuff.

Have fun, John
 
Thread owner
OMG I think I am ready to start with some primer....

One thing that is piffing me off are the tracks. They look really cheap and nasty. The kit was when it first came out with remote control, thus the tracks are rather thick and heavy. Not nice at all.

I can't seen to find after-market tracks for it, nor for a leopard 1 which the Gepard was based on... not sure if Leopard 2 tracks can do it. Any tankies that have an ideas about that?

I need to paint the bottom part of the hull and get the wheels on before I can join the top to the bottom. A task I am not looking forwards to!

Ian M
 
Status
Not open for further replies.
Back
Top