Theme editor

Scale Model Shop

Ian M's HMS HOOD. Trumpeter 1/200

I'll be watching. I'd like this model, but I do not have room to make or display.
 
Ah, the Sunday post!
When my Great uncle was alive (lived in Stirling) and came down to see my Grandparents, i always got a copy of the Broons or oor Wullie album for christmas that was over 35 years ago, but the tradition lives on now, with my wife getting me one or the other at Christmas.
 
When my Great uncle was alive (lived in Stirling) and came down to see my Grandparents, i always got a copy of the Broons or oor Wullie album for christmas that was over 35 years ago, but the tradition lives on now, with my wife getting me one or the other at Christmas.
Nice one! I've graduated to VIZ now, which shows a clear influence from those old strips!
 
Thread owner
Well it would seem that the mob is getting restless, so I better start sticking bits together and we might get this ship back on the right course... Please.
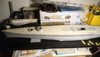
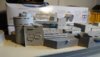
First bit was simple enough. After I had tidied up the bench to make room for the darn thing!
View attachment 273120
The one piece hull just needed the factory cuts for the moulds gates sanded and a quick swipe down the center to get the very fine mould join seem off. The Decks all fitted well. There are four parts, foredeck, midships and aft deck. a bit of a beast to get glued down though due to the size and that the angles twixt decks and hull prevent any clamping. Masking tape was the order of the day.
View attachment 273121
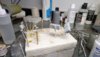
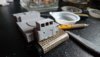
The Rudder and prop-shaft holders complete the first few steps in the instructions.
View attachment 273122
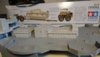
Most if not all of the super structures are also moulded in in piece, well individual pieces. You know what I mean.
It would appear that the next step is to paint the midships deck to allow the next level of deck to go down. This will also mean that the structures between the decks will need painting as well.As these will be pretty much hidden by the deck, close enough colour will do for now....found a couple of shops, on in Germany one in Holland that sells colour coat, which is good seeing that no one in the UK will send them overseas!!!
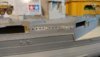
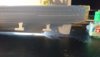
Oh! I did drill out the rear anchor eye as Trumpeter forget it. Did the one on deck, just not the hole or the one in the hull! The others have also been filled out a bit to give them the slanted bowl shape, and not just a hole at the end as Trumpy had done!. No way in hell that a chain will lay correctly in that! lol.
 

Attachments

  • DSC_0491.JPG
    DSC_0491.JPG
    2 KB · Views: 0
  • DSC_0495.JPG
    DSC_0495.JPG
    1.8 KB · Views: 0
  • DSC_0494.JPG
    DSC_0494.JPG
    1.7 KB · Views: 0
Good to see it on the chocks Ian. I am picking and pecking at the Bismarck as I currently don't have a structured build plan. I am now 99% certain that I may not use the wooden deck. Seems a shame but I am not sure yet if it looks right.

How are you going to spray this beast? No way will my tiddler fit in the spray booth so there is no way yours will.
 
Thread owner
Do you know what Graham. I hadn't thought of that! Lol. The superstructures and all that will not be a problem. The hull, as you point out, could be a problem... I see fun and games with sticky tape and plastic sheeting in the near future. Ho hum.
 
I was thinking of removing the sides on mine then moving the hull through it as I spray a few inches at a time keeping the extractor filter in front of the airbrush to catch the overspray. Like you say, once the hull is done the rest will be fine.
 
Thread owner
I don't actually have a booth, I have an extractor over the paint desk. 99% of my work is acrylic these days. I'm thinking of a large foldable box for the smelly stuff.
 
I have seen this kit in one of my model shops I go to and what a size so I will be watching with interest.
 
Thread owner
And the fun continues...
The Cover-deck needs to be painted and assembled before the boat-deck so The Hull got primed and the paint has started to flow.
Oh how I have missed good old enamel paints! Primed with Alclad primer then cracked open the Colour Coats.
The wooden decks have gotten a general coat of 'teak'. After that has cured i can give it a wash and pop the detail up.
View attachment 273243
The Superstructures have had a coat of Colour Coat AP507C Admiralty Light Grey
View attachment 273242
together with all the vents and 'boxes' etc., that need to be mounted before the boat-deck goes on and hides it all.
View attachment 273241
Due to these parts looking much the same, I thought it prudent to label them on the paint stand.
The next step is to pick out the vents mesh with black then dry brush over that to bring the mesh up again, a quick bit of wash around the doors and a few hatches that are moulded into the deck to paint in with a hairy stick. One of the things I like with colour coat paints is the fact that there is no difference in the sheen if you paint some parts with a brush and others with the airbrush. They all end with the same finish!
Then things really start to go mad.
I believe this is what is known as a gentle start up. lol.
 

Attachments

  • DSC_0510.JPG
    DSC_0510.JPG
    2.6 KB · Views: 0
  • DSC_0509.JPG
    DSC_0509.JPG
    2.1 KB · Views: 0
  • DSC_0508.JPG
    DSC_0508.JPG
    2.5 KB · Views: 0
So you'll be painting all the little hatches etc on the deck by hand then? Is that the best way to go as an alternative to masking?
 
Thread owner
So you'll be painting all the little hatches etc on the deck by hand then? Is that the best way to go as an alternative to masking?
Well the jury is still out on that point. I'll have a ponder over how many and how small they are...

One thing I dislike about painting as you build; I paint a bit then find out that I needed to put other bits on first. Planing ahead is apparently not my stronge point, lol.
 
Well the jury is still out on that point. I'll have a ponder over how many and how small they are...

One thing I dislike about painting as you build; I paint a bit then find out that I needed to put other bits on first. Planing ahead is apparently not my stronge point, lol.

I am struggling to form a battle plan with mine at the moment. Started to do some PE today and one bit pinged into oblivion quite quickly. Not sure I have the dexterity to handle it all anymore.
 
Thread owner
Now now Graham. Positive thoughts. But those pesky bits of brass don't get easier as the years storm past.
 
Thread owner
Right then. I did say that I would post a few pictures of bits as they come forth. So here are a couple of the superstructures.
View attachment 273349
This one is Three parts. the lower part has has a couple of rafts and booms added, along with the fillets under the overhangs and a fer bibs and bobs but the actual building was one part! Cleaver moulding. The the thing that looks like a mutant USS Enterprise, is the second part and the small round compartment at the top the third. Cutting the windows out in the bridge was a PITA. port holes are all drilled out as well....The two on the diagonal walls where moulded in at the same angle as the ones on the sides and looked naff, so they are now plugged and will be re drilled later.
View attachment 273350
This one is ONE piece! How they do that beats me. It is though a pain 'cause it is rather incorrect and needs a visit from mr razor saw. More on that when I get there.
View attachment 273351
For some odd reason Trumpeter missed off most of the port holes on this side. So instead of the 13 you see here there was only 5 or 6....I just couldn't let it alone.
The three to the right are plugged due to them being to small and the wrong place. The plugged one in the middle is due to some twat drilling the hole to low down.:oops:
View attachment 273352
Both the funnel bases are also one piece. the larger of the two has had an omission rectified. They had forgotten three rather large windows at the back of the small 'shed' with is in-fact the boat repair shop.
View attachment 273353
Now the carpenter can see to repair the ships boats! Might be a bit drafty until the glass goes in though!
Laters!
 

Attachments

  • DSC_0513.JPG
    DSC_0513.JPG
    2.2 KB · Views: 0
  • DSC_0515.JPG
    DSC_0515.JPG
    2.1 KB · Views: 0
  • DSC_0514.JPG
    DSC_0514.JPG
    2 KB · Views: 0
  • DSC_0512.JPG
    DSC_0512.JPG
    2.3 KB · Views: 0
  • DSC_0517.JPG
    DSC_0517.JPG
    2.3 KB · Views: 0
Back
Top