Theme editor

Scale Model Shop

Ian M's Loyd carrier and 6 lb'er

Status
Not open for further replies.

Ian M

Administrator
Staff member
Joined
Dec 14, 2008
Messages
18,334
Reaction score
571
Points
113
Location
Falster, Denmark
1/3
Thread owner
Well the first part has arrived so I can start a thread! Yeah.

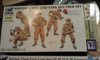
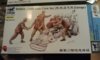
The Loyd Carrier coming fresh from the tools of Bronco and is one of there latest Über kits.

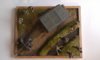
A quick look in the Box;View attachment 99845


View attachment 99846

View attachment 99847

View attachment 99848


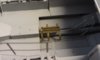
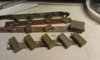
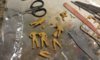
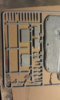
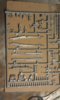
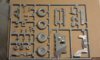
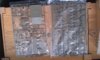
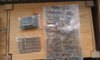
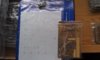
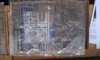
A whole mountain of sprues in olive green plastic. There are loads of very fine parts with superb detail. Some of the parts are going to be a challenge parting from the gate. 1mm dia rods! Some parts even finer!!! A nice decal sheet and a plate of PE with some silly small parts. (most buy a magnifier thing!).

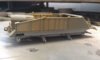
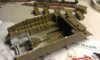
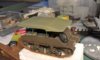
The whole hull is built up, pretty much like the real thing. The Tracks are one of my pet hates. 'link and length'. Which I consider a pain in the bum. Much rather have a 'rubber band or loose links, Having said that they are very small links! There is a full compliment of 6 lb'er ammo and boxes as well, a nice touch

View attachment 99849

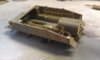
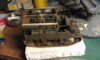
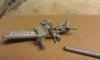
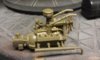
The engine, a Ford V8 side valve, if you are into that kind of thing, is very detailed and only took the best part of an hour to build! Might just open the engine compartment for this one. I s'pose that means I better do some ignition wires o.O
View attachment 99850

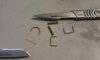
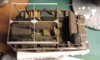
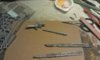
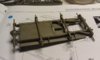
The building of the hull takes time. All the parts are very thin. The floor almost see through! Each main rail of the chassis is made up of about 10 parts....This is not a kit for the shaky handed type!
View attachment 99852

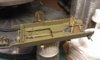
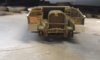
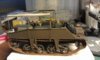
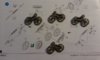
Running gear boggies are also well detailed and even have (supplied) springs, though only for the outer coils. Choice of two different wheel patterns as well, I went for the more common type...
The 6lb'er is still on the way, but plenty of time yet. If all else fails I have just found one in the stash which I could fall back on.

More later.

View attachment 99851

View attachment 212868

View attachment 212869

View attachment 212870

View attachment 212871

View attachment 212872

View attachment 212873

View attachment 212874

View attachment 212875
 

Attachments

  • IMAG1982.jpg
    IMAG1982.jpg
    2.5 KB · Views: 0
  • IMAG1984.jpg
    IMAG1984.jpg
    2.3 KB · Views: 0
  • IMAG1986.jpg
    IMAG1986.jpg
    2.2 KB · Views: 0
  • IMAG1987.jpg
    IMAG1987.jpg
    1.9 KB · Views: 0
  • IMAG1988.jpg
    IMAG1988.jpg
    2.3 KB · Views: 0
  • IMAG1989.jpg
    IMAG1989.jpg
    2.1 KB · Views: 0
  • IMAG1985.jpg
    IMAG1985.jpg
    2.3 KB · Views: 0
  • IMAG1990.jpg
    IMAG1990.jpg
    1.7 KB · Views: 0
Thread owner
It's a great build. Very far from a shake 'n' bake. You really have to build this little gem.

Ian M
 
do like the looks of this one Ian,will be interested to see how she turns out, ;)
 
Thread owner
Hmm having spent an hour the other day getting the sides of the hull on yesterday, I used just as long today removing them again as everything was leaning out wards!


Any one else tempted by this kit a LOT of care and attention is needed in getting parts lined up!!! Grrrrrrrrr!


Ian M
 
Thread owner
I'm a bit behind with the photos so here we go:


View attachment 100616

The hull is built up from separate parts, that is to say not a moulded top and bottom. Here is the bottom under the rebuild, I think.

View attachment 100617

A full comp of ammo boxes for the 6 pounder was a nice touch..

View attachment 100618

View attachment 100619

View attachment 100620

View attachment 100621

View attachment 100622

Lots of very fine (read paper thin) PE in the box. Also as can be seen by the light showing through the plastic sides, the plastic is nice and thin, almost scale thickness...?

View attachment 100623

View attachment 100624

An example of the fine moulded parts. Great fun to clean up!

I ended up putting the engine cover on. Two reasons, it was a pig to get to sit open. It wasn't much easier to got on closed.


I have mentioned it before, but this is not a kit for the feint hearted! there are so many very fine plastic parts and PE all over the place. One good thing about the PE Bronco alway put the PE on a low tac clear film so nothing ping's across the room when you part it from the fret. Nice touch.


So most is now primed and a few parts have started to get paint on as well.


Still dreading the tracks.


Ian M

View attachment 213639

View attachment 213640

View attachment 213641

View attachment 213642

View attachment 213643

View attachment 213644

View attachment 213645

View attachment 213646

View attachment 213647
 

Attachments

  • IMAG1999.jpg
    IMAG1999.jpg
    1.9 KB · Views: 0
  • IMAG1998.jpg
    IMAG1998.jpg
    1.5 KB · Views: 0
  • IMAG1997.jpg
    IMAG1997.jpg
    2 KB · Views: 0
  • IMAG1991.jpg
    IMAG1991.jpg
    2.3 KB · Views: 0
  • IMAG1992.jpg
    IMAG1992.jpg
    2.2 KB · Views: 0
  • IMAG1993.jpg
    IMAG1993.jpg
    2.4 KB · Views: 0
  • IMAG1994.jpg
    IMAG1994.jpg
    2.5 KB · Views: 0
  • IMAG1995.jpg
    IMAG1995.jpg
    2.1 KB · Views: 0
  • IMAG1996.jpg
    IMAG1996.jpg
    1.9 KB · Views: 0
Nice start, nice work on the pe, looks very delicate and fine, looking forward to seeing more.
 
Thread owner
Well have had another run at it yesterday and today. Its official I do not like link and length tracks!


OK I should have done the tracks at the stage they said in the instructions, but where is the fun in that!


So...


View attachment 101053

View attachment 101054

View attachment 101055

Got the stowage in and the frame for the tarp on. Needs a bit of touching up I see. I could swear I had painted those tyres again!

View attachment 101056

Need to paint the straps for the pioneering tools, then add and paint the straps that hold the front of the frame for the tarp down. The cover needs a bit of work yet, then its weathering time!! (and I can hide those 'orrible tracks).

Hope that the 6lb'er turns up soon!


I s'pose I can always start on the gun crew...... Yikes.


Ian M

View attachment 214076

View attachment 214077

View attachment 214078

View attachment 214079
 

Attachments

  • IMAG2000.jpg
    IMAG2000.jpg
    2.5 KB · Views: 0
  • IMAG2001.jpg
    IMAG2001.jpg
    2.6 KB · Views: 0
  • IMAG2002.jpg
    IMAG2002.jpg
    2.6 KB · Views: 0
  • IMAG2003.jpg
    IMAG2003.jpg
    2.5 KB · Views: 0
That looks very nice Ian! Bronco tracks aren't the easiest, but so much better than rubber bands!
 
Thread owner
Cheers chaps. I like Bronco's separate link tracks but the link and length type are a pain.


Better find a base board for it as well!!!


Ian M
 
Thread owner
Thanks Paul, I think it's taking forever but I have been coming and going at it a couple of hours a day. It really is a challenging build..
 
Thread owner
Weathered it yesterday and was looking at it this morning thinking "What is wrong with that?) then it hit me. I had forgotten to put the decals on!!!! Duh!


So a bit of scrubbing and rubbing down and I got back to a good base. Bit of clear and got the decals down. phew.


So weathering again tomorrow...


So in the mean while.


Stage II the figures


Have these in the stash View attachment 101317

View attachment 101318


So I will mix a few of them from each set, just for variety sake, View attachment 101309


I'm only aiming at four figures, as that is the complement for the 6 lb'er.


I need to try and make one of them look like he has or is falling over..... Hmm


Ian M

View attachment 214332

View attachment 214340

View attachment 214341
 

Attachments

  • IMAG2008.jpg
    IMAG2008.jpg
    2.6 KB · Views: 0
  • IMAG2011.jpg
    IMAG2011.jpg
    2.6 KB · Views: 0
  • IMAG2012.jpg
    IMAG2012.jpg
    2.4 KB · Views: 0
Thread owner
Figures are basicaly done, just need a few tweeks here and there


I have however one slight hitch! The 6lb'er I ordered in Denmark the day before I ordered the Loyd carrier, from England still has not arrived yet. So I cancelled the order.


I have now dug up the 6lb'er from the Bedford portee kit in the stash. It's not a bad kit, a bit dated, but pretty good.


Here are those sprue shots-


View attachment 102449

View attachment 102450

View attachment 102451

A bit of flash here and there but nothing to bad.

View attachment 102452

View attachment 102453

And after a cup of mocca we have gotten this far. It aint big.

Oh started a base as well. Not big either. I just hope its big enough... :)


Ian M

View attachment 215472

View attachment 215473

View attachment 215474

View attachment 215475

View attachment 215476
 

Attachments

  • IMAG2014.jpg
    IMAG2014.jpg
    2.4 KB · Views: 0
  • IMAG2015.jpg
    IMAG2015.jpg
    2.5 KB · Views: 0
  • IMAG2016.jpg
    IMAG2016.jpg
    2.5 KB · Views: 0
  • IMAG2017.jpg
    IMAG2017.jpg
    1.7 KB · Views: 0
  • IMAG2018.jpg
    IMAG2018.jpg
    2.2 KB · Views: 0
Status
Not open for further replies.
Back
Top