
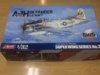
Here is the BIG box that landed today...
View attachment 39694
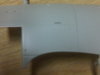
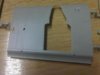
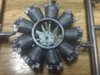
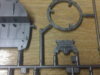
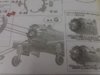
This box is simply packed with plastic. I will not put on here pictures of all the sprues, just a few examples of the moulding. Overall I find the kit offers excellent well rendered detail with the sprues mostly individually packed. They offer seats with or without moulded seat harnesses, two options for the instrument panel - you can have it molded for painting or in clear plastic with a decal. The wings are articulated and can be raised or lowered, however, there are some parts which if glued to the raised wings means they cannot be lowered.
One criticism some have made is that the kit offers a lot of detail that will never be seen once it is closed up. This is true, but I like that as it offers opportunities for advanced modellers (I am not one of those...) to really have fun with the kit not necessarily having to buy aftermarket parts. Its good to have the choice and I may choose to paint up and include all the unseen material, I may not...
Some detail shots:
View attachment 39695View attachment 39696View attachment 39697View attachment 39698View attachment 39699View attachment 39700View attachment 39701
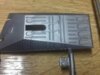
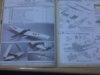
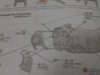
The instruction sheet, to me, is most impressive - it reads like an aircraft manual. It contains colour reference photos of the kit construction and some very clear warnings including such as ... 'be careful not to bend during assembly'. There are different views that explain exactly how/here parts should be placed - quite simply a lot of thought and planning went into these. It seems very clear to me and includes a sheet correcting a couple of errors. If only Dragon were half as considerate with their instructions!
View attachment 39702View attachment 39703View attachment 39704View attachment 39705View attachment 39706View attachment 39707View attachment 39708View attachment 39709
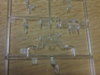
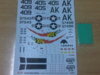
The decal sheet offers two aircraft options which are very similar from USS Intrepid and in this I would have thought they could have done better by offering two much more different schemes. On the positive side they seem good quality and are in register.
View attachment 39710
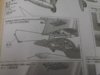
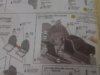
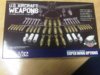
Whenever I picture a Spad it is weighted down with a massive load of weapons, absolutely dripping with bombs and rockets. The kits includes only drop tanks which is another criticism. They do, however offer a separate weapons set and there is no way I am going to build a Skyraider without that classic look.... So I invested in the set. It includes pretty much a full range of weapons and some clear guided as to what would go where. You will not end up using a fraction of what is included in the set unless you decide to pose the ordnance around the aircraft. The separate set makes equipping the Spad expensive, but how can you not? Maybe there is room here for some enterprising aftermarket intervention.
View attachment 39711View attachment 39712
One final criticism - the instructions carry Vallejo paint references and as I am a big fan of Vallejo paints I was pleased with that. But, the main camo colour is 'Gull Grey' and Vallejo were commissioned to produce this colour (Model Air 71130) by ZM for this kit. The colour is simply not available from Vallejo and when I enquired they referred me to ZM. I did ask John to see if he could source this colour for me but no luck. Therefore I assume that this paint is only available in Japan. Maybe that will change but not soon enough for me.... I intend to start this kit in a couple of weeks, as soon as I have finished my Mustang...
I will do this as my first photo build, stage by stage.... Watch this space!!!
Anyway..... to summarise - I am well pleased with what I see and I think that this will build into a large (19 inch wingspan) and very impressive model.
Is it worth the dosh?..... this is far from a cheap kit.
So far so good, yes, I recommend it. But, of course we will see how the build progresses but from some reviews I have read I suspect that my initial impression will hold.
If you like large scale aircraft then I do believe that ZM are the 'up and coming' stars to watch producing 'must builds'....
View attachment 43496
View attachment 43497
View attachment 43498
View attachment 43499
View attachment 43500
View attachment 43501
View attachment 43502
View attachment 43503
View attachment 43504
View attachment 43505
View attachment 43506
View attachment 43507
View attachment 43508
View attachment 43509
View attachment 43510
View attachment 43511
View attachment 43512
View attachment 43513
View attachment 43514
View attachment 156522
View attachment 156523
View attachment 156524
View attachment 156525
View attachment 156526
View attachment 156527
View attachment 156528
View attachment 156529
View attachment 156530
View attachment 156531
View attachment 156532
View attachment 156533
View attachment 156534
View attachment 156535
View attachment 156536
View attachment 156537
View attachment 156538
View attachment 156539
View attachment 156540
View attachment 39694
This box is simply packed with plastic. I will not put on here pictures of all the sprues, just a few examples of the moulding. Overall I find the kit offers excellent well rendered detail with the sprues mostly individually packed. They offer seats with or without moulded seat harnesses, two options for the instrument panel - you can have it molded for painting or in clear plastic with a decal. The wings are articulated and can be raised or lowered, however, there are some parts which if glued to the raised wings means they cannot be lowered.
One criticism some have made is that the kit offers a lot of detail that will never be seen once it is closed up. This is true, but I like that as it offers opportunities for advanced modellers (I am not one of those...) to really have fun with the kit not necessarily having to buy aftermarket parts. Its good to have the choice and I may choose to paint up and include all the unseen material, I may not...
Some detail shots:
View attachment 39695View attachment 39696View attachment 39697View attachment 39698View attachment 39699View attachment 39700View attachment 39701
The instruction sheet, to me, is most impressive - it reads like an aircraft manual. It contains colour reference photos of the kit construction and some very clear warnings including such as ... 'be careful not to bend during assembly'. There are different views that explain exactly how/here parts should be placed - quite simply a lot of thought and planning went into these. It seems very clear to me and includes a sheet correcting a couple of errors. If only Dragon were half as considerate with their instructions!
View attachment 39702View attachment 39703View attachment 39704View attachment 39705View attachment 39706View attachment 39707View attachment 39708View attachment 39709
The decal sheet offers two aircraft options which are very similar from USS Intrepid and in this I would have thought they could have done better by offering two much more different schemes. On the positive side they seem good quality and are in register.
View attachment 39710
Whenever I picture a Spad it is weighted down with a massive load of weapons, absolutely dripping with bombs and rockets. The kits includes only drop tanks which is another criticism. They do, however offer a separate weapons set and there is no way I am going to build a Skyraider without that classic look.... So I invested in the set. It includes pretty much a full range of weapons and some clear guided as to what would go where. You will not end up using a fraction of what is included in the set unless you decide to pose the ordnance around the aircraft. The separate set makes equipping the Spad expensive, but how can you not? Maybe there is room here for some enterprising aftermarket intervention.
View attachment 39711View attachment 39712
One final criticism - the instructions carry Vallejo paint references and as I am a big fan of Vallejo paints I was pleased with that. But, the main camo colour is 'Gull Grey' and Vallejo were commissioned to produce this colour (Model Air 71130) by ZM for this kit. The colour is simply not available from Vallejo and when I enquired they referred me to ZM. I did ask John to see if he could source this colour for me but no luck. Therefore I assume that this paint is only available in Japan. Maybe that will change but not soon enough for me.... I intend to start this kit in a couple of weeks, as soon as I have finished my Mustang...
I will do this as my first photo build, stage by stage.... Watch this space!!!
Anyway..... to summarise - I am well pleased with what I see and I think that this will build into a large (19 inch wingspan) and very impressive model.
Is it worth the dosh?..... this is far from a cheap kit.
So far so good, yes, I recommend it. But, of course we will see how the build progresses but from some reviews I have read I suspect that my initial impression will hold.
If you like large scale aircraft then I do believe that ZM are the 'up and coming' stars to watch producing 'must builds'....
View attachment 43496
View attachment 43497
View attachment 43498
View attachment 43499
View attachment 43500
View attachment 43501
View attachment 43502
View attachment 43503
View attachment 43504
View attachment 43505
View attachment 43506
View attachment 43507
View attachment 43508
View attachment 43509
View attachment 43510
View attachment 43511
View attachment 43512
View attachment 43513
View attachment 43514
View attachment 156522
View attachment 156523
View attachment 156524
View attachment 156525
View attachment 156526
View attachment 156527
View attachment 156528
View attachment 156529
View attachment 156530
View attachment 156531
View attachment 156532
View attachment 156533
View attachment 156534
View attachment 156535
View attachment 156536
View attachment 156537
View attachment 156538
View attachment 156539
View attachment 156540
Attachments
-
 IMG00520-20120202-1623.jpg2.5 KB · Views: 0
 -
 IMG00532-20120202-1629.jpg1.5 KB · Views: 0
 -
 IMG00533-20120202-1630.jpg1.8 KB · Views: 0
 -
 IMG00535-20120202-1633.jpg3.1 KB · Views: 0
 -
 IMG00536-20120202-1633.jpg2.5 KB · Views: 0
 -
 IMG00537-20120202-1634.jpg2.8 KB · Views: 0
 -
 IMG00538-20120202-1635.jpg3 KB · Views: 0
 -
 IMG00539-20120202-1636.jpg2.2 KB · Views: 0
 -
 IMG00522-20120202-1624.jpg1.7 KB · Views: 0
 -
 IMG00523-20120202-1624.jpg2.1 KB · Views: 0
 -
 IMG00526-20120202-1624.jpg1.9 KB · Views: 0
 -
 IMG00527-20120202-1625.jpg2.2 KB · Views: 0
 -
 IMG00540-20120202-1638.jpg1.9 KB · Views: 0
 -
 IMG00541-20120202-1638.jpg2 KB · Views: 0
 -
 IMG00542-20120202-1639.jpg1.7 KB · Views: 0
 -
 IMG00543-20120202-1639.jpg2.1 KB · Views: 0
 -
 IMG00529-20120202-1626.jpg2.7 KB · Views: 0
 -
 IMG00544-20120202-1640.jpg3 KB · Views: 0
 -
 IMG00546-20120202-1641.jpg2.9 KB · Views: 0
")