Theme editor

Scale Model Shop

Italari 1/48 v-22 Osprey

Thread owner
Good progress Barry. I have not used styrene cement for clear parts for fear of it fogging the transarencies. I imagine it gives a stronger join than the PVA type glues.

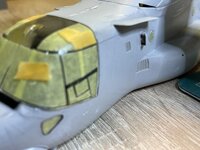
Indeed. The trick is to use capillary action and keeping it away from clear areas, make sure there is a frame that will be painted. Care is needed
 
Thread owner
IMG_7995.jpg
IMG_7986.jpg
IMG_7989.jpg

IMG_7990.jpg
IMG_7995.jpg

IMG_7987.jpg
A few more progress pictures.

internals fit OK except the rear ramp. It is OK for positioning down but to have it up I needed to sand a fair bit off the inner edge.

i also need to position a fair bit of ballast in the front and there is limited space. So I used plastic sheet to block a hole from the inside it won’t impede fitting the probe on the outside. I also positioned some masking tape to protect a window. This piece of tape can be remove easily form inside the cockpit. I then used plastic sheet to create a barrier between the ballast and the cockpit. I cut it roughly to size, trimmed a corner and cut it to size. It doesn’t matter if it isn’t tight into corners as I have a plan to seal these with pva glue. One side needed painted black where it faces into the cockpit.

Apologies for not putting the photos into a proper order with associated text. It has been driving me up the wall.
 

Attachments

  • IMG_7988.jpg
    IMG_7988.jpg
    255.1 KB · Views: 0
  • IMG_7995.jpg
    IMG_7995.jpg
    140.9 KB · Views: 0
  • IMG_7989.jpg
    IMG_7989.jpg
    342.2 KB · Views: 0
  • IMG_7989.jpg
    IMG_7989.jpg
    342.2 KB · Views: 0
  • IMG_7987.jpg
    IMG_7987.jpg
    262.5 KB · Views: 0
  • IMG_7993.jpg
    IMG_7993.jpg
    552 KB · Views: 0
Considering that the kit does not have the sharp detail of some other, more modern kits that cockpit looks very good indeed. Glad the nose weight is sorted. No fun having it sit on it's arse when the nose is no longer accessable. Strange about the ramp fit. You'd think it would be made to fit nicely in the 'up' position - down doesn't have to fit except at the top.
 
Thread owner
I have managed to get in some bench time over Christmas.

Fuselage halves joined and liquid gravity added. Just need to do some cleanup. The rotors are assembled, again some clean up needed.

Undercarriage painted and weathered as well.

I am expecting to get more bench time over the Christmas/New Year break
period.


IMG_7998.jpg


IMG_7997.jpg
 

Attachments

  • IMG_7998.jpg
    IMG_7998.jpg
    327.1 KB · Views: 0
Thread owner
I have been dealing with some very stubborn fuselage seams but all done now though they will need some revisiting after primer.

Consequently I have glued the tail and wings into place. These too will need some attention at the joins, then this the main airframe will be ready for primer.


I have primed the two rotor sections which went together well. These can attach as final fittings making the model easier to handle given how nicely they fit their location points.

Note, one seat has fallen out. I will reinsert it before attaching the canopy which fits well.


IMG_7999.jpg

IMG_8002.jpg

IMG_8001.jpg
 
Thread owner
I have been attaching some parts best attached before painting. That includes the canopy which I found to have gaps around it. I used Micro Kristal Klear to fill the gaps. That way no white filler will show when looking into the cockpit.

I did lose one part but was able to make another from plastic card.

tomorrow I will mask the wheel wells then spray the first primer.


IMG_8005.jpg
IMG_8004.jpg
IMG_8003.jpg
 

Attachments

  • IMG_8005.jpg
    IMG_8005.jpg
    234.6 KB · Views: 0
All looking very neat, especially the masking. Seeing that last photo reminds me how ungainly this aircraft looked.
 
LOOKIN good barry keep it comin an ive never built one of these weird aircraft either so im learning from watchin you sir
chrisb
 
Thread owner
The airframe is all dressed up in her sexy black undies. I have also sprayed the underside colour on the rotor assemblies, Light Ghost Grey. I will do this on the fuselage next and then some masking up to spray the Dark Ghost Grey topsides.

all proceeding nicely

IMG_8006.jpg

IMG_8007.jpg
 

Attachments

  • IMG_8007.jpg
    IMG_8007.jpg
    469.8 KB · Views: 0
Very nice Barry, that paintwork looks as smooth as glass..

how big is this kit ?, I'm guessing the rotors take up some serious space
 
Lovely paint job Barry. MRP is superb. Since you recommended it my painting has been trouble free.
 
Back
Top